Build Your Own Custom Imaging Computer
It Is Easier Than You Think

Build Your Own Color Imaging Computer

The motherboard is the heart of a computer, while the CPU is the brain.
© 2002, George Schaub, All Rights Reserved

Don't worry; you will not need a soldering iron to build your own computer. In fact all you need is a Phillips screwdriver and maybe a pair of needle nose pliers. But then, why would anyone build their own computer when you can buy one in a store for $500? Good question.

We're bombarded with ads every day in newspapers and magazines touting great bargains in new computers. Which one should you buy? The answer--get one that exceeds your current needs. This really means you need to decide on the specifications in order to get the ideal machine rather than rely on an dvertisement or a salesman. That's largely why many retailers advertise "Build your own computer."

Seriously though, you should consider building your own PC. It's not nearly as formidable a task as it sounds. Even if you do not pluck up the courage to build your own computer, knowing how to do it by reading this article or a book on the subject will help you make the best decisions when you buy a pre-built computer.

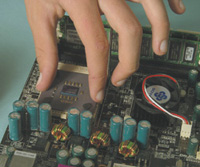
Thanks to the zero-force design installing the CPU is the easiest part of assembling a computer.

If you have any technical aptitude it's really quite rewarding to build your own computer. What's more you can build the exact computer for your needs. Okay, you might not save much money but you will end up with a better computer. How come? After all, if you tried to build your own car or refrigerator you'd end up with something not nearly as good as buying one off-the-shelf. The secret is that apart from laptops and Apple Macintosh computers, few of the other PCs on the market are built using exclusively proprietary parts. Instead, all the components of a modern computer can be purchased off-the-shelf and it takes nothing more than a screwdriver and some dexterity to assemble one's own computer. About the most difficult part of building your own computer is installing a hard drive. In fact, if you have already installed a hard drive in a PC you're ready for the next step--building a complete system from scratch.

A Dozen Components
The reason it's so easy is that a PC is made up of only a few sub-assemblies. In most cases all that's needed to assemble a functioning computer are the following dozen or so components:

Case
Motherboard
CPU
CPU Fan
RAM Memory
Hard Drive
CD-ROM Drive
Floppy Disk Drive
Keyboard
Mouse
Operating System
Monitor


Retail components come in boxes with installation instructions, whereas OEM parts, such as the two hard drives and the CPU are usually sold without any manuals or assembly instructions.

A key component is the motherboard. This is the soul of the computer. But without a doubt the heart of a computer is the CPU (Central Processing Unit). It's a good place to start. Basically there are two choices of manufacturer for a CPU in a PC--Intel or AMD. (Apple uses an entirely different CPU). Intel and AMD CPUs are all but identical from the end-user's point of view. On the whole you're more likely to find AMD CPUs sold through the Internet and in retail stores and they are generally less costly than Intel CPUs.

CPU Speed
The rated speed of a CPU has become a contentious issue, as the actual speed of operation of many programs is not dependent purely on the speed of the CPU. For example, Apple will say that its PowerPC chips are as fast as Intel CPUs with a higher megahertz or gigahertz (MHz or GHz) rating. Likewise AMD claims that its Athlon CPUs are faster than the equivalent Intel Pentium CPUs. Because of this, AMD does not publish the actual GHz speed of its Athlon CPUs. Instead it uses a nomenclature that infers the chip's equivalent speed to a comparable Intel CPU. It's become somewhat confusing but should not really concern you as any CPU over 1GHz (1000MHz) is pretty much fast enough for everyday business computing. Gamers and those involved in really high-end 3D graphics and/or video editing are the ones who gain the most from higher speeds.


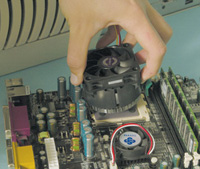
The essential cooling fan has to firmly attach to the top of the CPU for maximum effectiveness.

The Motherboard
More important is choosing the ideal motherboard as they are tailor-made for specific types of CPUs and are even matched to their speed. For this reason it usually makes sense to look at the motherboard and CPU as a unit. Many electronics stores, where you'll find the components for building your own computer, are more likely to sell the motherboard and CPU at a combination price, usually for less money than buying the two items individually. That's why many people recommend researching the motherboard first by deciding on what features one wants in a motherboard. This will invariably determine what CPU is required.

Many of the functions that used to be on separate cards are now integrated onto a motherboard. On the whole this is a good idea unless one needs a specific card that offers better performance than the built-in system. Functions integrated on the motherboard can include USB ports, Ethernet (network) port, FireWire (IEEE1394) port, modem, sound, and graphics. Except for graphics and sound these functions tend to be better when integrated on the motherboard. Unless you need high-end graphics and sound it's not a bad idea to have them integrated on the board as well. However digital editing and games are two areas where a separate AGP graphics card is better than having one built into the motherboard.


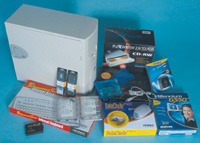
Installing the PlexWriter CD-RW drive in the Antec case is easy as it slides in on rails.

Motherboards are made by a wide variety of manufacturers including Intel, which is the only household name recognized outside of the computer world. There are numerous web sites that carry reviews on motherboards from all companies. In the ever-changing computer world new ones are coming to market literally every week, so it is hard to keep up, just as it is for the average consumer in the world of cars!

Gamers are the most serious group of DIY computer users. The AMD Athlon CPU is a favorite with teen-agers who build their own high-powered game machines. It's also truism that today's game machines are tomorrow's business machines, and it's also true that teen-agers become tomorrow's buyers. All of which means the AMD chips have a future despite Intel's overwhelming dominance in marketing.

It shouldn't be hard to find a co-worker, the son of a friend, or your own child who could give advice on the best components to purchase. Other sources are web sites, college courses, and computer stores such as CompUSA and Fry's. There are several books that describe how to upgrade and build a PC and for a real hands-on approach there is at least one videotape on the market.


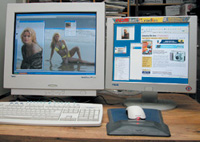
Dual monitors give you much more space for editing images. The 17" KDS RAD-7 LCD monitor on the right supplements the NEC FP1375X 22" CRT monitor quite nicely.

Assembly
Once you've got the components together it's fairly straightforward to assemble a computer. If you live in an area where there is any chance of static electricity make sure you are grounded with a wrist strap. Otherwise, nothing more than a Phillips screwdriver will be required.

If you buy a high-end motherboard in a retail box it should come with a good assembly manual. The Soyo Dragon motherboard I use for my current computer has a well-written 200-page manual that describes what part goes into every plug or socket on the motherboard. It also tells how to set up parameters in the BIOS to tweak the computer for optimum performance. This motherboard, which has since been replaced by the upgraded Dragon Plus, needs an AMD Athlon CPU. When I assembled this computer the 1.2GHz Athlon was the most cost effective. By the time you read this article you'll probably be able to get the Athlon XP 2200, which is about 50 percent faster, for about the same price as the 1.2GHz cost last year ($120). Such is the pace of progress in the computer world.

A good computer case, such as those from Antec, will have nice smooth internal edges and have plenty of room to accommodate several drives. It is wise to get a case with at least a 300w power supply as additional hard drives and CD-ROM drives will add to the power requirements in a hurry. Nowadays the majority of cases come with a power supply already installed and are ready to accept a motherboard built to the ATX standard. In most cases they will also include a kit of screws and brackets so that drives can be mounted on sliders for easy assembly. All the wiring should be clearly marked so that they can be plugged into the correct sockets on the motherboard.


Once all the drives and cables are installed there is not a lot of room in the computer, which is why a bigger tower case makes sense.

Step By Step
The first thing to do is insert the CPU into the large CPU socket on the motherboard before putting it in the case. As long as all the pins are straight that should be easy as a zero-force mechanism is utilized with a lever to lock down the CPU, firmly imbedding it in the socket. Modern CPUs run very hot so it is necessary to attach a fan which is clipped onto the top of the CPU. Most good fans, such as the Antec Jet Cool, come complete with a heat sink and special thermal compound for good conductivity.

Next the memory modules need to be inserted in their slots. In my case I elected to use a couple of 256MB PC 2100 DDR RAM memory modules made by Value RAM, a division of Kingston. Memory has become so inexpensive nowadays that it's wise to use as much as possible, although most digital camera users will not find great benefit of going beyond 512MB. Those doing heavy graphics or video editing will benefit enormously from added memory. Memory is another area where a name brand pays dividends. I chose Kingston, but Crucial, Micron, and Viking are all brands with a good reputation.

Next it's a good idea to mount the floppy disk, hard disk, and CD-ROM drives in the case, as there will be more room without the motherboard getting in the way. I opted for a 80GB 7200rpm Seagate hard drive as my main drive to give me plenty of storage room and a good access speed for digital image files. I also installed an old 5GB drive I had from an older computer as a second drive for making quick back-ups. Once the drives are installed, the motherboard can be mounted in the case with the standoff spacers and screws supplied.
If the motherboard does not have integrated graphics capability it's also necessary to install a graphics card in the AGP slot, as was the situation with the Soyo Dragon motherboard. As digital editing is the primary use, I chose to install a Matrox G550 graphics card, which is aimed at business and graphic users rather than gamers. It provides excellent 2D graphics and has the added benefit of being able to drive two monitors, which can prove really useful if you need lots of screen real estate.

Once everything is in place, plug in the power supply, the cables to the drives (supplied with the case and most drives in retail boxes) as well as the leads to the on/off button and any warning lights mounted on the front of the computer.

Of course you'll also need a monitor to be able to use the PC, as well as a mouse and a keyboard. Because of the importance of having good quality color on the screen for digital image editing I opted to try the top of the line NEC FP1375X 22" CRT monitor for my main screen. While I was at it I also hooked up a space saving 17" KDS RAD-7 LCD monitor as the secondary one. It's a great combination for working on several projects at the same time and is really useful when editing images, as you can have all the menus on one screen leaving an uncluttered space on the main screen for the images you're working on.

Switch It On
Once everything is plugged in all that's left is to connect the keyboard, mouse, and monitor and your computer is ready to be turned on. The moment of truth is at hand... If you carefully followed instructions in the manual and did not plug anything in the wrong socket you should be rewarded with information scrolling down the screen indicating the computer is booting up. In some cases you'll see a complicated looking menu with a whole bunch of parameters. This is the BIOS setup menu for changing information that is permanently stored on the motherboard. Usually the factory default settings will be sufficient for the machine to boot up, ready for installation of the operating system.

XP Facility
Until recently the most complicated thing that had to be performed before loading an operating system was formatting the hard drive. It required the insertion of a DOS-formatted floppy disk and entering some parameters at the C prompt. Fortunately, Microsoft's newest Windows XP operating system has finally
gotten away from that archaic requirement in most situations.

This was certainly true on the system I built. Once the Windows CD-ROM was inserted in the PlexWriter 24/10/40A CD-RW drive (a recordable CD-ROM drive) a menu appeared allowing the hard drive to be formatted. Once that was done the operating system was automatically loaded and the computer worked just fine. Amazingly, no drivers had to be loaded for any of the drives, the built-in Ethernet network, or the Matrox graphics card. From this point of view, Windows XP is light years ahead of the older Windows operating system that was so often fraught with problems in getting drivers or Internet connections to function properly.
Did I encounter any problems? Yes--when I first switched the computer on it shut down within 3 seconds without even displaying anything on the monitor. At first I thought I had really messed something up. I checked all the wiring and found I had plugged the power cable to the CPU fan into the wrong socket. If the CPU fan is not working the computer shuts down automatically to avoid overheating. It needs to be plugged into the correct socket for this function to work correctly. I just wasn't watching what I was doing.

All in all it was a painless experience. It was the first time I had built a PC from scratch. Previously I had only replaced one item at a time, such as a CPU, a motherboard, a hard drive, a CD-ROM drive, etc. in a functioning computer. In each of those situations I knew what was causing problems if something didn't work. As if to prove how easy it is, my 15-year-old son has now assembled his own computer and has re-formatted hard drives and loaded new operating systems several times, much to the chagrin of his mother who has to share the same computer!

The reality is that if you can work on a car or do household DIY chores you can build your own computer. If you've ever been to a computer show or a local computer store you'll find technicians in these places can assemble a computer in less than half an hour. It really is quite straightforward. If you do it yourself you can end up with a good powerful computer with better components for less money than buying one off-the-shelf. Ironically, the most expensive part of building your own computer is not any single piece of hardware but the Windows XP operating system. Because of Microsoft's licensing agreement with big manufacturers it is about the least costly part of a brand-name computer, giving them an unfair advantage over DIYers.

Adding Extra Cards
Once you've got the basic computer running now's the time to add extras. It's a wise move to add extra cards and peripherals one at a time. If there are any problems it is then easier to deduce which product is causing the problem. If you add more than one at a time you'll not really know which one is causing a conflict.
During my initial assembly of this particular PC I only had to install the Matrox G550 graphics card to get the computer up and running. That's because the motherboard had built-in Ethernet capabilities and I use a cable modem with a router to access the Internet. As soon as I plugged the PC into my network it was immediately live on the Internet without having to change any settings. Those of you without a network will have to install a modem for online access.

As this computer is being used for digital imaging I was keen to immediately add two extras--a built-in card reader and some FireWire ports. The Antec DataChute is a PC card reader just as found on a laptop computer. It offers tremendous flexibility as it can accept CompactFlash, SmartMedia, and other storage cards with the use of adapters. It will also take modem cards and other PC cards that are used in laptops. Because it is powered by an internal PCI controller card the reader transfers files at speeds considerably faster than an external USB card reader, which is what most of us use. It is only about 1/3 as fast as FireWire, which means that if you don't need the flexibility of reading several different types of storage cards an external FireWire card reader would be a better bet.

FireWire ports are a standard part of a Mac computer but many PC users add them to their computers so they can transfer Digital Video directly from a DV camcorder. FireWire is also far preferable to USB 1.1 for attaching external hard drives, CD-writers, or DVD-writers as data is transferred much faster. I elected to try the Pinnacle Studio Deluxe package that includes a FireWire card with two FireWire ports and a breakout box that can take video and audio signals to or from a VHS or S-VHS camcorder or VCR. Along with the DV editing software included, I will be able to do simple editing of old VHS tapes as well as those I capture nowadays on my Canon Optura DV camcorder.

Although around $1500 in hardware has been invested in this particular PC it is still only a mid-range computer. It's possible to build a computer for under $500 and it is also quite easy to build one that would cost $5000 such is the variety of components that can be purchased.

Nowadays, though, the actual computer is the least costly part of a complete system. As you'll note the two high-end monitors I tried with this digital imaging system cost more than the computer. In reality it's worth spending money on a good large monitor as it is what you'll be staring at for hours on end. More expensive monitors deliver better images and the bigger a monitor the more space you'll have to work on all those images that need editing.

Sadly, the most expensive part of a good computer system will probably end up being the software. As already noted the operating system is the most expensive part of the basic computer. Then you'll need a digital imaging program such as Adobe Photoshop, although Photoshop Elements will work just as well for 90 percent of image-editing requirements by non-professionals. Paint Shop Pro, published by Jasc, is also another program worth considering as a lower cost alternative. Inevitably you'll need a word processor and maybe even a spreadsheet to calculate all those costs. This means you'll likely end up with Microsoft Office, which is a really good if costly package, as it is the standard used by almost everyone, including Mac users.

Complete Components
These are the components I used to build my mid- to high-range PC (approx. prices, January 2003):

Basic Computer
Case: Antec SX635 with 350w power supply (www.antec-inc.com) $80
Motherboard: Soyo K7V Dragon (www.soyousa.com) $100
CPU: AMD Athlon 1.2GHz (www.amd.com) $60
CPU Fan: Antec Jet Cool (www.antec-inc.com) $30
Graphics Card: Matrox G550 (www.matrox.com) $130
Memory: Kingston Value RAM 2 x 256MB DDR modules (www.kingston.com) $80
Hard Drive: 80GB Seagate 7200rpm Barracuda (www.seagate.com) $100
CD-RW: Plextor PlexWriter 24/10/40A (www.plextor.com) $80
Floppy Disk Drive: Sony (www.sony.com) $20
Keyboard: Antec Internet-Ready (www.antec-inc.com) $20
Mouse: Microsoft Optical Intellimouse (www.microsoft.com) $40
Operating System: Windows XP Home Edition (www.microsoft.com) $199

Extras
Monitor 1: NEC FP1375X 22" CRT monitor (www.necmitsubishi.com) $900
Monitor 2: KDS RAD-7 LCD 17" monitor (www.kdsusa.com) $700
PC Card Reader: Antec DataChute PCI (www.antec-inc.com) $99
FireWire Adapter: Pinnacle Studio Deluxe (www.pinnaclesys.com) $299

Cost of this DIY computer without a monitor or the extra cards is approximately $1000, while a similarly equipped computer would cost between $900 and $1400 from a mail-order company such as Dell or Gateway. The nearest equivalent Apple Macintosh would cost about $1500.

Resources

Web Sites
If you type in "Build your own PC" on www.google.com you will find lots of useful web sites to help you. They also tend to be more current than books. Check out these sites:
www.Techtv.com/buildapc
www.pcmech.com/byopc
www.hardwarecentral.com
www.motherboards.org
www.mysuperpc.com
www.tomshardware.com
www.buildyourowncomputer.net/learntobuild.html

Books
It's very easy for books on the subject to become outdated as technology changes so rapidly. However there are several books on upgrading and repairing computers that provide a ton of information for those who like to work on computers themselves. The following two books are updated annually and are a mine of information for those building their own computers as well.

Upgrading and Repairing PCs, 13th edition by Scott Mueller; published by Que; $59.99.
The Complete PC Upgrade & Maintenance Guide, 12th edition by Mark Minasi, published by Sybex; $59.99.
Upgrading Your Home PC, by Glenn Weadock, published by Sybex; $29.99.

Video
This VHS tape covers the advantages and disadvantages of building your own PC and then takes the better part of an hour to show you how to build your own computer. If you're interested in building your own computer and have never done any work on one before this tape makes an ideal starting point.
How to Build Your Own PC, by TechTV, published by Que; $24.99.

X