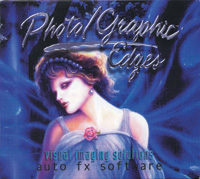
Auto FX Photo/Graphic Edges 6; Give Your Images A Custom Frame

Are you ready to go beyond traditional borders? Whether you want to enhance your photos with photographic edges like film sprockets or a Polaroid transfer look, or you prefer to emulate traditional art media such as watercolor or charcoal, or your goal is to create out of this world digital effects, check out the latest version of Auto FX Photo/Graphic Edges 6. A suite of dramatic graphic effects, Version 6 enables you to digitally add unique artistic enhancements to give your photos distinctive shape, dimension, and impact. There's an incredible array of choices--the program's three CDs are loaded with 10,000 edge effects, 1,000 textures to use as backgrounds, 175 frames, vignettes, 230 effect brush shapes, and 210 lighting effect tiles.

Whether you're starting with a portrait, an action shot, a landscape, or a still life, it's easy to use these effects to enliven your images. Whether you're a novice or an old hand at digital manipulation, Photo/Graphic Edges 6 has a lot to offer. While there are more than 300 preset effects--with large thumbnail previews to select from--for instant visual enhancements, you also have multiple choices and advanced adjustment and layer options, including a large preview window to show how each effect will apply to your image. In the preview, you can zoom to 1600 percent and pan as well.

1. Starting with a gray scale duplicate of the original portrait used in image 2, I created a cutting edge look by applying an Acid Edge Layer Preset in Photo/Graphic Edges 6.
Photos © 2003 Howard Millard, All Rights Reserved

New Tools
New tools allow you to brush on (and brush off if you change your mind) different looks like watercolor, charcoal, oil paint, splattered airbrush and impressionistic effects. For contemporary looks, try acid edges, montages, burned or ripped edges, metallic 3D frames, even scratches and smudges. For the effects that you brush on, each edge you create is unique. Additional features include effect layers, offering you more control to combine multiple effects. Thanks to new unlimited Undo/Redo, you can experiment and explore without fear of losing your idea or train of thought. There are even Memory Dots--buttons that allow you to save your image at different stages or with different combinations of effects.

Plug-In Or "Stand-Alone"
Out of the case, you can use Photo/ Graphic Edges 6 as either a stand-alone application or as a Photoshop compatible plug-in. As a plug-in, Auto FX states that Photo/Graphic Edges 6 works with Adobe Photoshop 4.0, 5.0, 5.5, 6.0, 7.0, and CS, Adobe Photoshop Elements 1.0 and higher, Adobe PhotoDeluxe 2.0-3.0, Corel PhotoPaint, and Jasc Paint Shop Pro. However, because of its ravenous memory demands, I suggest you use Edges 6 as a stand-alone application, with all other programs turned off.

2. To enhance this contemporary portrait with a dynamic graphic effect, I added a Layer Preset of film with sprocket holes. Transform tools enabled me to perfectly fit the edge effect around the model.

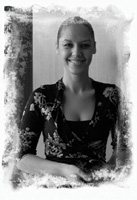
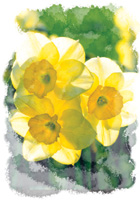
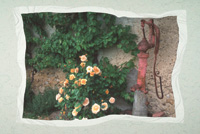
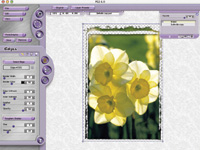
Getting down to business with Photo/Graphic Edges 6, you might add drama to a contemporary portrait by adding acid edges (#1), film sprocket borders (#2), or painting burned edge shapes on a layer behind the subject. For an evocative floral image, try a watercolor loaded brush to paint several layers of interest, (#3). When printing a still life, brush stroke edges or torn paper edges can complement the image. To enliven a landscape, go for the transfer effect, (#4). Emulating a Polaroid transfer, the borders are white with low opacity, allowing you to add one of the matte texture surfaces (paper, stone, etc.) to show through below. Further, you can brush on the wrinkles characteristic of this process wherever you want them. How's that for control? If you've ever tried the original wet transfer process, you know how fussy and unpredictable it can be. With digital control, it's a delight.

Dynamic Work
Everything is dynamic so that when you click on a layer all of the controls for that layer and effect are automatically loaded for you to adjust. The layers palette lets you turn on, off, clone, move, and add new layers. Photo/Graphic Edges 6 uses a non-destructive dynamic imaging architecture which means that you can undo, redo and adjust as much as you like, but your original image is never changed until you save the file. You can combine effects, transform and re-size images multiple times with no degradation to the quality of your original.

One drawback is that for larger images (10MB or more), Photo/Graphic Edges 6 takes its time to render many of the effects--one, two or even three minutes on a medium speed computer with lots of RAM. Furthermore, it can take quite a while to save an image, again, minutes rather than seconds with large files. So why put up with it? Because the edges and frames are so dramatic, beautiful, unique, and distinctive, and it would take me much longer to create them myself.

Another consideration is that with Version 6, the program and the data files containing the thousands of edge effects must be loaded on your hard drive, taking up 1.4GB of space. Now in this age of supersized hard drives, that may not be much for some of you. But if you have an older computer or just a small hard drive, or a drive that is already pretty full of stuff, check to see how much space you have available before installing Photo/Graphic Edges 6. To make more room, copy some of your older pictures to CD or DVD.

3. From the Layer Presets in Photo/Graphic Edges 6, I chose an edge brush with watercolor to add this multiple brush stroke effect to my daffodil image. Next, I saved it in .psd format, then increased the saturation in Photoshop CS with a Hue/Saturation adjustment layer.

New Effects
Some of the effects added in Version 6 include acid brush, ambient brush, burned edges, putty brush, smudged edges, new photo borders, photo tabs (like photo corners used to hold prints in a scrapbook), new frames, new vignettes, and montage. Further features include blending and opacity controls, edge coloring, shadow generation, and advanced lighting and shading options. For excellent examples of these effects, go to the Auto FX website listed at the end of this article.

Style Choices
Among the styles you'll find under Edges are: traditional, darkroom, geometric, artistic, digital, painted, deckled, feathered, semi-transparent, torn and ripped, film frames, impressionistic, watercolor, fadeouts, rubbed charcoal, splattered, airbrush, etched scratchboard, darkroom transfers, brushed acrylics, rough and gritty, and abstract shapes. All effects can be applied to either color or gray scale black and white photographs, and all will work with any image regardless of resolution, size, or proportion.

Additional features of Photo/Graphic Edges 6 include visual presets (called Layer Presets) and integrated support for image-editing program capabilities such as Adobe Photoshop Actions, Layers and Last Filter, and Filter Fade commands. A large on-screen catalog and edge history window facilitate selecting new and previously used edges, while a surface control button adds background color or surface grain and texture to photos. Further, you can take advantage of advanced Lighting, Shading, Shadow Generation, Blending Modes, Opacity Rendering, and Edge Coloring. Users can create an unlimited number of multiple light sources and shadows, each with independent controls. Photo/Graphic Edges 6 allows you to create, save and load your own customized edges and settings.

4. The Transfer effect digitally emulates the wet and unpredictable Polaroid transfer process, but with total digital control. You can even brush on wrinkles or remove them, as you like. I chose a background paper from Photo/Graphic Edges 6's 1000 surface textures.

These presets can be saved for capturing the exact look of an effect for later use and are linked to a small thumbnail for visual reference. File types supported for both importing and saving are: .psd, .tif, .bmp, .jpg, .gif, and .png formats. Saving in Photoshop .psd format exports the effect onto a layered document with full transparency. Customizable interface colors and desktop textures allow you to personalize how Photo/Graphic Edges 6.0 looks on-screen. Effects are resolution independent, so you can apply an effect to a small image and get the same result later on a much larger image. This is useful when you're preparing pictures for both print and the web.

Easy To Use
Follow these steps to digitally add an edge or frame to your image:
1.) If you're using Photo/Graphic Edges 6 as a stand-alone program (highly recommended), open it, choose File>Open to open one of your photos (#5), and proceed to step 3. If you installed Photo/Graphic Edges 6 as a plug-in, select one of your photographs and open it in your image-editing program, such as Photoshop or Elements.

2.) Choose Filter> AutoFX> Photo/Graphic Edges

3.) The easiest way to sample all that the program can do is to click the Layer Presets button at the top center of the screen. This opens a window with 14 categories such as Edges, Frames, Acid Edge, Burned Edge, and Edge Brush.

4.) Click on any of these to see the choices of presets in the category you selected. You choose from large color and black and white thumbnails of sample images. When you see one you like, click on the thumbnail to highlight it, then click the OK button at the bottom of this window and the effect will be applied to your photo.

5.) Use the edge treatment as is, or add additional effects to it. To apply the edge to fit just the way you want it, there are transform tools for both the edge and the photo, allowing you to re-size, move, distort, or rotate them independently.

6.) When you're more familiar with the program, you may want to go to the Photographic button (4th down on the far left) and choose from the thousands of options of effects loaded on your hard drive during the install process. Unlike previous versions, all the frames, edges and effects must now be loaded on your hard drive. This makes access to them much quicker, but takes up hard drive space.

7.) Once you've tweaked the effects the way you want them in the preview window, apply them with a click. Then save them in one of six formats--I use the Adobe Photoshop and Elements .psd format. Other than waiting for the rendering and the File>Save time, that's all there is to it.

5. Auto FX Photo/Graphic Edges 6 screen showing control tabs and an edge effect applied to a flower still life.

Once you've chosen an effect and applied it, you can further modify the edge by adjusting the softness, feather, opacity, apply colored borders, add shading for depth, surface textures, matte textures and colors, fill the edge with color or textures, and apply customized tonal lighting and shading. To fine-tune each image, you can precisely draw with brushes and interact with the effect on-screen for an infinite variety of looks that render to the preview as you adjust them.

Control Buttons
There are four sets of control buttons or tabs used in Photo/Graphic Edges effects: Effect, Surface, Light Tile and Lighting. From the effect tab, you choose the edge style you want. The surface control tab allows you to fill the edge or background with textures or colors. Photo/Graphic Edge 6's 1000 textures include paper, stone, marbles, hand painted, brushed metals, and seamless patterns. You can adjust the hue, saturation, and luminance, and soften and change the orientation of the textures. Next, choose from over 200 customized light tiles to blend lighting effects into your image. Lighting and shading controls allow you to create multiple light sources and related shading that are then rendered onto the effect. Shadows are cast and blend together based on the lighting angles and intensity. These shadows are automatically generated by the lights but can also be independently controlled by the user--shadow color, height, softness, angle, and offset values are all adjustable.

You can now merge multiple edged photos into artistic Montage compositions, create soft fade-out edges in Vignette, and apply colored and metallic frames around your images with Frames. In addition to the new features, Photo/Graphic Edges 6 includes all the effects from the previous releases.

The comprehensive manual, furnished on CD in .pdf format, is loaded with full color illustrations, screen shots and examples. At press time, Photo/Graphic Edges 6 was $179 from the Auto FX website. To upgrade from a previous version costs $79, and a free demo version can be downloaded, as can the complete manual.

Once you've created your dramatic edge effects, try printing them on different surfaces. While a high-tech image might look good on a glossy paper or film, a watercolor edge will look best on a heavy matte surface or textured paper. Hahnemuhle and Luminos offer a variety of papers and inks for Epson and other ink jet printers. The Luminos Preservation Series includes heavyweight archival papers in a variety of surfaces including matte, suede, flax, and parchment textures.

If you can be patient while Photo/Graphic Edges 6 renders its effects and performs saves, these unique edge treatments and distinctive frames will creatively enhance the tone and mood of your pictures, adding dramatic new looks enhanced by shape and depth.

FACTS
· Windows: Windows 98, NT, 2000, 2000 Me/XP; 128MB RAM.
· Mac: OS 9--OS X: G4 or higher processor, 256MB RAM or higher recommended.

Contacts
Auto FX
(205) 980-0056
www.autofx.com

Hahnemuhle
(856) 642-1410
www.hahnemuhle.com

X