- REVIEWS
Camera Reviews 
More Reviews Mobile Reviews Photography Reviews - GALLERIES
- VIDEOS
- BUYER'S GUIDES
Add Gorgeous Orange Sunset Glow to a Blue Sky in Photoshop (VIDEO)
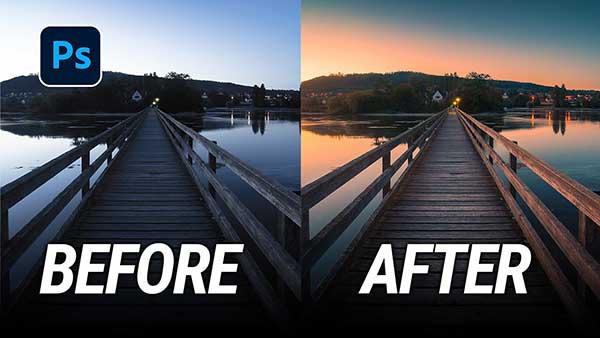
Shooting photos at sundown doesn’t always go as planned. Sometimes you get the timing wrong and sometimes the sky and, more critically, the light doesn’t cooperate.
There are ways though to tweak your sunset photos to add more color to the shot if, for instance, you got too much blue in your sky and not enough orange glow. In the below video tutorial, Christian Möhrle of The Phlog Photography shows you how.
“Since the original Raw file was missing a lot of warmer colors for my taste, I decided to add heavy orange tones for the highlights, while having a reduced blue tint on the shadows,” Möhrle says. “A lot of the editing was done inside the Camera Raw editor, while I used Photoshop to do some final adjustments.”
#1 Basic Adjustments
“I changed the profile to Adobe Landscape and increased the white balance temperature for warmer, more intense colors,” he explains. “Then, the exposure was raised to get back details from the shadows. At the same time, I brought down the highlights and the whites to prevent overexposure. For a clear image, I added texture and clarity. Finally, I increased the vibrance and saturation slightly.”
#2 Masking
“I covered the sky with a linear gradient and brought down the exposure to make the top part of the sky darker. To add some glow on the left, I used a radial gradient and increased blacks while dropping dehaze. For some color in that area, I also raised the temperature. To darken the foreground, I used another linear gradient and brought down the exposure.”
#3 Color Grading
“In the HSL tab, I brought down the yellow and green saturation. For the split toning I used a warm, very saturated color on the highlights and a cold color on the global settings.”
#4 Photoshop
“I enhanced the glow on the left some more using the brush with a warm color on a soft light layer. Then, I dodged the midtones on the boardwalk and burned the midtones in the woods in the distance just to add some contrast. For warmer colors, I used the photo filter adjustments layer and the brilliance warmth effect of the Nik Collection plug-in.”


![]()
Get the Latest Photo Tips, News & Reviews from Shutterbug!
| Camera Reviews Other Reviews | Mobile Reviews Photography Reviews Columns | News | Features | How-To | Resources |
 © 2026 Shutterbug
AVTech Media Americas Inc., USA
All rights reserved