- REVIEWS
Camera Reviews 
More Reviews Mobile Reviews Photography Reviews - GALLERIES
- VIDEOS
- BUYER'S GUIDES
8 Very Useful Filters
Adding a filter or two to your camera bag is a quick and relatively inexpensive way to improve your photos
How can you tell if you need filters? Take this quick test: Do you take photographs? If the answer is yes, you very likely need some filters to get the best possible images. Here are some that can really improve many of your future photos.
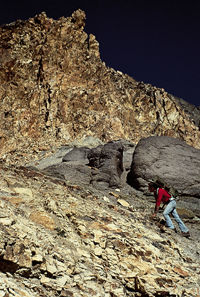 1. Polarizer
The polarizer is probably the single most useful filter for photographers. This remarkable device can reduce or eliminate reflections from objects that don't conduct electricity (i.e., nonmetallic ones), darken a blue sky in black-and-white and color photos without adversely affecting color in the latter as a red filter would, increase contrast by reducing reflections and haze, bring out stress colors in plastic items and intensify colors by eliminating the polarized reflections that tend to de-saturate them.
While you can get into complex calculations of camera angles vs. light angles vs. subject-plane angles, it's really very easy to use a polarizer. Just mount it on your SLR's lens and rotate the filter until you see the effect you want. (If you don't have a camera with through-the-lens viewing, just hold the polarizer up to your eye, rotate it until you see the effect you want, then place the filter over the camera lens in the same orientation.) Hint: You'll get maximum sky-darkening when the sun is off to one side&—a polarizer won't have much effect when shooting directly toward or away from the sun. Most polarizers have a filter factor of 2.5 (increase exposure 2.5X, or 11/3 stops, when using the filter), and this applies no matter how the polarizer is oriented&—whether or not it is cutting off polarized light (but it's always a good idea to bracket exposures the first time you use any new filter or technique, to see just what compensation produces the effect you like best).
Most current 35mm SLRs utilize beam splitters in their metering and autofocus systems and thus will not operate properly when a standard linear polarizer is used over the lens. With these cameras, use a circular polarizer, and you can let the camera's automation handle exposure and focusing duties accurately.
Photo by Ron Leach
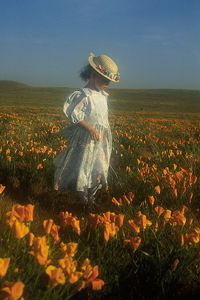 2. Diffusion
There are many types of diffusion filters&—Tiffen offers five types in their Hollywood/FX line alone, plus a variety of net-mesh diffusers. The Zeiss Softars are also excellent. Diffusion filters soften the image, the better ones providing a dreamlike glowing effect that's great for glamour and portrait work as well as ethereal scenics (some cheap diffusers just make the image look fuzzy). Every people photographer should have at least one good diffuser, but diffusion can be effective with nature subjects, too. These filters generally are offered in a range of strengths; if your budget allows for only one diffuser, get a medium-strength one. No exposure compensation is required with diffusers, but with some, the lens aperture will have an effect (wider apertures producing greater diffusion).
Photo by Lynne Eodice
 3. Enhancing
Enhancing filters (available from Tiffen, Singh-Ray and B+W, among others) are made of special didymium glass which eliminates a specific range of orange wavelengths, thus brightening reds and oranges without affecting other colors&—great for fall-color shots. Filter factors for enhancing filters range from one to two stops, depending on the manufacturer&—check the instructions that come with your filter, and bracket exposures the first time you use it.
Photo by Lynne Eodice
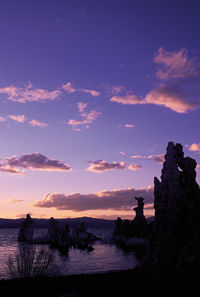
 4. Graduated ND
Graduated neutral-density filters are the mainstay of landscape photographers, for whom bright skies present a big problem: If you expose for the bright sky, the dark foreground reproduces too dark, and if you expose for the dark foreground, the sky burns out. Available from several manufacturers in a variety of strengths (landscape pros have full sets, but a two-stop grad is a good choice if your budget limits you to one filter), graduated ND filters are half clear, half neutral density, with a blended area in-between. Just position the filter so the dense area covers the sky portion of the scene, while the clear portion lets all the light from the dark foreground through to the film, and you can get beautiful scenic shots with detail throughout. Graduated filters also come in a wide range of colored versions, which allow you to do such things as enhance a pale blue sky or an pale orange sunset.
The rectangular grad filters are more useful than screw-in types, because they allow you to move them up or down and thus position the horizon where you want it in a composition. With a screw-in grad, you have to compose with the horizon in the middle of the frame.
Ideally, when using graduated filters you should meter the foreground to determine the exposure for it, then meter the sky to determine the appropriate filter strength to produce the effect you want in your photograph. But you can get good results more quickly by using your camera's TTL meter with the graduated filter in place on the lens.
Photo by Lynne Eodice
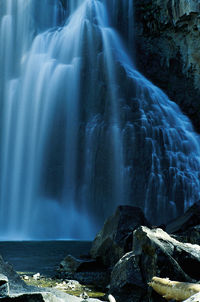 5. ND
5. ND
Neutral-density (ND) filters reduce the amount of light entering the lens without otherwise affecting it. They are very useful when longer exposure times or wider apertures are required in bright lighting (or when you have only fast film available), as well as for reducing light in precise increments for film-speed testing. Kodak Wratten gelatin ND filters (now distributed by Tiffen, www.tiffen.com) come in strengths from 0.10 to 4.00, each .10 of density reducing the light transmitted by 1/3 stop (so an ND 0.30 filter reduces the light by one stop, a ND 0.60 filter by two stops, etc.). Other manufacturers offer glass or plastic ND filters, but in fewer strengths. Some manufacturers designate their ND filters by filter factor instead of by density: 2X, 4X, etc. A two-stop ND filter was used for this waterfall photo, to permit using a slow shutter speed to blur the moving water while the nonmoving portions of the scene are rendered sharply.
Photo by Lynne Eodice
|
| |||||||||


![]()
Get the Latest Photo Tips, News & Reviews from Shutterbug!
| Camera Reviews Other Reviews | Mobile Reviews Photography Reviews Columns | News | Features | How-To | Resources |
 © 2026 Shutterbug
AVTech Media Americas Inc., USA
All rights reserved