- REVIEWS
Camera Reviews 
More Reviews Mobile Reviews Photography Reviews - GALLERIES
- VIDEOS
- BUYER'S GUIDES
8 Essential Tools for Landscape Photography: Here’s the Gear You Should Have In Your Field Bag
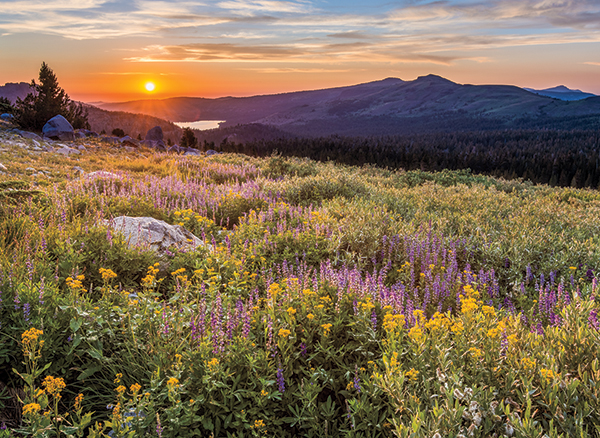
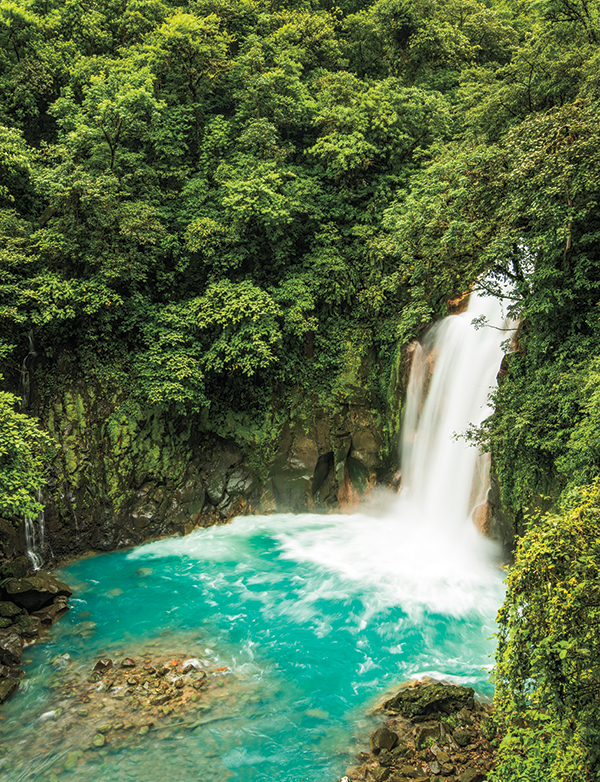
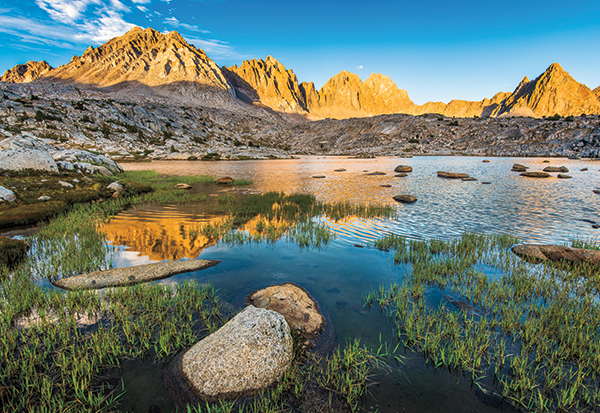
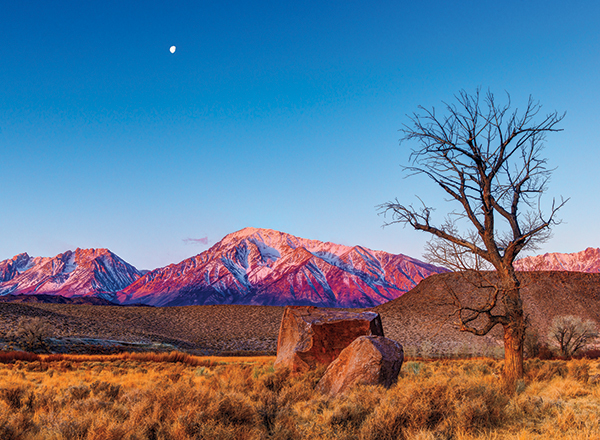
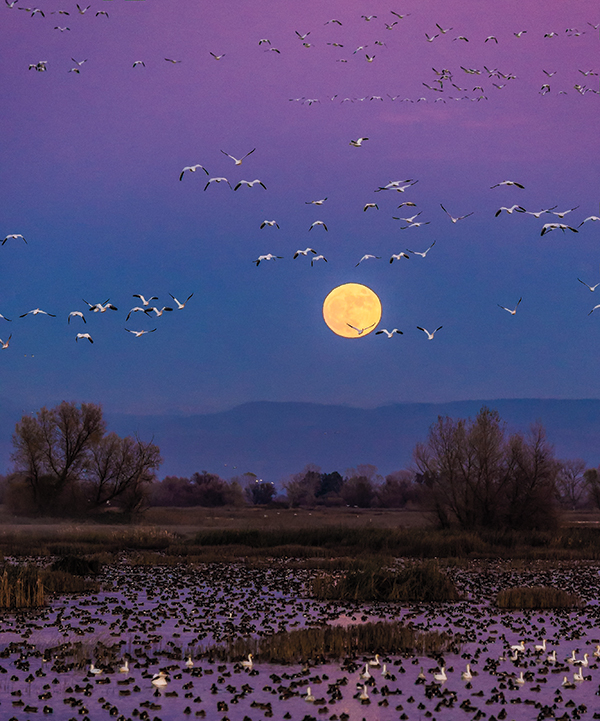
All Photos © Josh Miller Photography
While nothing beats practice and time spent in the field waiting for perfect light, there are a few essential tools that should be found in every landscape photographer’s bag. These photo accessories might not be as exciting as that new camera we all dream of, but they will help you take your photography to the next level much quicker than upping your megapixel count.
1. Solid Tripod
Hands down this is the most important tool of a successful landscape photographer. While not as much fun as a new lens or a new camera, upgrading your tripod is the quickest way to improve image quality. When I was first starting, my mentor told me that “you can always tell how serious someone is about their photography by the size of their tripod.” Times have changed and many people are using smaller cameras and carbon fiber, which has helped reduce the weight of big tripods, but his rule still holds true. If you want to make tack-sharp landscape images, then you need a tripod that is rock solid and built for more weight than your biggest lens and camera. This overkill mentality helps reduce the effects of wind and other vibrations through the system. Choose a tripod that is eye level without its center column extended (even better, get one without a center column); not only will this increase stability but it will also save your back from bending over all day to look through the camera.
As a backcountry photographer I regularly break my own rule in order to save weight when I am hiking or skiing, but my success rate is reduced as a result. Anytime weight isn’t the primary issue, you will find me working with my super steady, five-pound Gitzo carbon-fiber tripod that is rated for close to 50 pounds.
2. Ball Head & L-Bracket
To complete the package, a good tripod needs to be mounted with a high-quality Arca-Swiss-style ball head like those made by Really Right Stuff and Kirk Enterprises. As with your tripod, choose a head that is rated for more than your heaviest lens/camera combo. This helps reduce vibrations from wind or shutter shock. Tired of framing up a shot only to have your camera sag slightly when you take your hands off to shoot? When you are choosing your ball head invest in the Arca-Swiss clamp system and your camera will never sag again, and don’t skimp on the camera L-bracket. A good L-bracket allows you to shoot vertically just as easily as horizontally, and as a result increase your successful take-home rate.
When looking at a tripod, ball head, and mounting plate, it is easy to spend a lot of money really quickly. But remember when you invest in equipment at this level you are making a lifetime investment. I personally have been using my Kirk head and Gitzo tripod for more than 10 years and they still have plenty of life left. How many cheap and frustrating tripods would I have broken during those 10 years?

3. Cable Release
Now that you have that solid camera support system, it’s time to get your hands off the camera. When shooting longer landscape exposures, touching your camera will cause vibrations that can blur images. Unless you are using a mirrorless camera you will also want to lock your mirror up prior to the shutter opening to help further reduce vibrations. Many cameras now allow you to use the self-timer to create a delay between pushing the trigger button and the photo actually being made, but this removes your ability to time your shots. The easiest way to reduce vibrations while still maintaining control over when the shutter actually fires is by using a cable release/shutter remote. These come in a wide range of wired and infrared versions; just make sure whatever style you choose that you pack an extra so when you lose the first one it doesn’t end your trip.
4. Graduated Neutral Density Filter
In the days of High Dynamic Range (HDR) it may come as a surprise to you that I still carry two Graduated Neutral Density (GND) filters. Depending on the situation, I might also shoot bracketed frames for HDR, but many times a GND filter is quicker and easier. If the shot is really special, I may end up shooting with a GND filter and bracket for HDR so I have as many post-processing options as possible when I get back to the studio. There are also times HDR is just not possible, such as with quick-moving subjects. Many times I use my three-stop hard or soft-edged filters in conjunction with a little dodging and burning in Lightroom to bring a shot together that wouldn’t have worked using bracketed frames.
5. Circular Polarizer Filter
The circular polarizer is the one filter I never leave home without. There is no amount of Photoshop trickery that can replace a good polarizer’s ability to reduce reflections in the water and make skies pop. In addition to its more common uses for skies and water, perhaps the polarizer’s most useful attribute is its ability to reduce reflections off of wet leaves. Often new photographers don’t think about pulling out their polarizers in these situations, but have you ever wondered why someone else’s photo has such rich lush leaves while yours look flat? Quick tip: Buy a quality circular polarizer for your largest diameter lens, then buy inexpensive step-up rings to make the threads on your smaller lenses match the size of your new filter.
6. Variable Neutral Density Filter
This is a newer one to the photographer’s tool kit, but worth its weight in gold if you are shooting flowing water. Traditionally, a landscape photographer might carry several different neutral density filters of different strengths to reduce the amount of light reaching the camera, thus allowing for long exposures that create more dramatic blurred water. Over the last few years the need to carry several filters has been replaced with a single variable version that allows the photographer to simply rotate the filter to achieve the desired darkening effect. As a result, photographers are able to quickly adjust their long exposures and vary their shutter speeds accordingly.
7. Wide-Angle Zoom
Wide angle? How can you call yourself a landscape photographer without a good wide-angle lens? All joking aside, the vast majority of all landscape images we see published were created with focal lengths in the 16-35mm range. So after upgrading your support system it stands to reason that it is time to upgrade your wide-angle lens. Personally, I have found that while primes are slightly sharper, I prefer a wide zoom for its convenience versus carrying multiple primes to fill the same range. Once stopped down to landscape apertures like f/8 to f/16, today’s quality zooms are every bit as sharp as a prime lens. I use the AF-S Nikkor 16-35mm f/4G ED VR as it gives me a nice range and is super sharp, but any lens in this range will do the trick.
8. Telephoto Zoom
After a good wide-angle zoom comes a good telephoto zoom. While most photographers will end up using the wide-angle zoom more, the ability of a telephoto to isolate small parts of a scene make it a close second in popularity. For landscape photography, speed isn’t an issue, so skip the 70-200mm f/2.8 models and look at the cheaper and lighter 70-200mm f/4 models instead. If you plan on shooting wildlife, you may also want to look at the 80-400mm or 100-400mm range, which while larger than the 70-200mm f/4, they offer a much larger focal range and more subject isolating power.
Josh Miller’s images have been featured in publications throughout the world and his work is represented by Aurora Photos. To find out more about his work and his workshops, including his upcoming Bald Eagle workshop, follow Miller on Facebook or Instagram @joshmillerphotography or visit his website at joshmillerphotography.com.
- Log in or register to post comments


![]()
Get the Latest Photo Tips, News & Reviews from Shutterbug!
| Camera Reviews Other Reviews | Mobile Reviews Photography Reviews Columns | News | Features | How-To | Resources |
 © 2025 Shutterbug
AVTech Media Americas Inc., USA
All rights reserved