- REVIEWS
Camera Reviews 
More Reviews Mobile Reviews Photography Reviews - GALLERIES
- VIDEOS
- BUYER'S GUIDES
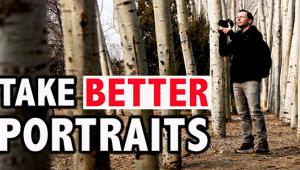
7 Great Tips on How to Shoot Eye-Catching Environmental Portraits
(Editor’s Note: Giulio Sciorio is a professional photographer specializing in portraits and video. To learn more about Sciorio’s process of shooting environmental portraits, check out this tutorial video package with the Phoblographer. It includes one polished video, two behind-the-scenes videos, and Raw files for you to play with on your own. Plus, it’s got something for all photographers of different levels.)
Environmental portraits are all the rage these days in photography because they are far more revealing than a basic portrait of an individual or a simple headshot. As the name suggests, environmental portraits capture a subject within his or her typical environment such as a workplace.
More often than not, the subjects of environmental portraits are not models or professional on-camera talent; they’re just regular folks. So making their portrait within their usual environment allows them to be more relaxed than they would be in a studio, which can be intimidating. Also because they’re created within the subject's environment, that environment often helps tell their story. I’m usually commissioned by publications or small businesses to make environmental portraits because it’s the experience conveyed through the overall image that has a lasting impact on the viewer.
Here are five of my tips on how to shoot better environmental portraits. I’ve also included some environmental portraits I captured of chefs as examples.
1. Start With Conversations and Let the Ideas Evolve
Coming up with a concept for a powerful environmental portrait starts with a conversation with the client and subject. I usually start the conversation by thanking them for their time to make a beautiful portrait and that I’m really excited to work with them. The conversation, however, requires more listening than talking. A good rule to follow is knowing that we have two ears and one mouth, so listen twice as much as you talk at this point.
When talking with the client/subject I’m completely present, meaning I’m not doing anything else. It’s crucial to listen to what words people use and what phrases energizes them as this is going to be where you start to build off their words with the visual elements of the portrait. Often I’ll repeat something they said to me and ask to hear more about it and ask why something is important.
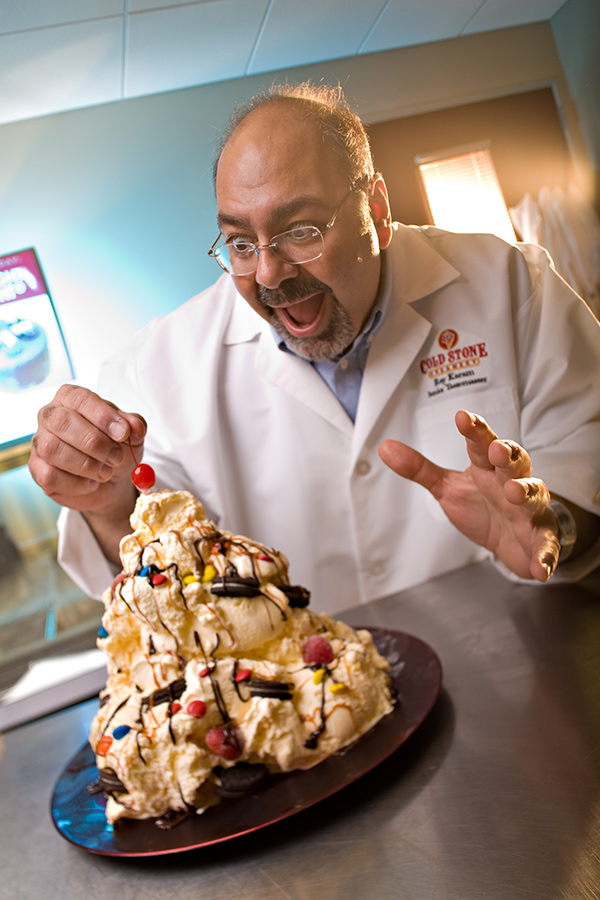
When I was commissioned by Village Voice Media to photograph the Tastemaker of Cold Stone Creamery, one of the things that stuck out was that Ray (the Tastemaker) said he was kind of like a mad scientist when it came to his creations and that he worked in an ice cream lab. Since the actual lab was off limits to the public, we shot in a small tasting room, which was somewhat bland visually so I pitched him the idea of playing into the mad scientist idea, which he loved.
At the time of the commission I was studying the cinematography of Close Encounters of the Third Kind and was inspired by the scene where Richard Dreyfuss looked upon his massive mashed potatoes sculpture of a mountain and said, “this means something,” while in another scene where the orange light of an alien craft outside of farmhouse was so intense, glowing orange beams cut through the windows like lasers. I learned early on in my career that if you include something that inspires the subject in the portrait, things go much smoother in general.
I shared with Ray my inspiration from the movie, which he was a fan of as well, then we combined both his ideas and mine into one. The light was designed using three strobes: One inside a 32-inch octabox to light Ray, a second strobe with a CTB gel to light the background, and a third strobe outside the room with a full stop CTO shooting in through the small window in the door. The image (above) worked out great! After the issue came out, I brought Ray a 4x6-foot poster of it, which he loved. As a thank you for the poster, Ray made my wife a custom ice cream cake for her birthday which is proof how sweet success can taste.
2. Develop a Rapport
A view I always held when photographing chefs is that they are the artist, the plate is their canvas, and the finished plate is their art. I share this view with every chef I work with which in a way, is a complement to their hard work.
Giving sincere compliments to your subjects helps break the ice while building trust at the same time. When I made the portrait of Memphis from the Arrogant Swine BBQ restaurant (below), he was open to anything I wanted to do so I decided that we should show the raw materials of his craft, which in this case was half a pig. We often think of environmental portraits as captured on the interior of a location but going outdoors can be just as effective.

One of the outdoor walls of Arrogant Swine has this beautiful mural of the arrogant swine himself, which I thought would be a fun contrast to chef Memphis holding a half of a butchered pig. Unlike the portrait of Ray, the mural with the prop (the pig) could easily become visually heavy so for lighting I kept it simple.
I used a large octabox powered by a single Elinchrom Quadra head and a second Elinchrom Quadra head with the stock reflector to illuminate the swine mural, both powered by a single ELB 400 battery pack. I used a Skyport Transmitter Plus to control the lights from my camera so I work quickly which was important with the portrait of Memphis.
The side of pork was rather heavy and I wanted to be respectful to my subject. When creating an environmental portrait with impact, make sure not to over-light the scene. If I tried to light Memphis like I did Ray, the lighting would be visually dominant and draw focus away from what’s important, which is Memphis. Whereas with the portrait of Ray, I designed the lighting to be part of the story since the location itself was bland.
3. Gear Should Be a Partner to Your Creative Vision
I hold the belief that gear needs to be a partner in creating, not a barrier for it. If the camera is not helping remove technical barriers, then it's holding up the creative process and needs to go.
Being that it’s 2017 and we have self-driving cars and phones that link up to satellites, I don’t think I’m being unreasonable here. If you struggle to learn the basics of your gear in a weekend then it’s probably not a fit for you. In 2010 I realized that the camera was becoming a paintbrush when I switched from a DSLR to a Micro Four Thirds-based mirrorless camera.
There’s so much good stuff to be found in a mirrorless camera I could write books about it. I just love the benefits of the mirrorless format such as live view; not having to “chimp” my shots on the back of the camera; and being able to preview my final color or monochrome look in-camera as I shoot.
The one thing that scared me most while making the transition turned out to be a huge advantage – the small camera size. In my mind I thought clients and subjects would want a large setup with big cameras and heavy gear being the focal point, but I was wrong.
What I found instead is that with the small size of mirrorless cameras, subjects are more at ease and since I can use the live view of the LCD on the back, I can still have a face-to-face connection with the subject as I shoot. The result is that I’m a faster photographer and more in touch with my vision than ever before, which makes my clients and I happy.
My current kit for assignments is the Panasonic Lumix GX8 and 25mm f1.2 Nocticron lens, which I most often shoot wide open at f/1.2 with a GX85 camera body as backup. My typical workflow is shooting from the camera to my iPad Pro, or shooting to card and backing up on the iPad Pro into Lightroom Mobile, which syncs with my desktop over wifi. It’s a super handy way to create and one that gets the work done fast.
4. Be Present and Listen to Your Subject or Client
Photography is about communication. If you’re not listening carefully from the start you’re already weakening the image. You have two ears and one mouth, let that be your guide. The subject and/or client will tell you what they want but often they will struggle with how to describe what excited them so you might need to dig in a bit.

When Ray told me he’s like a mad scientist, I laughed and asked him what that was. As he described his working process I could tell he was quite passionate about this self-bestowed title so I played off of that in the concept of his portrait.
5. Include Your Subject in the Concept
It does not matter if you’re being commissioned or not, people like to be included in the creative process. If you listen carefully and ask questions you’ll get to what motivates the subject and you can play off that. Remember it’s about them, not you.
I don’t particularly like to pose a subject for environmental portraits. I’ve found that posing can make the subject often look stiff so I work hard at connecting with the subject when I’m talking to them about their craft.
The closest I get to posing is basic direction once we get a general place for them to stand or sit I’ll ask to lift their head up or down or perhaps turn their left shoulder towards camera a bit, turn a bit toward the light etc. Based on the conversation I had with the subject and because I’m open to including them in the creative process, the subjects are usually loose and real. They are having fun and it shows in the images.
6. Speak To What Works, Not What Does Not
Photographing non-professional talent (i.e. non-models) means they often don’t know the process of a photo shoot. If you tell someone, “I got to fix my lighting because the way the shadows fall right now makes you look scary,” or something to that effect, it really hurts the confidence of the subject. Instead tell them something like, “Ok we’re getting close, let's try this..” then give clear direction.
7. Include Fun Props When Possible
For both Ray and Memphis we included props that not only made sense for the shoot, they were items close to their heart. For Ray, the Tastemaker for Cold Stone Creamery, it was ice cream, and for Memphis it was pork. They subjects already know how to interact with these familiar items, so their actions are natural. Also, most non-professional on-camera talent don’t know what to do with their hands, which often results with them crossing their arms. Boring.
(If you’d love to know more about Sciorio ’s process of photographing chefs, then we highly encourage you to check out his tutorial video package with the Phoblographer. It includes one polished video, two behind the scenes videos, and Raw files for you to play with on your own. Plus, it’s got something for all photographers of different levels.)


![]()
Get the Latest Photo Tips, News & Reviews from Shutterbug!
| Camera Reviews Other Reviews | Mobile Reviews Photography Reviews Columns | News | Features | How-To | Resources |
 © 2026 Shutterbug
AVTech Media Americas Inc., USA
All rights reserved