- REVIEWS
Camera Reviews 
More Reviews Mobile Reviews Photography Reviews - GALLERIES
- VIDEOS
- BUYER'S GUIDES
6 Tips on How to Take Safari-Quality Photos at a Zoo
(Editor’s Note: The following is an excerpt from Andrew Darlow’s newest book, Focus and Filter: Professional Techniques for Mastering Digital Photography and Capturing the Perfect Shot, from Ulysses Press. Darlow has been a professional photographer and educator for over 25 years, and this is his fourth book. To better explain what his how-to photography book is all about, he shares these comments with us: “For years I’ve strived to find ways to create more compelling images and make my job a bit easier, whether that meant adding simple accessories to carry my gear more comfortably, or by learning techniques to shoot through glass and fences at wildlife parks and zoos. Most importantly, I’ve learned to capture images of the people who I care about most in many different lighting situations, and I hope that readers of Focus and Filter will be inspired to take out their cameras more often to take photos of their loved ones.”)
Zoos, wildlife parks and farms are some of my favorite places to recommend taking pictures, especially when you are looking to build your portfolio with a diverse subject matter. They offer many opportunities to learn how to photograph rare animals as well as teach you how to cope with challenging environments and locations, similar to what you would encounter if you were on safari on the savannahs of Tanzania or tracking tigers in the jungles of Borneo. Here are six tips on how to take photos at a zoo that look like they were captured on a safari.
1. Photograph Animal Interaction
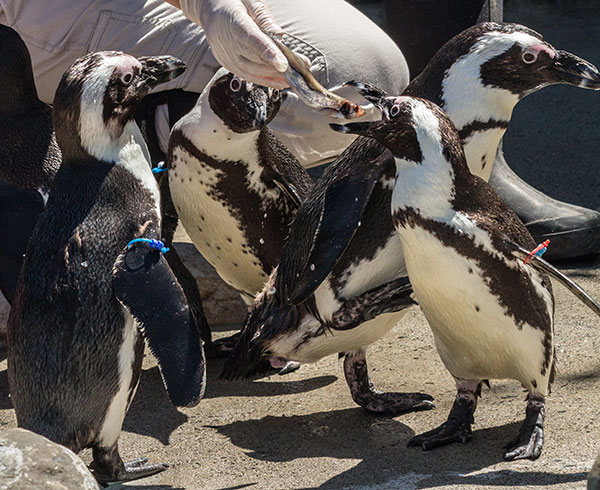
Some of the most incredible opportunities in animal photography are in capturing the interactions at the zoo, whether it’s between animals or an animal and zookeeper. It’s always amazing to see how excited the animals can become when they play together or are fed, and how remarkably stunning these photos can turn out. A zoom lens is very useful in these situations, allowing you to capture incredible detail from a long distance. I recommend practicing with something like a 28-200mm lens because it allows for a wide range of different focal lengths without having to change lenses.
2. Capture Animals and People Together
One of my favorite photos to take at the zoo or aquarium is of an exciting interaction between the resident animal and a visiting human. What could be more moving than a person’s hand “touching” an animal’s hand with just the glass between them? Without getting too much into the legalities of photography (I’m not a lawyer and can’t offer legal advice), always consider people’s privacy when posting and licensing/selling photos, especially if the people are recognizable in the photos.
3. Create a Wild Scene in a Controlled Environment
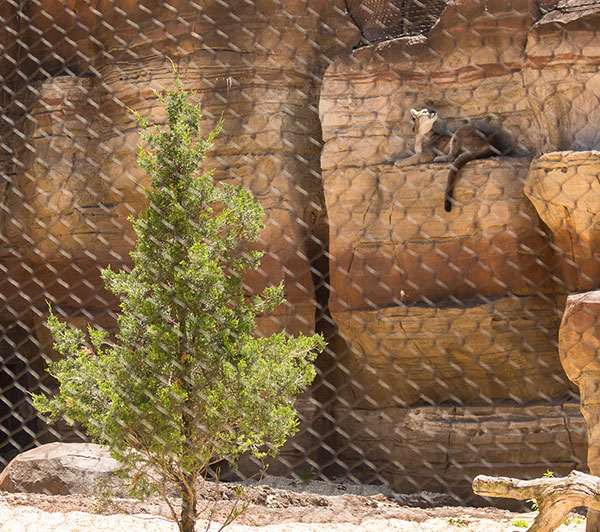
Whether you’re photographing animals at the local zoo or while on safari, one of the most common challenges for any wildlife photographer is removing the human element from photographs, be it the shadow of your safari jeep or the chainlink fence of a zoo enclosure. Practicing at the zoo, you should try getting a fence to disappear, which can be done by getting very close to the fence and using a fixed focal length long lens, or a zoom lens that has a telephoto setting (over about 200mm in 35mm terms), as I show in the “before” and “after” images of the lion. It’s best to set your lens to Aperture Priority, with as shallow a depth of field as your lens will allow (for example, f/2.8-f/5.6). I’ve also found that this technique works best when your subject is at least 10 feet from the fence. If your autofocus system gets confused, you may need to focus manually.
4. Take Pictures at Wildlife Parks
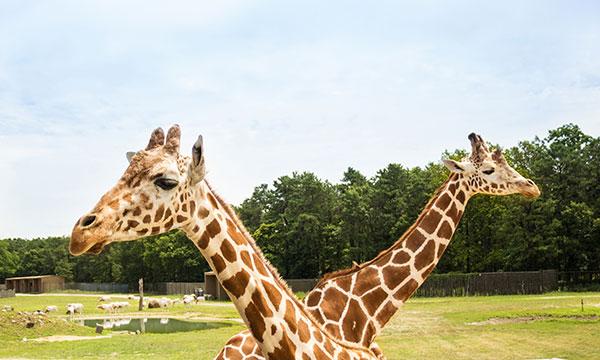
If you’ve always dreamed of or are planning to take a big trip to do wildlife photography, wildlife parks offer by far the best chance to shoot in a simulated wild environment. In these situations, much like a safari in Africa or a wilderness expedition in Alaska, you are the one limited in movement while the animals roam free. Many of the same photography challenges you would face in the wild will present themselves on these easier expeditions. I was in the right place at the right time for the photo of giraffes in this story. That’s a big part of the magic of photography—the unknown. Also, it’s a good idea to take photos of the signs and maps outside and inside the park. They can be very helpful for finding your way around, and they offer an interesting look at what’s inside.
5. Photograph Animals from a Vehicle
If you are shooting from a car, stabilizing your camera becomes very important. Your primary source of stability when stopped should be the ledge of your window (preferably with the window all the way down, but some products are designed to be used with the window partially up). In order to reduce vibration, you should either purchase a beanbag or place a medium-sized towel or jacket beneath your lens and on top of the window ledge. You can use a beanbag that’s designed for stabilizing light stands, or you can choose a purpose-built beanbag made for vehicle windows, hoods and/or the ground. TheVestGuy.com makes many camera supports, and a product well worth a look is called the Puffin Pad (PuffinPad.com). When moving, it’s best to shoot handheld unless you have a special rig made for such situations.


6. Be Ready for Bumpy Rides Ahead!
Photographing while constantly on the move requires a quick trigger finger, or the ability to photograph well in broad sunlight and shadow. I suggest starting out shooting at as high an ISO as your camera will allow without sacrificing much detail. That might be ISO 400 on a lower-end compact mirrorless camera, or ISO 1000-2000+ on some DSLR or higher-end mirrorless cameras. High ISO combined with lower f-stops (f/2.8, f/4, etc.) and fast shutter speeds (about 1/250 second or faster) should all combine to give you a high percentage of sharp images. And when it comes to wildlife photography, you should play for the percentages as much as possible. I will average about 1,000 exposures on a 2- to 3-hour trip, but that’s because I often shoot using my camera’s burst mode, which can really make a difference when there is action. When I was on a 4x4 tour through a wildlife park, I noticed that all of my photos faster than 1/1000 second were sharp as long as I focused properly, even when I took the photos while the vehicle was in motion.
Where To Buy
For more info on Andrew Darlow's Focus and Filter book and a special collection of content prepared just for Shutterbug readers, click here.


![]()
Get the Latest Photo Tips, News & Reviews from Shutterbug!
| Camera Reviews Other Reviews | Mobile Reviews Photography Reviews Columns | News | Features | How-To | Resources |
 © 2026 Shutterbug
AVTech Media Americas Inc., USA
All rights reserved