3D-Album Commercial Suite Creative And Profitable Photo Albums

3D-Album Commercial Suite Quick Look
· MAC and Windows compatible
· $299 -- US

Further Information
3D-ALBUM COMMERCIAL SUITE
http://www.3d-album.com

The beauty of the human brain is that it can so easily be fooled into seeing what it expects to see. Otherwise, we'd be watching movies one frame at a time and perspective effects would have little impact. Of course, that bit of trickery has to be well executed, and beautiful execution is exactly what you get in 3D-Album Commercial Suite. It envelops you in a world of your imagination.

3D-Album (for Windows), from Micro Research II (www. 3d-album.com), is very possibly the wildest and most awe-inspiring image-centric software I have ever seen. And among photo software packages it definitely ranks as the most fun, letting you create not only 3D photo albums, but slide presentations and screen savers as well. 3D-Album DVD Suite 2.03 kicked the utility level up a notch, letting you convert albums into DVD-, VCD-, and SVCD-ready files. Now the Commercial Suite takes 3D-Album into an entirely new dimension.

An overlooked and undocumented screen is the Home Page. When starting a new presentation, use this screen to select the required folders. It makes life simpler. Then move on to the Collect tab.

Versatile Applications
While considerably pricier ($299) than their consumer versions, 3D-Album Commercial Suite 3 is well worth it, adding numerous features, functionality, and enhancements not available in the consumer edition--not least of which is image editing. Now you can have your proverbial cake, but not simply eat it--you can sell it, too. A portrait or wedding photographer, for instance, can add a 3D album to the package. Or a corporate executive can use it for splashy business presentations, instead of those tired old slide shows. A realtor could use it to show off some fancy real estate in an appropriate fashion. More than that, you can create mini-movie presentations as well.

Select an image folder, then drag and drop image files into the current album.

An added benefit is that presentations can be made to run fully automatically or interactively, allowing the viewer to pause the show while a text bubble pops up, a voiceover chimes in, or a sound effect plays--all to highlight key features on that "slide" (options vary with style). Animated, scrolling text headlines are often available as well.

Image Protection
And in case you're wondering about someone using the pictures in violation of copyright, Micro Research has found a way around that by enabling you to lock and bind the package with an encryption key of your own making, so images cannot be used outside the presentation. There is also password protection, to ensure that only the designated recipient can view the show. This is only the icing, and there are many more layers in the Commercial Suite cake.

Drag and drop images into the necessary order, for a more cohesive presentation.

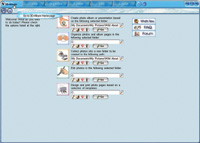
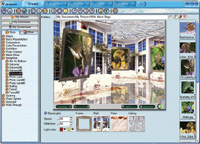
Building Your Presentation
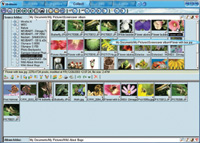
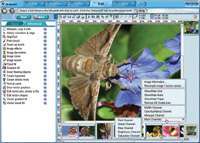
Commercial Suite is a robust program, and while you can just plunge right in to create a photo album, slide show, or screen saver, you should take the time to familiarize yourself with everything the program has to offer. As you progress through each step, you'll uncover all the program's niceties. You can also take a deeper plunge and explore how to create your own phenomenal 3D backgrounds, if you have the time, patience, and camera gear suitable to the task (instructions included in the software).

For now, let's develop a presentation with images found on your hard drive. (You can also import images directly from a camera or scanner.) There are a series of tabs at the top of the screen, and there may be others along the left side, each of which acts as a navigation button. The key tabs are Collect, Organize, Edit, and Create--all at the top.

The features found in Commercial Suite open a world of possibilities not available in the consumer edition of 3D-Album, among them image editing. The Basic editing screen often lets you get in and out quickly.

Collect
Gather all the images into a new folder after clicking on the Collect tab. (Copy the images for presentations to be distributed; or link them for stuff to be shown on your own machine.) You can simply drag and drop the images one at a time, or as a group. Images may be edited. (Make sure you've created a new folder to copy these files into. This way you can edit or even delete them later, and if you made a mistake, no worries because you still have the original.)

Organize
Move over to the Organize tab. Now you can put the pictures in the necessary order, again by dragging and dropping. At this point, you can also annotate the file, adding a title and descriptive data--and even a voiceover annotation, sound effect, or music clip, which begins to play as soon as the picture appears on screen. Keep it short: that image is frozen in time till the sound bite ends.

Basic editing opens up dialog screens such as this, where exposure corrections are made very simply.

You also have the option of adding "hot spots." Select an area of the image that should respond to a mouse click. Then as the presentation is played, scroll over to this area, and click on this spot--and whatever action you designated will happen. That could be music or a video, another picture, or open a web page or document.
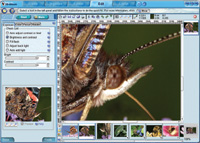
Note: When you go back into the folder that houses this collection, you'll notice additional files and/or folders. These have been added by the program. Do not modify the file/folder names, and especially don't delete these files/folders, or the presentation will not run properly, if at all.

Advanced editing options definitely enhance this program's functionality. Much of what can be done in dedicated image editors can be done here. Right mouse-click to reveal further options (shown).

Edit
Before we're ready to create an album, we might want to edit selected images. You can right-click on any image or click the Edit tab. I found it easier to simply right-click, since the Edit window made the process unnecessarily confusing. (You should also be able to designate your favorite image editor as the default editor, but this function was not working. I expected that, along with a few other glitches, it will be cleaned up in the next release.)

While editing is not quite on a par with Photoshop, it is surprisingly extensive and can easily go head to head with Photoshop Elements, Paint Shop Pro, and any number of consumer applications. There are both basic and advanced editing options, which go a long way toward delivering the kinds of results you're after.

There is just one hitch: several editing processes take a seemingly interminable amount of time to execute, the reason being that a 3D image is being rendered (or what the program assumes to be or treats as a 3D image). Some editing is best done outside the program.

Each style offers various options. In this Gateway#4 style, you can substitute textures (and other elements) with those provided by 3D-Album or with your own. Note the naturally looking reflections on the floor. Subtleties such as this mark these presentations as distinctive.

Create
Now we're ready to have some real fun. Click on the Create tab and you'll be greeted by a blank screen flanked by several tabs on the left and the images currently selected for this album on the right. The Style tab (on the left) should be selected.

When you click on a category, any number of styles will be unveiled. As you click on each in turn, a magical wonderland will seemingly unfold. The tough part is deciding which style to use. Some are truly three-dimensional--or more correctly, shown in perspective, with texturing, reflections, and shadowing to match (no glasses needed--it's not that kind of 3D); others are two-dimensional but go far beyond what you've experienced before in a digital photo presentation.

This is a full screen preview from the Photo Frame#5 style. Note the perspective effects, with the out of focus backdrop, and the butterfly off to the right (these flutter across the screen in perspective as well). Click on the placard hanging from the easel to open up a thumbnail filmstrip. Double-click on any image to bring it on screen. Or simply let the presentation run automatically, with pictures changing as the scene rotates.

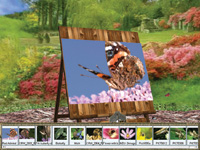
Play around with the various options, or use the default settings for starters--you won't be disappointed. You can often change backgrounds, color schemes, and text overlays (varies with style). Some of my favorites are Fading #5, 7, 8 and 9 (under Basic Presentation), Photo Cube Outside #3 (Cube Presentation), Exhibit Island (Exhibition), and (under Photo Frames), Photo Clock and Photo Frame #5 (this last one features butterflies fluttering across the screen). There are also seasonal/holiday themes, and one set of styles called "Walk Through," with interactive screens that let you move around on your own, as in a video game.

Keep in mind that individual styles may be best suited to certain types of photos, such as those where the center of interest is at or near the center of frame (images are sometimes shown cropped on screen)--but this is certainly not applicable to the vast majority of styles available.

If these choices are not enough, new ones crop up periodically on the 3D-Album website for download. And, again, there is the option of designing your own--albeit not a chore to be undertaken lightly. You can also take several albums and combine them as one presentation.

Build
The final step is the simplest. Click on "Build" to build the presentation for yourself or for distribution. (See sidebar, for the various options.) If you keep your level of involvement (and number of files) down to a minimum, this whole process could be completed in minutes. To keep everything manageable, use JPEGs (sized to suit the displayed images--some are full-screen, others somewhat smaller).

I never cease to be amazed by 3D-Album Commercial Suite. Working with this software is better than playing video games! And potentially more lucrative.

3D-Album Commercial Suite Options
Create a presentation as a screen saver. Use this function to create a screen saver for your own Windows PC.
Build a screen saver distribution package. Use this mode to create a screen saver that can be used in another Windows PC.

Create a self-running presentation. This function creates a stand-alone presentation/application with its own executable (.exe) file that plays the slide show on any Windows PC. The folder created also contains a 4-letter extension VEXE file for rendering by Visviva Animation Capture (included as part of Commercial Suite) into different types of video files. Be sure to retain all file extensions as originally written by the program, which applies to all presentations.

Create an HTML presentation page for a website. This function will create a presentation as an HTML file that can be uploaded to a web page.

Create a Zip file for e-mail. This option shrinks the package so it can be more easily delivered via e-mail. Music and voiceover should be omitted to keep size down.

Create a self-expandable executable file for e-mail. This option is supported only in Windows 2000 and XP. Again, don't weigh it down with audio.

System Notes: 3D-Album Commercial Suite requires an equally robust system to run without fits and starts, including a video card that supports 3D graphics. If you plan to send the presentation for use on other computers, including Mac, the surest thing is to render it to video. This software can render any show into a video file, which can then be burned into a video CD (VCD), SVCD, DVD, or miniDVD (using software sold separately). This presentation will then be viewable on any computer or device that can read the disc.

Contact
Micro Research Institute, Inc.
(630) 963-5559
www.3d-album.com

X