- REVIEWS
Camera Reviews 
More Reviews Mobile Reviews Photography Reviews - GALLERIES
- VIDEOS
- BUYER'S GUIDES
1-Minute Tip: Remove Blemishes in Portrait Photos with Adobe Camera Raw (VIDEO)
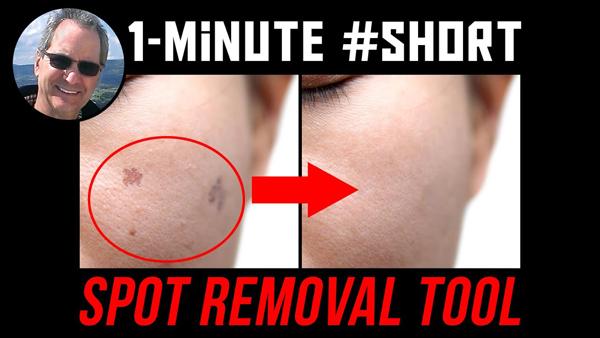
Whether you’re photographing an experienced model or a member of your family, simple portraits can be a lot of fun. But even with an attractive subject, skin blemishes can spoil an otherwise great shot.
Professional shoots typically include a stylist or makeup artist to handle things like hair and skin issues. But what if you’re working on your own? In the one-minute tutorial below, you’ll see how easy it easy to eliminate unsightly blemishes with Adobe Camera Raw.

This short clip comes from Marty Geller at Blue Lightning TV. With a long award-winning career in TV, graphic design, and print work, Geller really knows his stuff. And while some editing techniques can be complicated and cumbersome, Geller makes this one about as easy as it gets.
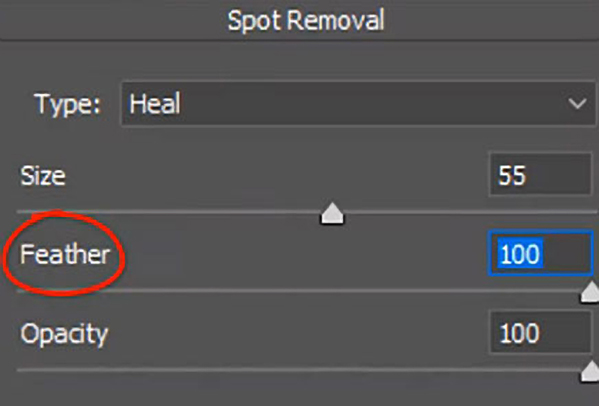
Geller explains that the Spot Removal tool provides much more control than Healing tool brushes, and he begins by converting his image into a Smart Object. Next he goes to the Filter panel, select the Camera Raw Filter, and clicks the Spot Removal tool icon. Then he suggests the proper settings to use.
You’ll see how to modify the size of the section tool and reposition the source area for maximum precision with texture and shading. Geller also provides keyboard shortcuts to speed up the process.
Once you’ve quickly adjusted the settings, removing a blemish is as easy as dragging a slider. Sounds too good to be true? Take a look and you’ll be convinced. You can also take advantage of this simple technique to remove other types of artifacts from photographs.
After watching the video, head over to Geller’s YouTube channel where you’ll find more tips and tricks. Then check out another quick tutorial we posted, explaining a one-click Photoshop technique for instantly fixing skewed colors in an image.


![]()
Get the Latest Photo Tips, News & Reviews from Shutterbug!
| Camera Reviews Other Reviews | Mobile Reviews Photography Reviews Columns | News | Features | How-To | Resources |
 © 2026 Shutterbug
AVTech Media Americas Inc., USA
All rights reserved