- REVIEWS
Camera Reviews 
More Reviews Mobile Reviews Photography Reviews - GALLERIES
- VIDEOS
- BUYER'S GUIDES
Output Options; The DPI Myth; Optimal Settings For Printing
One of the most frequent questions I get from readers or students is about
dpi, or dots per inch. There's a great deal of confusion out there on
what the best settings are, and it isn't being made any easier by the
use of two different measurements for resolution.
First, we have ppi, or pixels per inch, which usually applies to image resolution.
This is the number of pixels it takes to fill an inch--sounds logical right?
Next we have dpi. The common use of dpi is to talk about the number of dots
per inch your printer is capable of. This is normally in the range of 1200-2400.
Let's get one piece of the puzzle out of the way now--you never need
to use an image resolution that matches the printer resolution. A printer uses
multiple dots to make up a color, overlaying them in patterns to build the image
you see in print.
 |
|
|
There are optimal print settings for your images, and these can be dependent
on your printer. For example, most Epson printers work at their best with an
image that is 360 ppi. This resolution setting lets the printer process your
file without interpolating, or changing, the data. You'll also see good
results using a fraction of this setting, like 300 ppi, 240 ppi, or even 180
ppi, with the lower numbers working better for larger prints (because the viewing
distance for a large print is farther away, it's hard to detect the lower
resolution on these images).
Other printers, such as those from Canon and HP, will normally work at their
best with a 300 ppi setting. Again, you can use fractions of this size, such
as 240 ppi or 180 ppi for larger prints. One advantage to using a lower ppi
is that your image doesn't need to be re-sized as much, giving you better
image quality on output. Let's take a look at how this works.
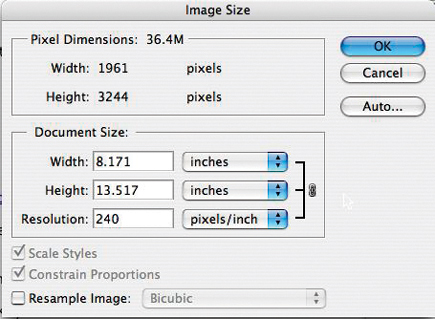
In Photoshop or Elements (and most any other image-editing program), you'll
find an option to set the image size. For Photoshop, this is Image>Image
Size, Elements users will find this under Image>Resize>Image Size (#1).
In this example, my image is set to 300 ppi and will print at about 6.5x10.8.
 |
|
|
If I change this resolution to 240 ppi, I now have an image that will print at 8x13.5. As you can see in #2, the actual pixel dimensions haven't changed at all, meaning that Photoshop doesn't need to re-size my file. If I wanted to change the size of the print from that file I would have to "resample," which always produces some image quality degradation because Photoshop needs to add or remove pixels to arrive at the new size.
 |
|
|
|
| |||||||||


![]()
Get the Latest Photo Tips, News & Reviews from Shutterbug!
| Camera Reviews Other Reviews | Mobile Reviews Photography Reviews Columns | News | Features | How-To | Resources |
 © 2026 Shutterbug
AVTech Media Americas Inc., USA
All rights reserved