- REVIEWS
Camera Reviews 
More Reviews Mobile Reviews Photography Reviews - GALLERIES
- VIDEOS
- BUYER'S GUIDES
Image Quality Shortcuts; Quick Tips For Photo Enhancement
The tips I am going to share here are all done in Adobe Photoshop. Photoshop is not the only imaging-editing program but it is the most widely used. Adobe Elements is nearly as good but lacks a few of the essential features of Photoshop such as advanced masking features and graduated filter features. In any event, there is a reason we say we are going to “Photoshop” an image as opposed to “Element” an image. Even so, many of the tips shown here will work with other programs with minor adjustments, in some cases only in nomenclature.
 |
|
|
Dodge And Burn
Dodging and burning are two of the most basic tools for the photographic print maker. In any print the viewer’s eye is first drawn to the brightest area of the image. Dodging lightens an area, making it more prominent, burning darkens an area, making it less obvious to the viewer.
Photoshop has a set of Dodge and Burn tools in the tool palette. In the CS3 tool palette the Dodge tool looks like a chocolate Tootsie Roll Pop and is located just below what looks like a water drop. If you pull out the fly-away menu the Burn tool, which looks like a hand, will appear. The PS tools work okay but are not as refined as one you can create yourself.
This photo can be improved by darkening the background which will draw the viewer’s attention directly to model Laurie Branch. I also notice that the brown make-up on the left eye (camera right) was too dark with this short lighting technique. To darken the background and lighten the make-up we will create our own custom Dodge and Burn tool.
Step 1
We’ll use Shift/Ctrl + N or Shift/Cmd + N for Mac to create a new layer. We’ll rename the layer B&D, select Soft Light from the mode pull-down menu, and check Fill with Soft-Light-neutral color (50 percent gray), and click OK.
 |
Step 2
In the tool palette we’ll select the Brush tool, checking to be certain the Black Foreground color in the tool palette is selected. On the upper left of the brush options bar we’ll select Brush and set the hardness level at 0 percent for the softest brush then click anywhere on the Brush Options bar to close the Brush Selection dialog.
Tapping the open square bracket keys [ ] on the keyboard will make the brush diameter larger or smaller. For this image let’s begin with a 500 pixel brush and change to smaller sizes as needed. Finally, we set the opacity of the brush. We’ll begin with 30 percent opacity which allows us to slowly build up density by brushing over an area several times until it appears the way we want it.
 |
Step 3
We now brush around the subject’s face to darken the background. We then switch to a brush with a diameter of 100 pixels to get in close behind her head and where her jaw meets her right shoulder (camera left).
 |
Step 4
Switching the background color to white and the opacity to 20 percent we place the brush over her eye and click the cursor, once, twice or three times, in order to lighten the eye.
 |
The final image with Dodging and Burning complete.
 |
Easy Make Over
If you want to be a successful portrait photographer you need to know how to make people look good.
It doesn’t take a lot to quickly retouch a face, here is just one quick and easy method.
Here’s is a close-up of model Kira Distler. She has as clear a complexion as anyone you’re likely to meet, but the camera sees everything and forgives nothing.
 |
Step 1
We’ll start by using the Dodge and Burn technique we just practiced to darken the background. We can switch the foreground color to white and use a smaller brush to lighten her hair.
 |
Step 2
Next, we’ll enlarge the face so it fills the window. Before proceeding we should return to the background and take this opportunity to use the Spot Healing Brush tool to remove any slight blemishes. We’ll use the Navigator tool to move around Distler’s face.
 |
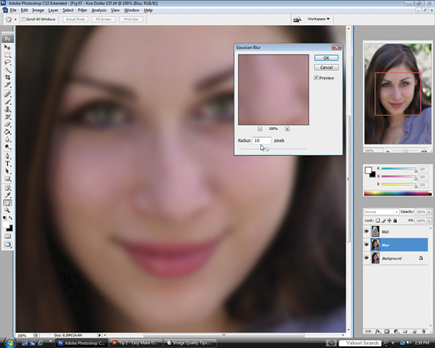
Step 3
While the background is highlighted we’ll use Ctrl/Cmd + J (PC/MAC) to make a Background Copy and rename it Blur. This will allow us to do all of our retouching on the surrogate layer.
Step 4
We’ll add Gaussian Blur to the image, Filter>Blur>Gaussian Blur. For this image I’ve chosen a radius of 10.0 pixels. We could use more or less up to about 30 pixels.
 |
Step 5
The next step is to add a Black Layer Mask to the Blur layer by holding the Alt/Opt key while clicking on the Layer Mask icon, a circle inside of a square at the bottom of the Layer palette. The black mask will hide any filters or effects on the layer it is active on.
Step 6
We now select the Brush tool from the tool palette. With the white foreground color active we move over the image with the Brush tool with an opacity setting of about 30 percent. We can use the Navigator tool to move around the face and neck as needed. There are four areas we should avoid: eyes, eyebrows, nostrils, and lips. These should remain sharp. If we inadvertently brush over these areas we can back out with Ctrl/Cmd + Z or change the foreground color to black and brush back over them.
 |
|
| |||||||||


![]()
Get the Latest Photo Tips, News & Reviews from Shutterbug!
| Camera Reviews Other Reviews | Mobile Reviews Photography Reviews Columns | News | Features | How-To | Resources |
 © 2025 Shutterbug
AVTech Media Americas Inc., USA
All rights reserved