I finally found a printer settings on my Canon Pixma Pro 9000 to turn off vivid and to print lighter. Works better than anything I have tried so far.
- REVIEWS
Camera Reviews 
More Reviews Mobile Reviews Photography Reviews - GALLERIES
- VIDEOS
- BUYER'S GUIDES
Are Your Prints Too Dark?; The Cause, And The Cure Page 2
The easy-to-use software, via a USB connection to the ColorEdge display, supports adjusting the display’s 12-bit hardware performance to meet specific targets for professional use in either publishing or photography with appropriate aim points of gamma and color temperature, and a white luminance of 80.0 CD/m2 for each. In addition, the ColorNavigator supports custom configurations, including a means to simulate white paper, and compensate for environmental ambient light, as well as additional refinements to obtain the best possible image reproduction.
 |
|
|
The EIZO CG222W LCD display provides brightness and color compensation with their Digital Uniformity Equalizer (DUE) for a Delta-E difference of less than three across the display screen. In addition, 16-bit grayscale internal processing is provided, as well as a hood for viewing. This latest EIZO model provides a wide color gamut of 92 percent of Adobe RGB, closely matching color captured in Adobe RGB mode. To assure critical color-stable brightness, a drift sensor and correction capability unique to EIZO is also part of the capabilities. This new 22” CG222W model provides 1680x1050 native resolution, 800:1 maximum contrast ratio, 200 CD/m2 maximum brightness, 178? viewing angle, as well as dual DVI-I input interface connectors. The retail price of the CG222W display listed on their website is $1499.
 |
|
|
A Solution For Too-Bright LCD Displays—ColorEyes Display Pro
After doing the side-by-side tests with my Sony CRT and an LCD, and confirming the results that the CRT did not cause prints too dark, and after an extensive test using the new EIZO ColorEdge CG222W LCD display and obtaining prints that were of ideal density matched to the screen image, I was thoroughly convinced of the solution to this problem: The solution to the prints too dark problem is a display that matches the print output gamut in brightness. But how does one get an LCD display’s white luminance down to 90.0 CD/m2 with good image reproduction quality? I’d tried that before and had been disappointed.
Integrated Color
(www.integrated-color.com) had sent me a demo of their ColorEyes Display Pro software sometime ago, but at the time I did not see any advantage in their calibration and profiling application. However, because of an exchange with a user with an iMac who was having a serious “prints too dark” problem with screen brightness being so high that the Apple iMac brightness adjustment would not lower sufficiently, I took notice of a news release from Integrated Color announcing a new Version 1.42 for the Apple Mac. This new version included support for the Apple Cinema Displays, including iMacs, that allowed adjustment, calibration, and profiling at a lowered white luminance. So I got in touch with Integrated Color and downloaded their latest version to try it with my LCD displays.
 |
|
|
ColorEyes Display Pro offers four distinct methods of functioning, including DDC (Direct Digital Control), LCD Brightness/Gain (contrast), Brightness only, and Apple Monitor, as well as selections for CRT monitors. If an LCD display is connected via DVI and has DDC support (including current Apple Macs with Cinema Displays), the adjustment of the display internally is effected by the ColorEyes software, including white and black luminance settings, gamma, and color temperature (white point), and, if the display has its own LUTs, adjustment of color by ColorEyes Display Pro. Then, once these adjustments are made, the display is calibrated and a profile created. With LCD displays that do not have DDC support, the manual display adjustment controls must be used to set brightness and contrast to set the white and black luminance levels, and then the calibration and profiling process is completed. The procedures are well explained by a “guided” on-screen mode, and the adjustment, calibration, and profiling is an easy process to complete, with a profile resulting, as well as boot-up calibration and a read-out of the results.
I have three LCD displays—a LaCie 320, an LG L2000C, and a Samsung SyncMaster 204B—covering the higher-end, mid-level, and consumer price ranges. The LaCie 320 has DDC support so I was able to use that mode with ColorEyes Display Pro, but the LG and Samsung have only manual brightness and contrast adjustments, so I had to reach the 90.0 CD/m2 white luminance level aim point by altering the brightness and contrast settings of the displays using the buttons for adjustment with the displays’ on-screen dialogs.
 |
|
|
With the LaCie 320 in DDC mode, the ColorEyes Display Pro achieved a white luminance just under 90.0 CD/m2 after it had been chosen as the aim point for brightness. Adjusting LCD displays manually by setting the brightness and contrast is a bit of a trial-and-error process, usually reducing both levels significantly but not by the same amounts. The contrast (gain) essentially provides most of the reduction in brightness—white luminance—but reducing contrast too much to achieve a 90.0 CD/m2 also can result in a muddy-looking image reproduction, so contrast must be balanced with a lower brightness. In short, contrast should not be lowered too much. However, if the brightness setting is too low, shadow values in photo images may be too dark to see detail. In other words, contrast and brightness both have to be lowered but neither by too much or poor image reproduction qualities result. It is not difficult to get there with a little patience.
With all three of my LCD displays now adjusted to gamma 2.2 and 6500K with a brightness white luminance of 90.0 CD/m2, down from 120.0 CD/m2, I set about doing tests using each of the three displays with Photoshop, Aperture, SilverFast HDR, and Lightroom. I color corrected and adjusted raw, high-bit scan files, processed raw format D-SLR image files, and inputted from my two scanners with color corrected, adjusted image files ready for printing. These files were printed with an Epson R2400 or an Epson R800 using various paper stocks. The resulting prints were all a close match in density appearance to their counterpart on screen, with but one exception out of over 30 prints, a shadowy representation of a house that has never been easy to get correct either on screen or in a print—but I had to give it a try.
 |
|
|
The Bottom Line—How You Can Avoid “Prints Too Dark”
Ideally, if you can afford a professional-quality LCD display like the EIZO ColorEdge CG222W with its ColorNavigator software application to do adjustment, calibration, and profiling, I can definitely assure you that using the standard setup aim points for photography that the EIZO supports will yield excellent prints that are as close a match between screen image and print as anyone could imagine or expect. In my experience with LCD displays it does not get any better, at least for ordinary photographers like myself.
Personally, I would like every serious digital photographer to have access to an LCD display like the EIZO ColorEdge CG222W. But such an idealistic dream is unlikely, and it is unlikely such a display will be affordable to but a few as long as the price is almost $1500. So if you, like me, have to make do with a less costly solution, my tests indicate that even a very modestly priced 20” LCD display, like the Samsung SyncMaster 204B or the LG L2000C, can be adjusted to a 90.0 CD/m2 white luminance level and calibrated and profiled to provide an effective screen image quality that supports very good image editing and adjustment performance with applications like Photoshop.
Unfortunately my trials are limited to very few models and makes of displays, so I cannot say if others will adjust to a 90.0 CD/m2 level and function as well. I doubt that older, analog LCD displays will, but many models from the last 2-3 years may. So my suggestion is to download a free demo copy of ColorEyes Display Pro if you already have either an X-Rite i1Display or ColorVision/Datacolor Spyder colorimeter; install the software and give it a try. The URL is www.integrated-color.com.
Correction: In the article I mentioned that DDC support is included with Apple monitors. According to Integrated Color Corp., makers of ColorEyes Display Pro, "This leads the customer to select DDC LCD in ColorEyes for their Apple monitor which will then fail. The error will say DDC communication failed, will switch to LCD brightness only. If they select the Apple monitor choice instead, all is good." My apologies for any confusion or inconvenience this has caused.
David Brooks can be reached via e-mail at: goofotografx@gmail.com.
|
| |||||||||
- Log in or register to post comments

printing darker than what shows on the screen
Submitted by photosbylois on December 13, 2011 - 11:47am
I agree with you Lois. I
Submitted by estherau on June 11, 2012 - 6:55am
I agree with you Lois. I would prefer a magic bullet like that than to have darker screens. I don't even know if my cintiq that i use for drawing would be suitable to change, and even if it was I think it would make it hard for me to do my artwork.
Love esther
My marketing needs for my
Submitted by erickknowls on August 15, 2013 - 9:13pm
My marketing needs for my business always involves printing of campaign materials, such as posters, banners and flyers. It is always good that the result would have clear and bright printouts for the people to easily comprehend with the print ads. Although I have full knowledge of printing I still get ideas from http://www.digiteksf.com/digital-black-white-copies/ where I frequently get guide about printing to a normal black and white to digital prints.
Printing problems
Submitted by Rose Fields on July 7, 2014 - 5:33am
This article provides solutions to almost all problems associated with prints, particularly in photography. Our work is affected most times because of the various problems in the color aspects of the print. I am sure this will help.
sports fashion
Solved Printing Issues:
Submitted by johnthomas on August 30, 2018 - 10:45pm
The objects were written generally for humans printing pix from software program such as Adobe Photoshop to high high-quality inkjet printers. Visit this link for knowing about Brother printer https://www.brotherprintersupportnumber.com/blog/how-to-fix-brother-printer-offline-status-error-on-windows-10/ The customer stage printers regularly don’t have the right controls to gain top exceptional prints. If the prints are coming out with wet ink then it's miles a signal that the paper isn’t well matched or the media type settings within the printer driver are wrong.

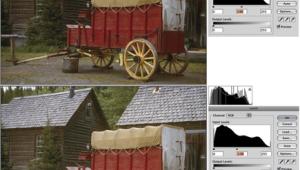


PHOTO OF THE DAY

Today’s photo is Portland Bridge by Jeff Van Scoyk
eNEWSLETTER SIGNUP
![]()
Get the Latest Photo Tips, News & Reviews from Shutterbug!
| Camera Reviews Other Reviews | Mobile Reviews Photography Reviews Columns | News | Features | How-To | Resources |
 © 2024 Shutterbug
AVTech Media Americas Inc., USA
All rights reserved