- REVIEWS
Camera Reviews 
More Reviews Mobile Reviews Photography Reviews - GALLERIES
- VIDEOS
- BUYER'S GUIDES
Create A Pop Art Portrait; Back To The ’60s Page 2
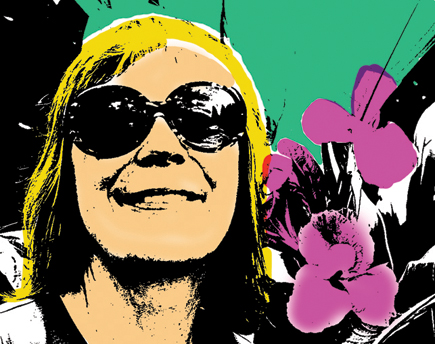
When you're finished with one color, decide on the next area to fill and repeat the steps, putting each new color on its own layer. If you make a mistake while painting, you can erase it by choosing the Eraser from the toolbox and erasing the paint you don't want. Then click on the Brush tool again to resume painting. Image right shows the flesh color I used for the face and neck.
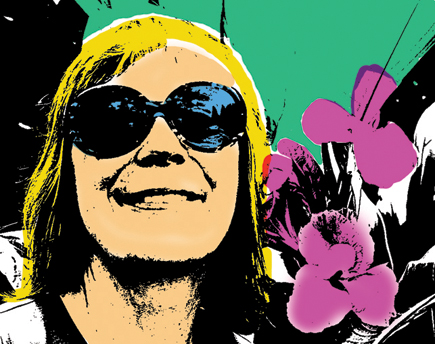
Next, I chose a yellow for the hair. Then came a green for the background. It would be nice to have some blue sky reflecting in the sunglasses, I mused, so I added a few brush strokes of blue.
 |
 |
 |
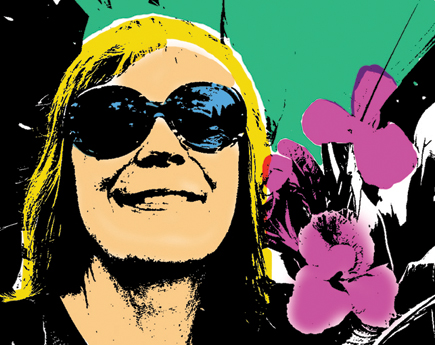
Finally, I decided to cover up the distracting white areas at the lower left of the picture. Choosing black, I painted over these hot spots for the final result. The screen below shows how all the final layers stack up.
 |
Want to work along with this image? Go to www.shutterbug.com and download the image in the Instant Links section, March 2008 issue.
 |
For a realistic pop art effect, don't add too many colors, five or six
should be plenty. That's all there is to it.
For more information, contact Adobe Systems Inc., 345 Park Ave., San Jose, CA
95110; (800) 833-6687; www.adobe.com.
Howard Millard will be leading workshops this year in the U.S.A. and Italy. In Maryland, Digital Photo Art: April 11th-13th; Photoshop Tools and Techniques: July 11th-13th. In New York City, Gardens of New York: May 31st-June 1st; Travel--Capturing the Spirit of Manhattan: June 7th-8th; through Horizon Workshops (www.horizonworkshops.com, (410) 885-2433). For a week-long photo and culinary adventure in Tuscany, Travel Photography in the Digital Age: May 10th-17th; through Il Chiostro (www.ilchiostro.com, (800) 990-3506).
|
| |||||||||
- Log in or register to post comments


![]()
Get the Latest Photo Tips, News & Reviews from Shutterbug!
| Camera Reviews Other Reviews | Mobile Reviews Photography Reviews Columns | News | Features | How-To | Resources |
 © 2024 Shutterbug
AVTech Media Americas Inc., USA
All rights reserved