Is Your Computer Set Up For Digital Photography
How To Stop The Deault Demon From Making Your Pictures Blah

Is Your Computer Set Up For Digital Photography?

#1

If "Steven" finally got to you and you have a new computer, is it ready for use as a digital darkroom? With rare exception the answer to that question is a resounding no. The reason is simple. Although digital photography has increased in popularity and many computers are purchased with making photos in mind, personal computers are still made and sold for general home/office use. They are set up, when delivered, to provide typical general functioning, what in the industry is described as being set at "default values." Default is a common minimum denominator of performance that supports a broad range of different kinds of uses, a "Jack of all trades master of none" configuration. This less than ideal default condition is largely relative to the condition of the operating system that comes pre-installed with your computer. But it also applies to any devices or software that were installed optionally at the factory or to software and hardware you have added to make your computer into a digital darkroom.

Preference Options
Your computer's operating system, Windows for example, as well as software applications like image editors and scanner drivers, contain provisions referred to as preferences, options, and settings that support different choices as to the functioning of the components involved in a digital darkroom. Most of these components will function as they are shipped by manufacturers either without any setting being made or at a "default" factory setting which, as I said, provides the broadest kind of acceptable functioning. To achieve the best performance each component and device in your system is capable of, in respect of digital photography, there are often better settings available than those preset preferences, options, and settings enable. The most appropriate and best performance that is available for a photographic purpose, then, is your choice--if you take the time and effort to make those choices.

There is a small possibility that the default settings will provide you with very close to optimal output quality with your digital photography, but unless you know you're always lucky, don't take a chance on the default demon giving you blah results. By following the suggestions and recommendations that follow you'll know that you'll obtain the best results you can. The basic and most fundamental preferences, options, and settings you'll need to make will be done through three or four "highlighted" selections in the Windows Control Panel. You may open the Control Panel window by clicking on "Start" and then Control Panel. (#1)

#2

Your Monitor Is What You Print
When you turn your computer on it tells the monitor what to display. But your computer has no idea what you are seeing. You can adjust the monitor controls to obtain a dark and contrasty or a light, low contrast screen image and the computer is oblivious to what you have done. So, the most important job in setting up your computer to do digital photography is to tell your computer what you are seeing on screen. If it cannot recognize what you see on screen, then it cannot use what you have done to adjust a photo image to assist with providing an optimum print match. In other words, the adjustment of photos with a computer is accomplished by your perception of how it looks. Unless your computer has an objective reference as to what you perceive on screen in terms of color brightness and contrast, it is blind to what you are seeing and doesn't have any information as a guide to then input a scan or output a print that matches what you see on screen.

The first bit of information about your monitor your computer should know is what monitor you have plugged in. If your computer is not too old it should have plug-and-play, which should sense and record the identity of the monitor. To ensure this is so, open the Display Properties window by clicking in the Display icon in the Control Panel window. (#2)

#3

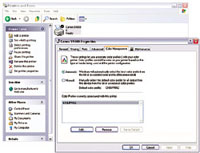
When the Display Properties window is open, click on the Setting tab at the top right and then click on the Advanced button in the lower right of the tab pane. Now a second window will appear with two rows of tabs. You should click on the Color Management tab. Immediately below the icon and explanation of the setting functions is the heading Current monitor, which, if plug-and-play recognizes your monitor will record the make and model of the monitor. Below that line is another heading for an entry, Default monitor profile: This line may be blank, or it may contain a name for an .ICM profile file, and there will then be a corresponding line in the box below called "Color profiles currently associated with this device."

If your monitor brand and model is identified but a profile is not designated as associated with the monitor, you can go on to the next step. If you are using an older monitor that is not plug-and-play, and you have technical information describing it, you may want to search for a corresponding generic profile by clicking on the Add button at the lower left corner of the box. This will display the Color folder in the Windows/System section of the operating system and display all of the potential file choices. By highlighting any or each file and right clicking the mouse on that highlighted file, you can, from the menu that pops up, choose Properties. You then get a three-tab window dialog providing a full description of the profile file, including what kind of product with which it is associated. If you are fortunate to find a generic profile for your monitor brand or type, then, when it is highlighted, click OK so it is displayed in the box and set it as the default (click on the Set As Default button in the lower right with the profile you have just added to the "current" box highlighted).

Adjusting Your Monitor To An Objective Standard
A profile file that is "associated" with a monitor and designated as default tells your computer some information about the monitor and how it functions. It does not, however, provide a fully accurate picture because there is no information as part of that profile that defines how the monitor is adjusted for brightness, contrast, and color balance. The easy way to do that is to use Adobe Gamma, which is a utility included with all full versions of Adobe Photoshop 5.0 or higher, as well as Adobe Photoshop Elements. If you have any of these versions of Adobe Photoshop installed on your computer, access to the Adobe Gamma utility is provided by a "monitor" icon titled Adobe Gamma in your Control Panel window. But, before going there, I would recommend making one setting adjustment to the adjustment controls provided on your monitor. If your monitor supports color settings and a selection of color temperatures in degrees Kelvin is provided, select 6500Þ. It is the best compromise for viewing photographs for the purpose of making perceptual adjustments to images, and it is consistent with the working space for Adobe Photoshop recommended for editing photographic images. (#3)

#4

With Photoshop on your computer and Adobe Gamma's icon in Control Panel, click on the icon to get a window on screen that defines the status of your monitor, including the description box at the top which names the current monitor profile (if any). A bar below that is the graphic depiction of Brightness and Contrast, a Phosphors menu dialog, which allows you to select the monitor CRT type, and a Gamma box that supports setting the monitor gamma and color balance. This includes a Desired drop-down menu selection of specific values, and White Point with two menu selection dialogs. (This screenshot reflects the result of calibrating and profiling my monitor, and a first-time user will obtain different value read-outs which reflect default settings.) At the bottom of the Adobe Gamma window on the far right is a Wizard button. This starts the Adobe Gamma Wizard, which guides you through the process of calibrating your monitor and producing and naming a color management (.ICM) profile file for your monitor, which when completed will set that profile as the system default. (#4)

When you click on the Adobe Gamma Wizard button, a screen will appear with two radio button options: choose the Step By Step (Wizard). Then read the instructions in each screen carefully and follow the directions precisely, going from one screen to the next until the process is complete by your naming the profile to be created and clicking OK. When that is done Adobe Gamma will set the new profile you have created for your monitor and, more important, will adjust your monitor output to exactly reflect the screen output to match the profile each time you restart your computer. Now your computer will know quite precisely what you are seeing. It will be able to convey that information in relation to inputting images into your computer using a scanner, or outputting an image to your printer. This provides accurate color, brightness, and contrast matching between these devices, based on what you see and perceptually adjust on screen.

#5

Adjusting Your Monitor On Your Own
Although Adobe Gamma provides an easy solution to obtaining optimum monitor performance and a profile which accurately describes to your computer what you see on screen, there are things you can do to obtain better digital photography performance from your system. You do this by manually adjusting your monitor to the following parameters, if you don't have Adobe Photoshop.

1. As referenced above regarding the Control Panel/Display Properties/Color Management dialog window, it is now essential that an .ICM profile file that most accurately describes your monitor be found and selected to set as the default. If, according to the brand and model of your monitor, such a profile file cannot be found in the Properties description for the files available in your system Color folder, I would suggest attempting to obtain a profile file from the manufacturer of your monitor. However, many scanner drivers, printer drivers, and photo software applications install many generic profiles in your system's Color folder, so at least a generic monitor profile should be available that is a close match.

2. Also mentioned earlier, on your monitor use the adjustment controls to set the monitor's color balance to a Kelvin temperature of 6500Þ. The default for computer monitors is 9300Þ Kelvin, which is much too blue and cold to provide a good perceptual on-screen image basis for making photo color adjustments that will result in good print colors.

3. Then, set the brightness and contrast controls of your monitor to the following settings. First, adjust the contrast to maximum or 100 percent. Then set the brightness control to minimum, or 0 percent. Next, gradually increase the brightness adjustment until you can just detect a difference between a dark shadow tone (an RGB value of 10) next to an RGB value of 0, which is pure black. You can create a visual guide for this with an image editor like Ulead PhotoImpact by making a New image with a black background, and then select half of the image with the rectangle select tool and lighten this selected half of the image until the RGB values are 10 for each channel. With this image as a guide you can set the brightness close to ideal when you can just barely detect a difference between the black and the dark gray with an RGB value of 10 (#5).

#6

The Remainder Of Setup Is Easy
If you have a printer installed and connected to your computer, a necessary precaution is to check to see that it is recognized and its profile is associated with the device. To make this check, again open Control Panel from the Start button at the lower right of your screen. Then click on the Printers and Faxes icon button to open its window. An icon with an identification of your printer should be in the window space to the right. Click on the icon for your printer with your right mouse button to open a menu dialog, and then click on Properties. In the "printer" Properties window click on the Color Management tab. In the sub-window dialog in the lower half of "printer" Properties/Color Management under "Color Profiles currently associated with the printer," a file name should be highlighted. If you click on the Add button below, your system Color folder will be opened in which the named profile for your printer is located. You may right click on that file in the Color folder window and select properties to obtain a window that will provide a description of the device (printer) the profile supports. If it is in fact your printer, everything is OK. (#6)

#7

If you have either a USB or FireWire scanner installed and connected to your computer, you should also check to see if it is recognized and profiles are associated correctly with the device. Again, you use Control Panel and then click on the icon there for Scanners and Cameras. The window that opens should contain an icon and name of your scanner. Again, by right clicking on the icon for your scanner and selecting Properties and then clicking on the Color Management tab you can check out if profiles are associated with the device and what they are. If your scanner is a flat-bed and will scan both prints and film there may be two profiles, one for each media. You should select one as default, whichever media you would be scanning. If you change your use of the scanner from print (R) for reflective scans which is selected and set as default, then go back to this window dialog in Control Panel and select the other film or transparency (T) profile and set it as default.

Some older, particularly SCSI interface scanners may not be recognized automatically by Windows, especially if they are not plug-and-play. With some of these scanners the scanner driver software may provide options or preferences that supports selecting a profile for the scanner. It is recommended checking this support and, if available, implement it to assure effective color managed scanning. (#7)

#8

Essential Application Software Options And Preferences
The "default demon" is as much of a potential threat of experiencing the photo blahs through application programs as the operating system defaults we've just dealt with. For instance, to choose one of the more popular and highly recommended photo application programs, Adobe Photoshop Elements, I'm afraid it, too, as installed to run at default values, will disadvantage digital photography use unless you intervene. This is done with the application launched and running, and then in Elements click on the Edit menu at the top and then select Color Settings by clicking on that menu item from the drop-down list. (#8)

#9

This will open a small window that provides three selections that are activated by radio buttons in front of three different option choices. The first is the default, which is no color management. The second is limited color management--optimized for web graphics. This selection uses sRGB as Elements workspace that should only be used to create graphics for use on the web. It should not be selected for photo editing and output as it provides a reduced color range that drops out as much as 30 percent of the color in a scan of a color film original. That leaves the last option: full color management--optimized for print. Click on it for photo processing and output. This option selects the Adobe RGB (1998) workspace profile, which is the same as recommended for use working with photographic images with the full version of Photoshop.

Another popular and recommended photo image-editing application is Ulead's PhotoImpact 7. In its preferences and options Color Management is offered, but only provides the choice of activating color management or not. Do not activate color management in this application. In other words, be sure there is no checkmark in the box next to "Enable Color Management" as you see in the screenshot. The reason is fortunately provided by the line at the top of the dialog window that tells you that images, graphics, and text are generated by sRGB Color Space, which as I have explained will reduce (truncate) the range of colors in your photographs. (#9)

#10

Without color management activated in an application like PhotoImpact or not supported by an application like Jasc Paint Shop Pro, are you left out in the cold where the blahs will get you? No, not if you have followed my recommendations mentioned and have a well-adjusted monitor and an active monitor profile. Most printer drivers, at least those made for printing photos by major brand names, will reference the default monitor profile as the "source" for processing an image for printing, and will usually provide a better print color match with the screen image.

However, with some applications there may be a "preference" you should look for that functions to match the applications display of images to the output of your monitor. By following the directions and making this adjustment you'll get a better match between the screen display and how it will print. (#10)

#11

Last, But Not Least, Important
The Windows ICM 2.0 color management functioning has been known to make mistakes by being confused and picking the incorrect .ICM profile file in the Color folder on your system. When Windows is installed Microsoft has already provided a number of commonly used .ICM profile files in the Color folder. And, when you install printers, scanners, digital camera software, and photo imaging application programs, each installation of software usually adds more .ICM profile files to your Color folder, including generic ones for monitors and color spaces, sometimes duplicating files already installed. A typical computer with a printer, a scanner or two, and several imaging applications can have from 100-200 .ICM files in the system Color folder, enough to confuse anyone! (#11)

It's Color folder housecleaning time, because probably at most you will only need and use a dozen or so of all of those files. But first you need to find your system Color folder. Because Microsoft has "hidden" the folder in various locations in different versions of Windows, I would suggest clicking on the lower left Start button in your desktop, and then go to the Find Files & Folders. Limit your search to the main Windows folder, and type in "color" as the thing to search for. Once you have your system Color folder open on your desktop also open a "New" folder and name it "UnusedProfiles." Then in your system Color folder highlight each file from the beginning, one at a time, and right click your mouse to then click on the Properties selection item. This brings up a five-tab Properties window which will allow access to Profile Information. In the window you will find a description of the profile as well as the source. If it is a profile associated with a device you have or one you know you are using, like Adobe RGB (1998), close the window by clicking Cancel and move to the next. If its description involves nothing you are using, again click on Cancel, but then drag the file into the "new" UnusedProfiles folder. This process is slow, boring, and timeconsuming, but patience is rewarded by getting it done. And I hope the result, if you have gone through this setup guide and followed the recommendations, will be consistent quality photo image processing with your system.

Computer Used: Sony Vaio PCV-RX660
To create this guide to setting up a digital photography PC I obtained the loan of a new Sony Vaio RX660 Digital Studio computer. Sony computers are specifically designed to support all kinds of media processing like audio, video, and, of course, photography, and come fully loaded with a sound system DVD-ROM player as well as a CD-RW drive to burn CDs, as will as a host of bundled software that support all of these media hardware capabilities, including Adobe Photoshop Elements. This is a mini-tower PC that is both well designed and substantially constructed. The quality and performance were as good as I have experienced with a Windows PC, and the results I obtained using an Epson Perfection 2450 PHOTO Scanner as well as a Canon Bubble Jet S9000 photo printer I was testing concurrently, were also as good as I have experienced using a PC. For more information, visit the Sony Vaio web site at: www.vaio.net.

SPECS
Processor: Intel Pentium 1.8GHz
RAM: 512MB DDR
Hard Drive: 80GB
Drives: DVD-ROM and CD-RW
Connections: Four USB one six-pin iLink (FireWire), one four-pin iLink, and Memory Stick Media slot

X