- REVIEWS
Camera Reviews 
More Reviews Mobile Reviews Photography Reviews - GALLERIES
- VIDEOS
- BUYER'S GUIDES
The Spot Option: Perhaps The Least Used, Least Understood And Most Hands-On Creative Metering Pattern You Have

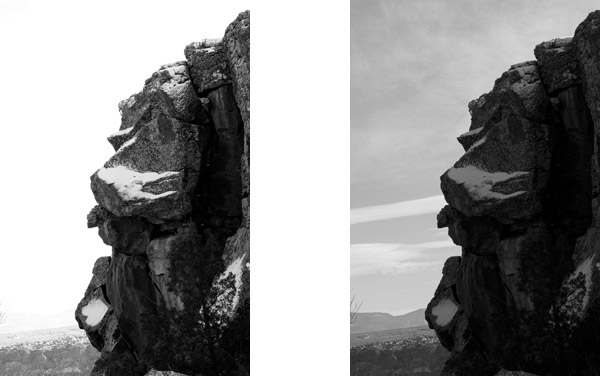
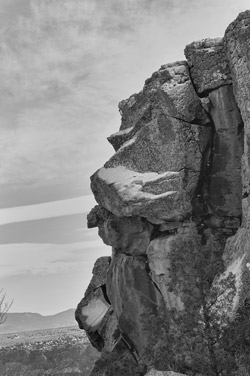
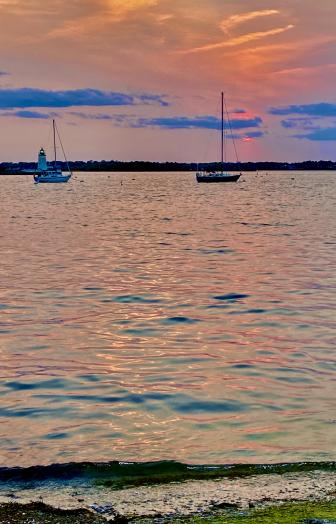
All Photos © George Schaub
Pattern Metering modes divide the framed scene into a myriad of zones. The system then compares the light, and in some cases the color, in the zones to come up with a computer devised exposure “solution”. Center-Weighted Averaging (CWA) takes a preponderance of the light reading from the “center” of the framed scene (actually a rough oval that covers about 70 percent of the frame) and then averages the values gathered there to middle gray. Spot takes a finite reading from a very specific area within the finder, usually dead center but sometimes from the focusing point you have chosen. The light gathered from this very small area yields a reading that converts that area to middle gray light value (the mid point on the brightness spectrum from white to black, or very bright to pitch dark). Spot, unlike CWA, does not average the values it reads because it generally reads just one light value in the very small area it reads.

For example, when using Center-Weighted Averaging (CWA) you generally will be gathering light values from a number of areas, some lighter than others and some much darker than others. The meter then puts these values on a scale from light to dark and finds the average. For example, a scene where values range from f/16 to f/4 would have an average of f/8. A spot pattern regarding the same scene with the scene framed exactly the same as it was in (CWA) might only cover the f/4 area, or the f/16 area, or perhaps an area of light value somewhere in between. It is in how and where in the scene you place the spot that determines how you use this pattern for exposure control.

In the days when many folks shot black and white and practiced an exposure and development regimen known as the Zone System, the area read and the way the film was developed worked in conjunction to get the most tonal spread possible and/or render the tones the way the photographer desired. This relied on a spot meter reading to specifically define the brightness values of certain areas so that the photographer could proceed with exposure compensation and/or development time compensation to attain the desired effect. For example, my technique at the time was to read the significant shadow area (the darkest area in which I wanted to record detail), then compensate minus 2 stops (or EV’s) and drop development by anywhere from 10-20 percent (to control highlights), depending on the scene contrast. It was a pretty simple technique but it certainly relied on my being able to isolate the light reading of the shadow area in which I wanted detail by using a spot meter.


With digital you get shadow detail in high contrast scenes simply enough these days by using HDR techniques and making bracketed exposures. You use plus EV to record shadow detail, average for a fulcrum exposure and minus EV to saturate highlights. You can do this in three shots for most scenes but can add more on both sides of the fulcrum for high contrast scenes or when you want to go with what is increasingly, and disparagingly, called “grunge” techniques.
Does bracketing and HDR eliminate the need for spot reading? Not if you want to control highlights to keep them from becoming overexposed; not if you want to enhance the saturation of high frequency colors; and, in many cases, not if you want to get excellent exposures right “out of the box” that can stand alone as very good JPEGs without much or any post processing or excellent Raw files that need only enhancement, not correction, to make the best exposures you have ever achieved. Indeed, spot readings have a place in HDR techniques as well and can be utilized to both cut down on the number of brackets you might need to make for HDR post processing and define the limits of under- and overexposure required to make a successful series of HDR shots that save processing time later.


Let’s look at these instances one at a time. The first step is to set your camera on the Spot or “Partial” (in some brands) metering pattern, set the camera to AV (Aperture Priority) mode and figure out how to work with exposure lock and exposure compensation controls. These are the tools and functions you’ll need to work with spot. Note that you can also use Manual Exposure mode and eliminate the need to use exposure compensation controls and exposure lock.
Highlight Control
In digital, highlight control is often the essential ingredient in exposure control. Burn up (overexpose) the highlights and you could well lose the shot. In tests of many cameras over the years I have seen how pattern metering often results in overexposed highlights (in higher contrast scenes) that require a good deal of post processing in special programs to make right, although it must be admitted that for many if not most exposures, pattern metering does just fine.
Spot metering makes highlight control easy. You simply “place” the spot area on the highlight (not the sun or glinting or “spectral” highlight!) and then raise exposure +1 or +1.5 EV to place the light value back where it belongs. Sounds counter intuitive—adding more to bright areas in the scene!? You do this because of the way the meter behaves—it “moves” the bright area to middle gray (darkening it) so you have to in essence move it back to where it belongs by adding that exposure back. You can do this by reading the bright area in an Auto mode, like aperture priority, locking that exposure using the exposure lock button (AEL) and keeping the camera set at +1 or +1.5 EV (you’ll learn by experience that brighter areas need a bit more “help”). In Manual mode, read the highlight and move the shutter speed or aperture control so the exposure indicator in the finder or on the back of the camera reads +1 or +1.5 EV on the hash marks.
Color Saturation
While there are easy ways to saturate color by raising the color saturation parameters in your camera or setting the camera on Vivid or even Landscape Scene mode, a great way to instantly saturate high frequency colors, like red, yellow or orange, is to place the spot right on the color, lock exposure in an Auto mode or set the exposure in Manual mode and do nothing else—no compensation or other changes are required. This in essence darkens the color, which is what saturating color is all about. This is a great trick for floral photography, industrial and cityscapes and creating abstractions where heavy shadows can be used as a counterpoint.
Bracketing Guides
When you bracket for HDR techniques you can sometimes get away with 2-3 shots if you know the exposure needed to yield a saturated (well exposed) highlight and the exposure needed to bring details into the darker shadow areas. Some folks shoot 5-10 brackets, a waste of time, file space and probably processing power later. There’s nothing wrong with bracketing like that for insurance, I suppose, but why not use spot metering to determine the outer limits of the bracket needed? When you have to bracket with too many shots subjects might move, the camera might have to be reset to create a wider bracket range, or you can touch the camera too much during the process and cause misalignment of the frames.
To find the limits of the brackets required, use the spot meter to take a reading of the darker areas of the scene where you want to show detail. Don’t bother with shadows in which your eyes cannot see anything—that’s stretching it too far and why some HDR shots look like they were made for a Halloween candy box and shadows are filled with an odd vibe. This brings us back to an old film term, one I discussed up front in this article—significant shadow; that is, the dark area in the scene in which you want to record and show detail. Make a spot reading there. Then do the same with the highlight area in which you need tone. Use the “blinkies” highlight exposure warning feature on your camera and make an exposure that eliminates them entirely. Note those exposures—that’s your HDR exposure parameters.
Say you get f/4 for the shadows and f/16 for the highlights. In this instance you would set the auto bracket at +/-2 EV and the medium exposure at f/8 and shoot a three-stop bracket with a +/-2 EV spread. Say you get f/2 for the shadow and f/16 for the highlight—that’s quite high contrast. In this case you might need a wider range for bracketing, one that’s beyond the reach of autobracketing programs (quite a few stop at +/-2 EV). In that case brace the camera on a tripod and shoot one shot at f/2, one at f/5.6, one at f/11 and one at f/16, all in Manual mode. If you have a remote tripper, all the better. In any case, don’t shoot more brackets than you need and make it a cleaner and simpler HDR process by using spot metering. It’s a great way to know the outer limits of the exposure required to get it right.


![]()
Get the Latest Photo Tips, News & Reviews from Shutterbug!
| Camera Reviews Other Reviews | Mobile Reviews Photography Reviews Columns | News | Features | How-To | Resources |
 © 2025 Shutterbug
AVTech Media Americas Inc., USA
All rights reserved