- REVIEWS
Camera Reviews 
More Reviews Mobile Reviews Photography Reviews - GALLERIES
- VIDEOS
- BUYER'S GUIDES
Why AI Denoise is This Pro's Favorite Lightroom Tool (VIDEO)
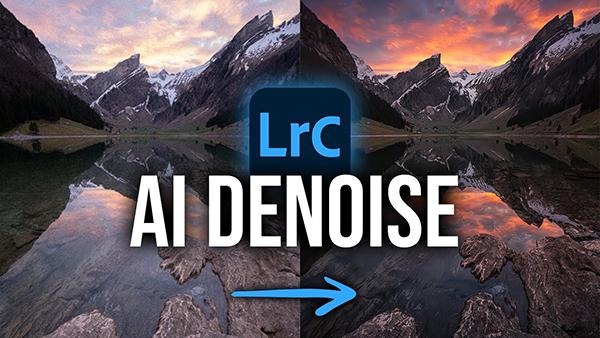
Dealing with image-killing noise is a task commonly faced by landscape photographer who shoot at high ISO settings, either because of low-light conditions or when using slow shutter speeds to capture motion. In either case, there's a simple way to remove these ugly artifacts, and today's tutorial from the PHLOG Photography YouTube channel explains how it works.
Instructor Christian Mohrle is an acclaimed landscape pro and a very popular educator. In this 14-minute episode he explains why "AI Denoise is my favorite Lightroom tool," and how it can save underexposed images. His demonstration image is a dark photo of a beautiful scene, shot at ISO 6,400, with a lake in the foreground and looming peaks in the distance. You can download the Raw file in the description beneath the video and follow along as the video proceeds.
Mohrle always begins with a few basic global adjustments that provide far more control for the important techniques that follow. His goal is a well saturated effect, so the first thing he does is go into the Basic tab and change the Profile from Adobe Color to Adobe Landscape. This immediately makes the image more vibrant and opens up the darkest areas.
Other preliminary enhancements include bringing up exposure, opening shadows, and carefully increasing Whites (taking care not to overly affect the dramatic sky). He then modifies White Balance, increasing the Temperature, "to make the shot feel warmer." He also boosts Texture for a crisper look, while gently dropping Clarity and Dehaze.
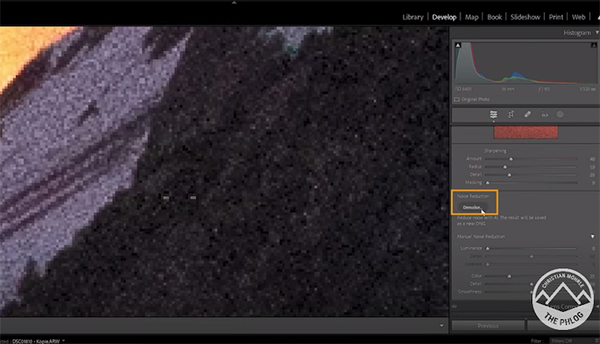
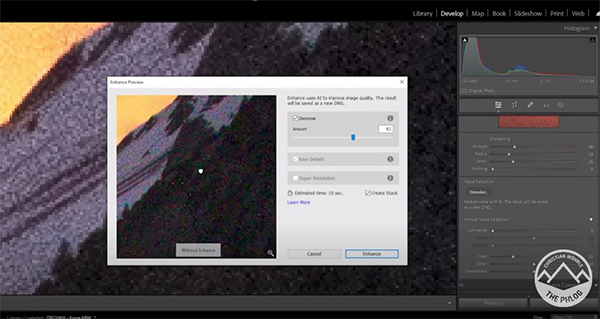
Now it's time to head into Lightroom's Details tab where it's easy to spot some very heavy noise—particularly in the darkest areas within the frame. The restoration process is initiated with a quick click on the Denoise button. At this point Lightroom does all the heavy lifting and provides a preview that reveals how the image will appear with and without AI Denoise applied.
The preview includes an Amount slider that enables you to refine the effect. When you like what you see just hit the Enhance button and you'll be able to continue with your normal workflow and any other adjustments that are required.
Mohrle walks you through these final steps that include masking, color grading, and a bit of judicious sharpening. We trust that you'll be very impressed when you view his before/after examples. In short, it's a quite remarkable transformation.
There much more to learn about shooting and editing landscapes and other outdoor images on Mohrle's instructional YouTube channel. So be sure to pay a visit and explore what he has available.
And for another straightforward and helpful Lightroom tutorial be sure to check out our recent post, explaining how to dramatically enhance dull and boring landscape photographs to make them POP!


![]()
Get the Latest Photo Tips, News & Reviews from Shutterbug!
| Camera Reviews Other Reviews | Mobile Reviews Photography Reviews Columns | News | Features | How-To | Resources |
 © 2026 Shutterbug
AVTech Media Americas Inc., USA
All rights reserved