- REVIEWS
Camera Reviews 
More Reviews Mobile Reviews Photography Reviews - GALLERIES
- VIDEOS
- BUYER'S GUIDES
Share Your Knowledge: 7 Tips for Teaching a Free Photo Workshop
The “Back to School” bug bit me and I volunteered to teach a digital photography workshop at my local library. You may have had the same inclination at one time or another, but never got around to putting together a syllabus and some example images. Here are a few tips that will help you create an informative, worthwhile photo class for your community.
1. Volunteer
Contact your local library and volunteer your services. They are going to ask you for a course outline and about your photography experience. If your library is like mine they’ll be very receptive. And if they’re not, try the library down the road.

2. Keep the Agenda Short and Sweet
The class I’m teaching runs 90 minutes, enough time to cover the basics and answer questions. We focus 100% on deriving the most enjoyment from the equipment the students already own. I’ve winnowed the thousands of possible topics down to a handful—just eight, as a matter of fact—so after a very brief overview of camera types, we explore the following: Megapixels, ISO Setting, White Balance, Program AE, Aperture & Shutter Priority Auto, Depth of Field, Flash Modes and Bracketing.
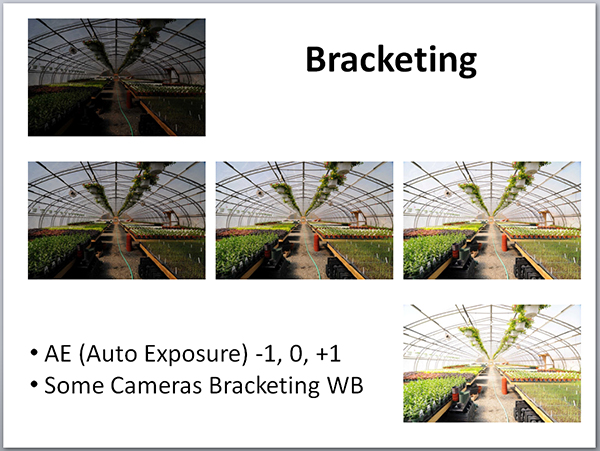
Is this the perfect list? Not likely. And I could easily swap out Bracketing for something else. But I have had good success stressing these eight concepts and I believe that anyone who has a reasonable grasp of these can improve their picture taking.
3. Build a Powerpoint
Select images from your collection to illustrate each topic. One or two images for each is enough. I recommend using as little text as possible on your slides. Work from notes if you have to, but don’t encourage your audience to be reading the screen while you’re talking.
4. Emphasize Local Places
Dramatic shots of the Arc de Triomphe, the jungles of Malaysia and similar wonders of the world are cool—but most of us do 95% of our shooting a little closer to home. When you assemble your Powerpoint presentation, restrict it to photos of places everyone in the room can easily visit. And if you can, show them some interesting local places they may not have discovered.
5. Relax and Talk Your Slides
If you choose images that speak for themselves, you’ll have less to say. In any case, just relax and have fun. Sharing knowledge is a defining characteristic of mankind.

6. Schedule a Follow-Up Beforehand
It’s not uncommon for people to bring their cameras to the workshop and ask specific questions about operation. But there’s usually not enough time to help everyone. So my Wednesday night class is followed by a 3-hour (1:00 to 4:00) open session on the following Saturday. Everyone is invited to bring their cameras and their questions.
7. Ask for Feedback
The most important question you can ask students is what they’d like you to cover the next time you conduct a workshop. For example, at my last class, a few of the folks said they want to learn about image editing. I plan to touch briefly on editing this time, and if the response is sufficient I’ll ask the library if we can schedule a session for October.
Remember the words of the famous poet, Robert Frost. He said, “There are two kinds of teachers: the kind that fill you with so much quail shot that you can't move, and the kind that just gives you a little prod behind and you jump to the skies.”
—Jon Sienkiewicz


![]()
Get the Latest Photo Tips, News & Reviews from Shutterbug!
| Camera Reviews Other Reviews | Mobile Reviews Photography Reviews Columns | News | Features | How-To | Resources |
 © 2026 Shutterbug
AVTech Media Americas Inc., USA
All rights reserved