Remote And “Slaved” Flash: Adding Extra Light To The Scene
Slaved flash units are fired in one of four ways.
1. A brief burst of light from a flash triggers an optical slave.
2. An infrared beam emitted from a transmitter can do the job.
3. A radio signal (also from a transmitter) fires a slave unit.
4. An on-camera flash can trigger another flash.
Whichever method you choose, the purpose in using a remote flash is to be more creative with light. You can use multiple lights, side lighting, back lighting, and set up a lighting ratio similar to what can be done in the studio. All of this can be done with portable flash units, and all you need to make this work is the ability to fire one or more flashes wirelessly.
Optical Slaves
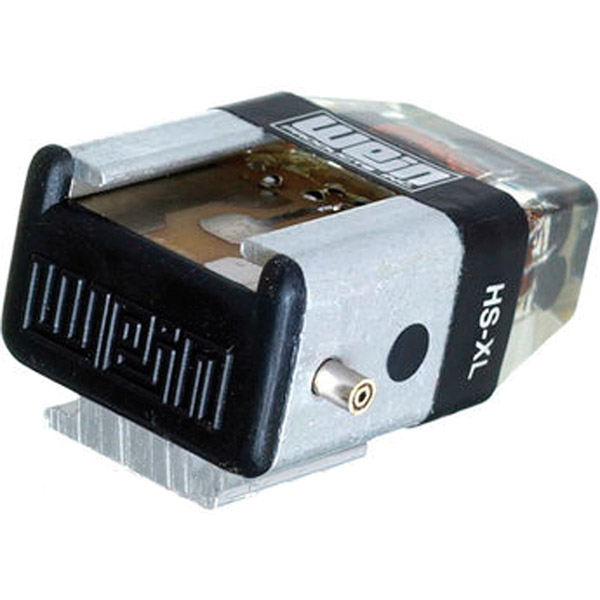
An optical slave is a small and relatively inexpensive device that slips onto the base of the flash unit. The Wein optical slave, HS-XL (#1) is an example (www.weinproducts.com). When another flash (such as an on-camera flash) fires, the optical slave detects that the burst of light is different than the constant ambient light, and it triggers the remote flash that it is attached to. A major advantage of using this system is that the on-camera flash unit doesn’t have to be electronically compatible with the off-camera flash. In other words, you can place one flash on the camera, and with an optical slave attached to another both units will fire. In fact, the on-camera unit could fire numerous flashes if all the remote flash units had an optical slave attached. This is the least expensive way to use two or more portable flashes wirelessly.
All Photos © Jim Zuckerman
The Wein optical slaves operate at remarkable distances. The HS-XL is functional up to 600 feet, and the SSL unit works to half a mile even in bright sunlight. These optical units don’t require a battery. They take a minute amount of power from the flash.
Infrared Beam
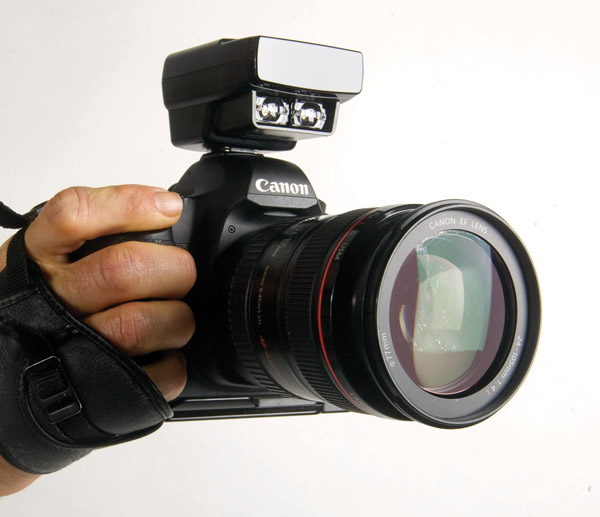
Wireless triggers are available with numerous units. Canon makes a wireless trigger they call the ST-E2 (www.usa.canon.com). Interestingly, it works with both Canon and Nikon flash units. This sits in the hot shoe of the camera (#2) and it sends out an infrared beam when the picture is taken. A receiver built into the second flash detects the beam and fires it. If any person or object blocks the line-of-sight from the flash to the ST-E2, however, the flash won’t fire.
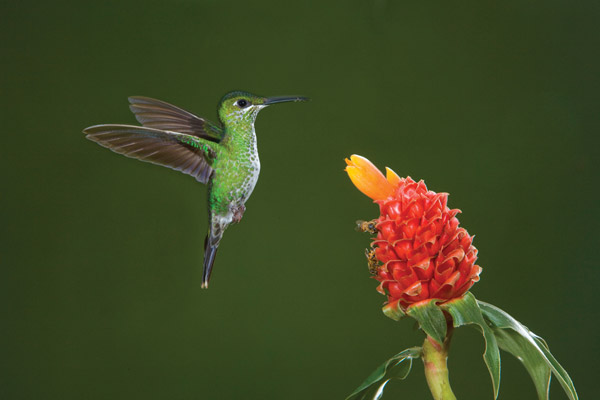
When I photographed hummingbirds in Costa Rica (#3, #4, and #5), I used the Canon ST-E2 with great success. I had four Canon 430EX flash units, three pointed to the flower that attracted the birds and one illuminating the background. All four flash units fired simultaneously when I took the picture, and in this case the infrared beam was unobstructed.


Note that when using the ST-E2, there is no light coming from an on-camera flash. You can see an example of this in the photo of an Indian model, (#6).

The undiffused portable flash was held above her face to create that pronounced shadow under the nose. This is referred to as butterfly lighting because the shape of the shadow beneath the nose resembles a butterfly, and it was a favorite type of lighting for movie stars of the 40s and 50s. The single flash was the only light source on her with no light coming from the camera position.
Radio Signals
A much more versatile wireless trigger is the Pocket Wizard (www.pocketwizard.com). This fires one or more flashes with a radio signal, thus it is no longer relevant whether or not there is line of sight between the transmitter and the receiver.
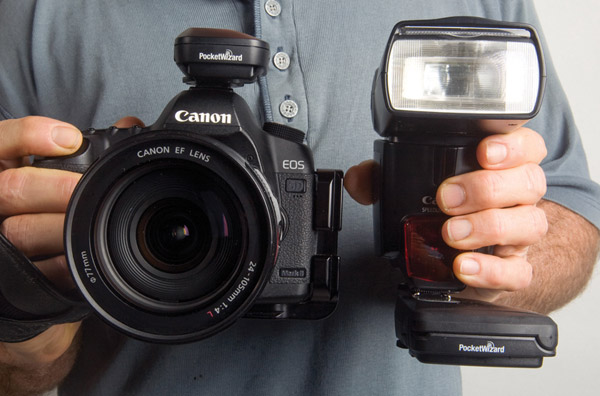
You need two things to make this work—the transmitter (Mini TT1) and the receiver (Flex TT5). In (#7) you can see both of these units attached to my photo equipment. They are small, light and you hardly notice they are there. For every flash that serves as a slave, you need a Flex TT5, but only one transmitter is needed to fire all the strobes. This system is obviously more expensive than buying a single Canon ST-E2 unit, but it is far superior. If you want an on-camera flash as well as the remote slaves, there is a hot shoe on the Mini TT1 transmitter that allows you to place a flash there.
The radio signal allows you to use the slaves at considerable distances from the camera. Depending on the flash and the amount of background radio signals, this could be from 40-200 feet. Firmware upgrades are coming very soon that will extend this range.
A nifty feature of the Pocket Wizard is that you can control the light output of the remote slaves from the camera. This saves you time (and the possible loss of photo opportunities) because you don’t have to run over to the slaves and manually adjust the exposure compensation.
The advantage of this kind of wireless trigger is that people or objects that get between the transmitter and the slaves won’t interrupt your shooting. The remote strobes will still fire. In addition, backlighting an opaque subject is not a problem at all. For example, in photo (#8), one of the flash units used in the set had a Flex TT5 attached and was placed directly behind the model. With the Canon ST-E2, that slave wouldn’t have fired.

In a festival where there are hundreds of people all around you, it would be virtually impossible to use a line-of-sight trigger device like the ST-E2. At the annual Sing Sing in Papua New Guinea, I used flash with a Pocket Wizard and asked an assistant to hold the flash for me so I could maneuver through the crowd of dancers and spectators, (#9).

Check with the distributor of the Pocket Wizard, the Mac Group, for compatibility with the flash you use, or plan to buy.
Hummingbird Photography
To successfully photograph hummingbirds so that their wings are tack sharp is such a unique and intriguing procedure that I thought I’d share it with you. All four flash units are set on Manual mode to 1⁄16th power. This means that the flash duration is about 1⁄15,000th to 1⁄16,000th of a second. This is fast enough to freeze the wings. However, this also means that the light output is significantly reduced. To compensate for this, the flash units that illuminate the bird and the flower have to be placed very close to the subjects. I fixed the flashes to light stands and set them up so they were about 15-18” from the flower. I put some nectar in the flower to attract the birds.
For the background, a 24x36” print of out of focus foliage was placed behind the setup. This was necessary because if the birds were exposed correctly, the background would be black. Since hummingbirds fly during daylight hours, a black background isn’t appropriate. Therefore, the out of focus foliage behind the flower and the birds looks completely natural.
I set the shutter speed to 1⁄250th of a second. In terms of freezing the birds in mid-flight, the shutter speed wasn’t relevant. It was the flash duration that was the determining factor. The lens aperture was determined by doing some test shots and then studying the LCD monitor on the back of the camera to assess the results. I determined that f/16 gave me a perfect exposure.
I took the pictures with a 70-200mm f/2.8 IS Canon lens from about 5-6 feet away. The hummingbirds didn’t object to my presence, and they seemed unaffected by the flash. I sat in a chair and whenever the birds came to drink nectar, I took pictures. Once the set up was put in place, it was probably the easiest wildlife photography I’ve ever done. Because the flash power was reduced so much, the recycle time was extremely short. I could fire at least two frames in a second continuously. Since it’s impossible to see whether or not the wing formation looked good at any one moment in time, I had to fire continuously when the birds were drinking. I threw away many shots, but there were a remarkable number of keepers.
The Master/Slave Relationship
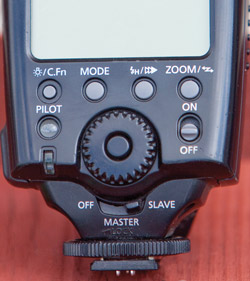
In order to trigger a slaved flash with another flash, the two units have to “talk” to each other. The way this is done is to set the flash in the camera’s hot shoe to Master and the off-camera flash to Slave. The locations of these commands vary, but they should either be visible on the outside of the flash (as you can see in #10, a detail of the Canon 580 EX) or in a menu of some kind within the flash. The Canon 580 EX II, for example, has the Master/Slave switches in a menu accessed from the back of the flash. The master flash sends out an infrared beam that triggers the slave.
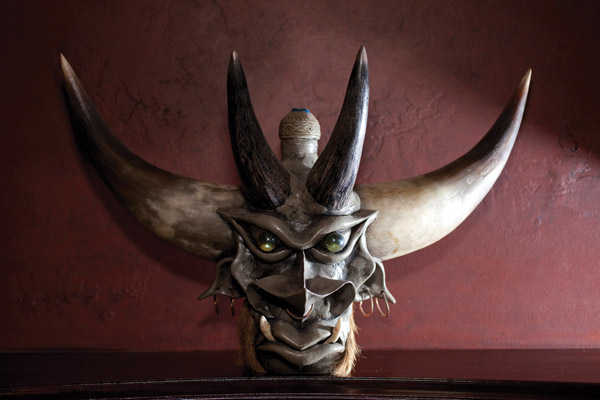
There are different ways you can use two portable flash units. For example, you can make one unit a main light and the other one can be a fill. This is what I did in the picture of a mythical creature from Peru, (#11). I placed a flash on its side on the shelf to the right of the subject and I reduced the power output of the on-camera flash by minus 11⁄3 f/stops. I placed the pocket diffuser from Dotline over the on-camera flash to minimize glare, and you can see how the side lighting is the main light while the frontal flash took the role of the fill light.
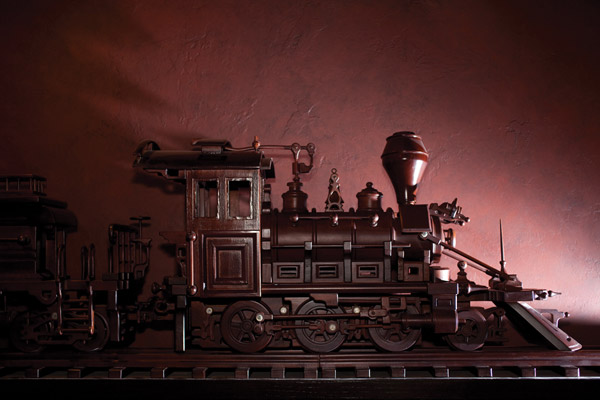
A similar type of lighting illuminated a hand-carved railroad engine, (#12). The varnish on the mahogany was quite shiny, so my first consideration was to prevent that from reflecting the flash. The main light was placed to the side at a 90˚ angle. I allowed some of the spill to create a shaft of light on the textured background because I thought that added some drama and dimension to the image. For the on-camera master flash, I used the pocket diffuser again to soften the frontal lighting. I reduced the exposure from the master by minus one full f/stop.
It is possible to create backlighting even though the line-of-sight must be maintained between the master and slave. If you position the off-camera flash behind the subject but slightly to the side, the wireless sensor can then see the beam from the master. That’s what I did in (#13). I wanted the edge of the black quartz to glow from a light behind it, and at the same time I felt it was important to show the detail in the front.

When I was shooting water drops on leaves after a rainstorm (#14), I used the on-camera flash to trigger a second flash placed on the ground pointing upward. I reduced the light from the master flash to minus 12⁄3 f/stops. This provided a hint of front lighting while most of the illumination came from the slaved flash that was hitting the slender leaf from behind. In this manner I was able to show surface detail as well as make the leaf seem like it was glowing from within.

- Log in or register to post comments
