- REVIEWS
Camera Reviews 
More Reviews Mobile Reviews Photography Reviews - GALLERIES
- VIDEOS
- BUYER'S GUIDES
Personal Project: Architectural Layers: Lighting For Post-Processing
All Photos © Mike Butler
Having been a practitioner of architectural photography since 1994, I was trained in the “old world” 4x5 film protocol. From the very first days when straight chrome moved to scanned negative, a gateway to full digital, I saw the almost Alice in Wonderland down the rabbit hole possibilities that were overcoming the industry, namely the possibility that I could shoot multiple exposures with varying lighting setups and combine them later in Photoshop. In lieu of 12 lights, a case of clip-ons, and a few Fresnels, I could bring only three lights and duplicate those three lights into 100 if I so desired.
Over the years, starting with scans from 4x5 negatives, I explored the parameters and pitfalls of this technique. Although transitioning to full digital incurred a steep learning curve, I soon saw the savings in the cost of film and processing, the lack of requiring long exposure times of film, and later how HDR changed the way many architectural photographers work. Yet, I also saw how HDR lacked the ability to bring out texture and hues hidden just below the surface, a nuance that can only be extracted with a skillful use of lighting and Layers.
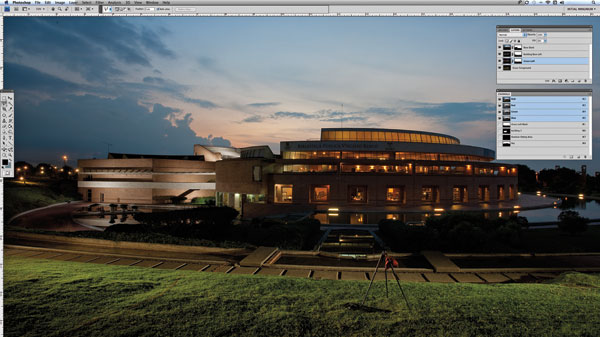
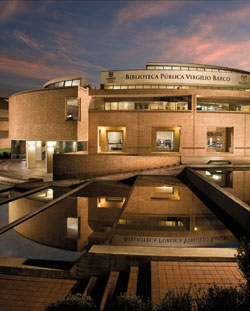
The basic concept of the shooting style is this: given that the camera, fixed to a weighted tripod does not move and objects in the field of view do not move, it becomes a simple task of previsualizing the final lighting outcome, and shooting, say, three lights at a time, moving them to each area of the space. Each time this move is made it effectively doubles the number of lights used and the complexity of the shot increases proportionally. Through the years I practiced and refined this technique both on commercial jobs and on self-funded ventures. That’s how I worked for the Salmona Project, photographing the beautiful Virgilio Barco Library in Bogotá, Colombia, designed by Colombia’s greatest architect, Rogelio Salmona. Because of its massive size and Escher-like architectural complexity, it certainly offered up some unique lighting and logistical challenges. Yet, these challenges could be easily overcome using this hybrid multi-shot exposure technique.
Preproduction
When looking at the Salmona space, a certain amount of planning was required both in terms of angles and the application of lighting, as well as how it all would be combined later in Photoshop. It was imperative for me to visualize the final lighting in a single shot execution. Although you can randomly put lights here and there with no logic, it is immensely better if you mentally compare the single shot lighting setup with the hybrid setup, looking for similarities and differences and how those can be bridged. My aim was to maintain some semblance of reality, even if that reality is totally manipulated. It is of no use after the shoot, while sitting in front of the monitor, to have five exposures with different lighting setups that do not relate to one another.
I could tell right off the bat that the Virgilio Barco Library was so vast that using three lights at a time would be aesthetic suicide, as the flexibility of that technique would be totally outweighed by the postproduction. In short, the library shoot required techniques from both new and old world schools of photography. I would need to use the full allotment of lights traditionally required for a single shot, and because of the grandiose size of the spaces, implement that single shot lighting setup multiple times. Also because of the extreme logistics, I would need a full four-person crew along with a full maintenance staff and security if I had any chance of doing more than one shot a night.

Shooting
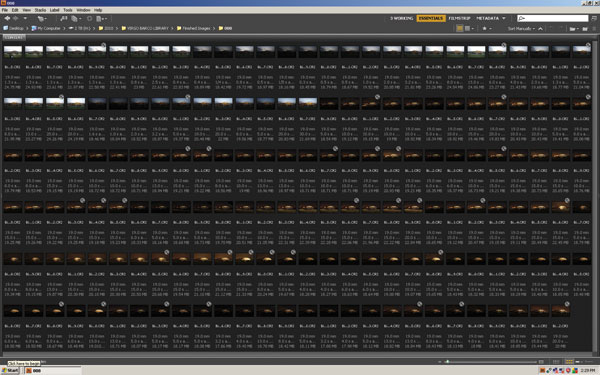
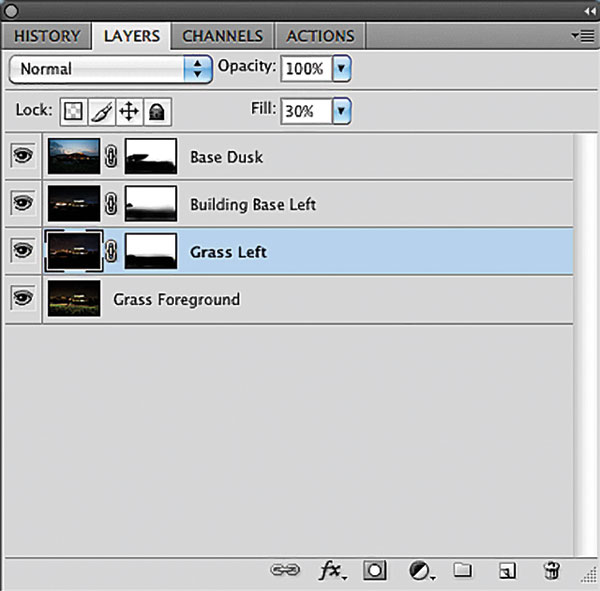
For the main exterior I stuck with Lowel DP hot lights for the simplicity and feel of the light. Just after capturing the dusk sky, I began the exterior shot by lighting a few main surfaces on the left side as a foundation. As the exterior shot progressed, these foundation lighting setups were moved so as to best implement a blending of planes. As I moved across the building, I noted that in order to blend the grass on the left side I would need to move from lighting the left background to a lateral foreground axis and continue that lighting using the small water effect as a termination point. I would use this termination point to continue and blend the lighting later when the right side background lighting caught up. Once the foreground was completed, I continued with the main structure, starting just to the right of where I left off, moving in a zigzag pattern, making sure everything would fit together later. Once the left side of the building was done I started on the far right, adding lights until the entire right facade was lit. I used this as my “right side” foundation for everything that followed, such as the grass and reflection image. Once all the compositional “puzzle pieces” and lighting were captured I was done for the evening.
Postproduction
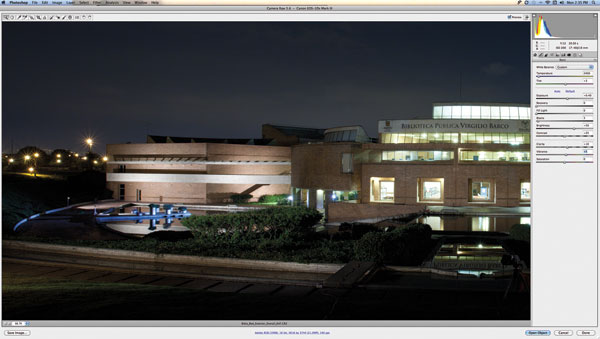
Postproduction becomes quite simple if the lighting and captures were done well. In this case, I began with the initial dusk image and started laying in lighting in the order that the frames were shot. This gives me a starting point, something that I continue as I move through the image. Being that all the images were shot in 16-bit Raw on a 21-megapixel camera, I had a ton of flexibility. (Although I have that flexibility and do sometimes use it, I try to always use exposures that don’t need a whole lot of processing or correction.)

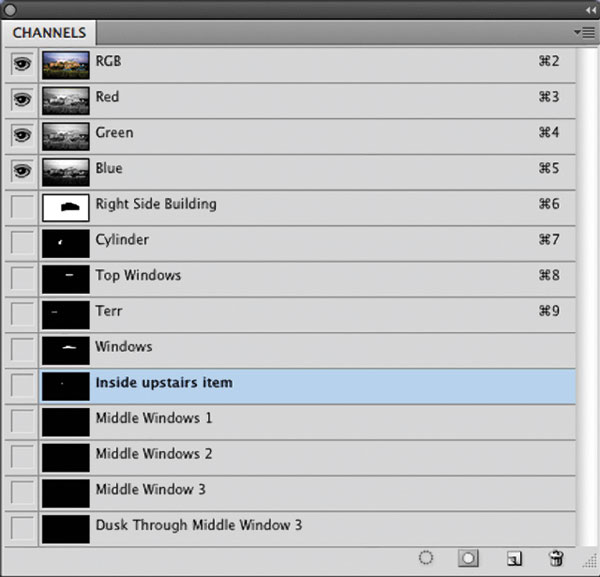
During Raw conversion the images need to stay consistent in tone, color, and contrast; if not, no matter how much time you put into lighting, the final image will not look right. From there it was the simple but tedious task of using Layers to stack all the images, blending them with the previous shot. Once the images for this shot were roughed in using Layers (about three hours) then the blend and polish began.
When time allows, I normally let the layered image sit for about a week after the initial “rough-in” before I start the refinement process. This stage of the work consists of moving through the image and cleaning it up, starting with the largest problems and progressively working toward the detail areas. I can also modify the overall thrust of the image depending on how I feel. After several sessions of this type of work the image begins to emerge as the “dull haze of preproduction” is removed layer by layer until, hopefully, a brilliant stone emerges. This is quite exciting because sometimes I think I have an amazing image just to find that I have nothing to write home about, and there are others, which I have no hope for, that turn out to be spectacular.
All this freestyling might on the surface seem to go totally against the near Teutonic nature of architectural photography. When you have 50 variables, any of which could ruin a shot, the last thing you would want to do is add another 50, but that is exactly what makes this style so dynamic. It allows the photographer who takes care and applies skill in lighting as well as preproduction and postproduction planning to indulge in all the wondrous possibilities of the craft without having to make an enormous investment in lighting and associated gear.
About The Author
Mike Butler first learned the core concepts of photography 20 years ago in Bangkok, Thailand, where he photographed the Bangkok streets, where, as he says, “the exceptional was every day.” He has been engaged in architectural photography for 15 years where he has gained a reputation for a completely unique and technically complex style of shooting. Butler brings these years of deep technical understanding, avant-garde lighting, and keen compositional skills to bear on his commercial projects. When photographing personal projects, Butler adapts these highly structured commercial elements to more complex logistical scenes. Whether he is camping with generators and lighting at 13,000 feet to photograph ruins, shooting in -10˚F conditions, or traveling through the complex and dangerous streets of Third World countries, Butler is always pushing the aesthetic and technical envelope.
To see more of Butler’s amazing work, visit his website at: www.mike-butler.com.


![]()
Get the Latest Photo Tips, News & Reviews from Shutterbug!
| Camera Reviews Other Reviews | Mobile Reviews Photography Reviews Columns | News | Features | How-To | Resources |
 © 2026 Shutterbug
AVTech Media Americas Inc., USA
All rights reserved