- REVIEWS
Camera Reviews 
More Reviews Mobile Reviews Photography Reviews - GALLERIES
- VIDEOS
- BUYER'S GUIDES
Nik Software’s Silver Efex Pro; A Monochrome Plug-In
In a world of oversaturated color, I’m always surprised at the popularity of black and white images. There is something magical about a well-crafted image in monochrome that is more expressive than any color image could ever be. In fact, it was black and white that first interested me in photography. So, with digital photography, I’ve often done black and white conversions with a varying degree of success. Early on, learning to use the Channel Mixer in Adobe’s Photoshop wasn’t always easy or intuitive, and some of the monochrome plug-ins left very little control over the final product—pick your film type and that’s it.
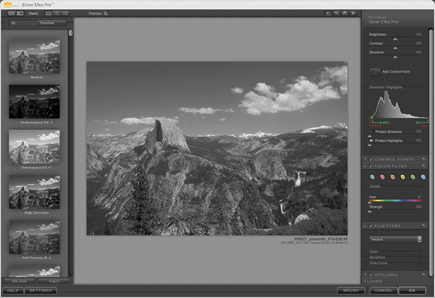
Silver Efex Pro is a new take on monochrome imaging from Nik Software. If you’ve ever used any Nik product the interface will be familiar (#1). Along the right side of the window are all the controls—Brightness, Contrast, and Structure, as well as a Shadows/Highlights control to protect important areas of the image from clipping. You also have a full set of color filters that can be applied at various hue and strength levels.
 |
|
|
Structure may be new for many. It works to enhance fine details in the image with positive adjustments, and diffuses with a negative setting. By default, these controls work globally on the entire image. Silver Efex Pro includes Nik’s Control Points feature to make masked adjustments, so if you want to enhance the sky and clouds in your image (as an example), you can create a Control Point on the sky to darken it while increasing the structure of the clouds (#2).
 |
|
|
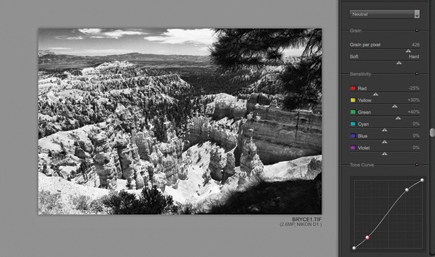
Under Film Types you’ll find a number of presets along with a full set of controls to adjust the effect, including the grain and color sensitivity along with a tonal curve. There is a tremendous amount of power in this one section of the plug-in, letting you fine-tune any adjustment. Many of the most popular emulsions are represented here, with a good range of ISOs and brands ranging from Kodak’s Panatomic X to Ilford’s Delta ISO 3200 (#3). You can also create your own look from scratch by selecting the Neutral setting.
 |
|
|
Silver Efex Pro has implemented a Grain Engine to emulate a natural-style grain. The Grain Engine bases its grain patterns on the exposure level for each pixel in the image, building the image from grain like traditional film does, rather than overlaying a noise pattern on top of the image. A good example of this is shown in #4. The lighter areas of skin tones have a smoother grain, while the darker areas around the eyes have a more pronounced grain.
 |
|
|
It’s easy to create a custom film type, either by starting with one of the preset types or from scratch, by selecting the Neutral type and building from that point with sensitivity to different color ranges, grain properties, and tonal curves (#5).
 |
|
|
Silver Efex Pro also gives full control over toning, vignetting, and edge burning through the Stylizing palette. There are a number of presets for toned images (#6), and adjustments can be made for both silver tone and paper color to let you recreate the real look of chemical toning and not just an Easter egg coloring. Vignette works in the normal way but adds the ability to set rectangular or circular as the shape, and to select the central point. Finally, Burn Edges allows you to selectively darken each edge with control over the amount, size, and transition. This is one area that I’d like to see improved in the next release—currently you must do each edge separately. I’d like to have the ability to burn all edges at once.
 |
|
|
|
| |||||||||


![]()
Get the Latest Photo Tips, News & Reviews from Shutterbug!
| Camera Reviews Other Reviews | Mobile Reviews Photography Reviews Columns | News | Features | How-To | Resources |
 © 2026 Shutterbug
AVTech Media Americas Inc., USA
All rights reserved