Minolta Maxxum XTsi SLR

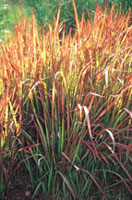
This cluster of tall grass at a local flower garden was strongly backlit with shade in front, so I put the camera on auto bracketing. The normal exposure turned out the best, but the bracketing feature assured me of having one really good exposure. (Maxxum XTsi, 28-80mm lens at about 70mm, program automatic on Agfachrome RSX 100.)
Photos © 1999, Robert E. Mayer, All Rights Reserved

The Minolta AF SLR cameras are aimed toward the entry photographer just purchasing their first SLR as well as more experienced individuals already owning some Maxxum equipment who need an additional camera body. Actually there are two practically identical lightweight models, the Maxxum XTsi and HTsi. The first thing you notice about these cameras is how small and lightweight they are when compared to the previous "si" models.

Both of these cameras combine the user-friendly features found in the Maxxum 500si base model with the more sophisticated capabilities found in the advanced Maxxum 800si. Both feature smooth autofocusing using a three-point Crosscut AF sensor that uses two sensors for better reading of contrast information for more accurate autofocusing.

The operating controls have been separated according to their functions. More basic operations of subject program modes and automatic functions are found on the right, or grip side, of the camera. More advanced functions are all accessed by a dial on the left side plus two buttons beside the lens. This intuitive control layout provides quick, easy operation for any skill level.

Both cameras offer rapid subject-program mode selection by accessing one of the five well-marked pictographs (icons) found along the top edge of the large LCD data panel. These include: portrait, landscape, close-up, sports action, and night portrait. By simply pressing a small button beside the LCD an arrow moves from one icon to the next. Once the appropriate icon is selected, the camera will automatically select the best shutter speed and lens aperture for the situation, leaving the photographer to only have to decide upon the subject composition within the viewfinder. If you ever want to return to the default basic program mode, simply press a large button labeled "P" just above the LCD which resets everything instantly.

The way the setting sun briefly struck my granddaughter Amy's face looked like she was in a spotlight. The nice smile makes her look like she felt she was on stage. The cameras metering compensated for the small bright sunlit face against the dark clothing and background to produce an excellent exposure on this quick grab shot. (Maxxum XTsi, 28-80mm lens at about 70mm, program automatic on Kodak Ektachrome Elite 200.)

Each camera has a sophisticated 14-segment honeycomb-metering pattern normally only found on higher priced AF SLR models. Logic technology continuously adjusts the metering pattern; weighing each segment according to the scene, subject's position in the frame, and the lighting conditions.

For rapid, practically instantaneous, response after switching on, the XTsi model includes eye-start automation. This cancelable feature informs the camera to activate both the autofocus and autoexposure systems immediately when it detects that the photographer's eye is close to the viewfinder. Then everything is ready to operate the instant the user frames the subject in the finder and decides to make an exposure. This can be a very helpful feature for fast-paced action or similar situations when you want to rapidly capture a fleeting image before it disappears.

Having a more powerful motor drive than found in previous entry-level models, these cameras feature an improved maximum continuous drive speed from one to two frames per sec.

Nine easily set custom functions permit each photographer to tailor the camera to conform to his or her shooting preferences.

The XTsi model also offers an user selectable grip/eyepiece sensor-start feature. It even includes a date back so you can imprint the date or time onto the lower right corner of the film image. A switch on the end lets you shift a film-plane mask inside the camera and the viewfinder for panorama cropping of the image. An electronic remote control socket and flash compensation round out the additional features found only on the more advanced model.

It's rather nice having the date function and panorama built-in so you can use these optional features when dictated by the subject, or the need to record the date permanently on any frame of film.

Another part of a local public garden provided an excellent situation when the panorama format could be used to capture this mass of red blossoms. (Maxxum XTsi, 28-80mm lens at about 50mm, program automatic on Agfachrome RSX 100.)

Merely turning the left control dial to the Multiple Exposure (ME) and exposure bracketing symbols does not immediately bring these handy features into use. You also have to press in on the central Func button in the middle of this dial, then turn the knurled dial in front of the shutter release. The LCD panel will then show both icons with either Off or one or the other of the two icons indicating that feature is in use. As a reminder, the active icon will still remain visible on the LCD until it is canceled after use. The only exposure bracketing offered is by 1/2 stop increments, but this is more than adequate for most conventional lighting situations. I found it effective and simple to access when I purposely selected some severely backlit subjects, which I felt, might challenge even the sophisticated 14-segment honeycomb patterning metering on sensitive color slide film.

If you want to be selective in the autofocusing area and not use the standard wide area, three sensor system, simply press in and hold down a large button on the back labeled "AF" to engage the center circle focus area focusing. This will lock and hold the focus and exposure and you can recompose the subject off-center.

Sometimes you want to use selective metering found in the center spot of the viewfinder without also locking the focus. To do this, just press your thumb on a button labeled "Spot" located just below the LCD. Now the spot metered reading is retained until you make an exposure, or release the button.

My brother takes in stray animals until the owners can be found. This black cat kept a wary eye on me for several pictures, then decided I was no threat to his tranquillity. The program automatic flash exposure brought out his whiskers and fur detail vividly. (Maxxum XTsi, 28-80mm lens at about 70mm, program automatic on Kodak Ektachrome 400X.)

Exposure compensation is available for bright scenes such as those encountered at the beach or in snow, which can bias any camera's metering system. To activate this feature, press in on a button beside the lens labeled "+/-" then turn the control dial below the shutter release until the desired compensation value appears in the LCD panel. Up to three stops plus or minus is available in 1/2 stop increments.
Most photographers use their flash as the main and dominant light source for taking pictures in low-light situations. But this is normally combined with a faster synch shutter speed, which does not take the background illumination into consideration resulting in a properly exposed person in the foreground against a darkened background. For more realistic pictures you should first meter the background then provide the proper amount of fill light for the foreground subject. To accomplish this quickly, simply press in and hold the "Spot" button for slow synch flash fill balanced to ambient light. The camera will select the proper shutter speed to record the background, then fire the flash to balance with the background for a far more pleasing picture.

As is the situation with many of today's cameras having a tiny pop-up, built-in flash unit that's not much above the camera body, when used with some zoom lenses at their wider focal lengths the lens can cast an arched shadow in the lower portion of the image. This is more likely to occur when the lens hood is left on the lens. The instruction book even lists several lenses with hoods that should be removed when using the built-in flash. The 28-80mm lens with this camera did cast a shadow when the hood was left on at the 28mm focal length.

Practical Test Results. During a month's testing of the Maxxum XTsi I was provided a 28-80mm f/3.5-5.6 zoom lens. I exposed many rolls of sensitive color slide films including Agfachrome RS 50; Fujichrome Velvia 50; Kodak Ektachrome E100S; Ektachrome Elite 100; new Elite Chrome 200 Select; and Ektachrome 400. All of the color slide film was processed by Accu-Color Lab Inc., Fort Wayne, Indiana. In addition, I exposed several rolls of Kodak Gold 100 color negative material since this will be the prime film many typical customers will expose. I also used some older Maxxum mount lenses I have including an MC 70-210mm f/4.5-5.6 Vivitar to be sure this new camera operated properly with older lenses, too. In addition, I used my Metz 45CT-4 handle mount flash when additional flash intensity was needed.

Rudimentary brick wall testing with the camera on a sturdy tripod, with autofocusing of the lens wide open on aperture priority automatic exposure showed excellent detail across the image area at 28, 50, and 80mm. There was a bit of barrel distortion at the 28mm setting and a slight bit of darkening on the corners. Stopped down to f/11 the detail was also excellent. At 28mm the flash produced slightly darkened corners, but this is an extremely severe test photographing a flat, blank subject, something that would seldom be done in actual routine shooting. As the instructions warned, there was a dark rounded area in the lower portion of the image when the flash was used at 28mm with the lens hood on. When the lens hood was removed, there was no shading at this focal length. The lens hood does not cast a shadow into the lower portion of the image frame at any other focal length.

All of my test images were consistently sharply detailed across the film frame and precisely on target when the standard three-point autofocusing was used. For unusually positioned off-center subjects the handy focus hold feature was employed. Exposures were proper under all types of lighting conditions outdoors in sunlight or cloudy bright conditions, or inside using only existing light with the automatic flash canceled. The autofocusing was rapid and accurate and I did not encounter any unusual condition that challenged it even though I purposely took a lot of low-light level interior situations using fast ISO 400 film with the flash canceled. The autofocusing speed and accuracy was impressive with the standard zoom lens and my older Vivitar lens to say the least.

The tiny, pop-up built-in flash was convenient to have immediately available when some fill light was needed for strongly backlit outdoor portrait or flower close-up subjects. Often when this type of situation is encountered and you only have an auxiliary shoe mount or PC cord flash, the flash is not nearby, or it's too much bother to pull it out of the gadget bag and connect it to properly illuminate the backlit subject. So you just shoot and don't bother with the extra illumination. Having a built-in flash eliminates this dilemma. The camera's metering was so smart, the flash would pop-up by itself when exceptionally strong backlighting was detected. If this did not happen, I could simply press the flash button, turn the knurled control dial, and the flash pops up to produce proportionally balanced fill suitable for the dominant light. In every one of the dozens of situations when I used this synchro sunlight feature, the exposure was excellent with just the proper amount of fill light to balance with the prevailing existing light.

The tiny flash also did a respectable job when it was the only light source for interior subjects, or outdoors at night, but the usable range with ISO 100 film and a f/4 lens was a rather limiting 3.3-9.8'. I also used my powerful SCA 333/2 AF dedicated Metz 45CT-4 handle mount flash when brighter or off-the-camera flash was needed and as was anticipated, it worked perfectly in TTL automatic mode again producing excellent exposures. It was even possible to use the camera with AC powered studio flash units by jury rigging a peanut slave sensor inside a white shield taped around the built-in flash which was used to trigger the other units.

The XTsi which we tested has a less expensive kissin' cousin HTsi model which is all black, does not have the eye-start automation; panorama capability; built-in data back; and it does not offer remote operation. Otherwise it is nearly identical in size and weight to the more full-featured XTsi model.

The suggested list price for the Minolta Maxxum XTsi with 28-80mm f/3.5-5.6 zoom lens is $880; body only is $598. The similar black HTsi model, with the same zoom lens, lists for $770. Contact Minolta Corporation, 101 Williams Dr., Ramsey, NJ 07446; (201) 825-4000; accessing their Photofax at (800) 528-4767; or their web site at: www.minoltausa.com.

Technical Specifications

Minolta Maxxum XTsi
Lens Mount: Minolta A-type bayonet mount
Autofocus Type: Minolta's TTL phase-detection system with three-point CCD sensors AF Sensitivity (ISO 100): EV-1 to 18
AF Illuminator: When raised, flash fires to aid focusing in low-light situations
Exposure Modes: Programmed AE (P mode); Aperture-priority AE (A mode); Shutter-priority AE (S mode); Manual (M mode); plus bulb setting with metering index
Metering Modes: 14-segment honeycomb-pattern metering with spot metering available
Film Speed Range: Automatic setting for DX-coded films ISO 25-5000
AE Lock: Exposure locked automatically with focus lock. Spot AE locks with Spot button
Flash Compensation: +/- 3 EV in 1/2 stop increments
Shutter Type: Electronically controlled, vertical-traverse, focal-plane shutter
Shutter Speed Range: 1/4000 to 30 sec, bulb
Flash Synch: 1/125 sec or slower
Flash: Built-in pop-up; GN 39 (in feet ISO 100); coverage 28mm lens; recycle time three sec; pre-flash for redeye reduction available
Viewfinder Type: Roof mirror with built-in LCD panel on left side
Focusing Screen: Acute-matte, non-interchangeable
Field Of View: 90 percent of film frame
Drive Modes: Single-frame advance; continuous advance (up to approximately 2 fps); multiple-exposures
Self-Timer: Electronic with approximately 10 sec delayed release
Displays In Viewfinder: Panorama format internal mask in viewfinder
Power: Two 3v CR-2 lithium batteries
Dimensions: 5.3x3.5x2.4"
Weight: 13.6 oz (without battery)

X