- REVIEWS
Camera Reviews 
More Reviews Mobile Reviews Photography Reviews - GALLERIES
- VIDEOS
- BUYER'S GUIDES
Imagenomic’s Portraiture 2; Digital Retouching Plug-In
The art of portrait retouching was born after a professional photographer first delivered a print to a client who then complained, “I don’t look like that!” Digital software tools such as Imagenomic’s Portraiture 2 make it easy to retouch portraits and meet the subject’s expectations of how they think/hope/dream they really look. Portraiture 2 is a Photoshop-compatible plug-in that also works with Photoshop Elements. It will be compatible with Apple’s Aperture and Adobe’s Lightroom 2 via free automation techniques that will be available from Imagenomic by the time you read this. Check their website (www.imagenomic.com) for details.
 |
|
|
Before doing any retouching to an image file there are a few steps you can take before you capture that original photograph to ensure your portraits won’t need much retouching. Start by hiring a good makeup artist for the portrait session. Another way to minimize retouching is to slightly overexpose the portrait, making it slightly lighter and brighter than what your meter says is “correct.” Using either or both of these techniques will minimize any retouching challenges.
Digital Beauty
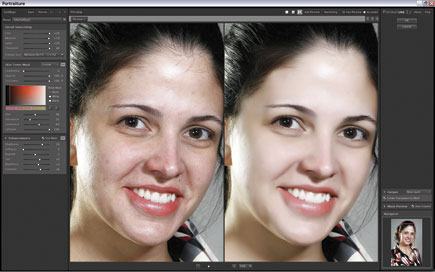
Portraiture 2 not only looks different from the previous version, it features plenty of improvements beneath the surface, is speedier, and supports multiprocessor systems for maximum retouching speed and workflow performance. The Mac OS version I tested ran noticeably faster than the previous version on my 2 x 2.66GHz Dual-Core Xeon processor-powered Mac Pro desktop computer. The large Preview window can be viewed full or split top to bottom or left to right, so you can compare the original to the retouched images at a glance. The new plug-in has an enhanced skin-masking control that isolates adjustments to the skin mask and offers eight style-based presets that, depending on your original portrait, can make retouching a one-click operation. You can also create your own custom presets and use the new Preset Manager to save adjustments from a specific portrait session and apply them later.
The built-in presets include Default, Smoothing: Normal, Smoothing: Medium, and Smoothing: High as well as Enhance presets for Glamour, (Skin) Tones, and High and Low Key. You can view the presets as text or as small thumbnails that use your image (visible in a vertical scrolling window). The interface includes lots of sliders that let you adjust the Skin Tones Mask where all of the retouching will be applied. The mask is controlled by a set of four sliders and a pair of eyedroppers that let you fine-tune the retouching if you have the time. (I’m always in a hurry.) There is also a set of six Enhancements sliders that let you apply sharpness, softness, warmth, tint, brightness, and contrast adjustments globally, or just to the skin tone mask. You can use the plug-in’s Bracketing feature that allows you to see several retouching alternatives on both sides of your preliminary choices in the Preview window, much like determining exposure using your camera’s auto-bracket feature.
 |
 |
|
 |
||
|
||
Real-World Challenge
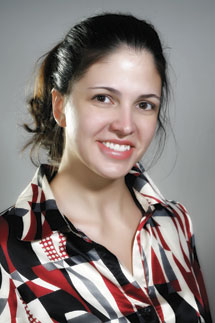
The plug-in performed perfectly when used with what could be called portraits from a “normal” session when I either had a makeup artist or a subject who was reasonably skillful in applying her own makeup. For this review I decided to take it one step beyond that and try a challenging photograph that was a “before” image of a model wearing no makeup. It is the kind of shot I usually do before a shoot for the makeup artist so she can have a “before and after” set.
|
| |||||||||


![]()
Get the Latest Photo Tips, News & Reviews from Shutterbug!
| Camera Reviews Other Reviews | Mobile Reviews Photography Reviews Columns | News | Features | How-To | Resources |
 © 2026 Shutterbug
AVTech Media Americas Inc., USA
All rights reserved