- REVIEWS
Camera Reviews 
More Reviews Mobile Reviews Photography Reviews - GALLERIES
- VIDEOS
- BUYER'S GUIDES
How To Take Great Photos in Low Light: Why Nighttime Is the Right Time for Outdoor Photography
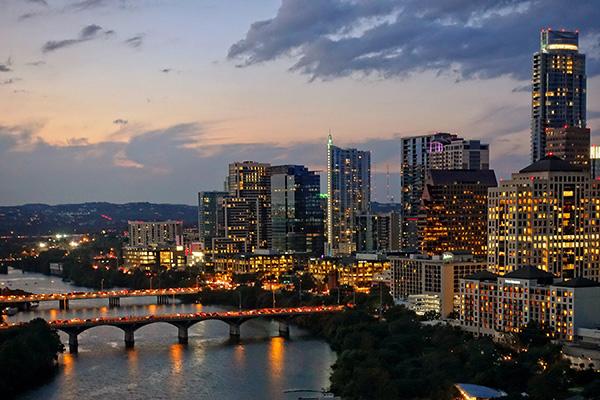
For many photographers, working with “existing light” means shooting during the day and stashing the gear after the sun drops below the horizon. But if you take that approach you’ll miss out on a whole realm of moods, special effects, and creative possibilities.
Floodlit monuments, shimmering cityscapes, evening street scenes, colorful fountains, and moonlit landscapes all offer the potential for great nighttime images. Even outdoor concerts are transformed by night into special scenes when photographed against a fading evening sky.
All you’ll need to get started is a sturdy tripod, a lens hood to eliminate flare from stray light, and a small flashlight to help you see your camera’s controls in the dark.
The best time to shoot is often immediately after the sun goes down while light is still draining from the sky and subtle shades of purple and orange provide an intriguing backdrop for your shots. Other times, framing your subject against a jet-black sky creates a very dramatic effect.
Exposure Calculations
The most difficult aspect of nighttime photography is arriving at correct exposure settings. The best way to begin is by using your camera’s meter to arrive at a rough approximation, then consider the specific scene you are shooting and adjust accordingly.
Let’s say you are shooting a street scene with a background that includes a number of bright highlights. The meter in your camera will be “fooled” by the extraneous light sources and your main subject may end up underexposed, appearing like a silhouette.
To compensate, you must increase the exposure either by opening up two or three f/stops, or by using a correspondingly slower shutter speed. With scenes in which the background is darker than your main subject, you’ll have to compensate in the other direction.
Let’s say you’re photographing someone standing in the glow of a bright streetlamp against an expansive black sky. This time, close down a stop or two or your main subject will be overexposed.
Rather than “chimping” by consulting your camera’s LCD after each shot, here’s a better approach: Once you’ve arrived at your best guess as to a correct exposure, simply improve your odds by bracketing—shooting additional shots in half-stop increments above and below your calculated exposure. That way you’ll have a selection of images from which to choose, and you’ll gain some experience in the process.
With more predictable subjects, like an evenly illuminated fountain, your best bet is to approach your scene as closely as possible to take an exposure reading, and then move back to recompose and make the photograph.
Special Effects
With a zoom lens you can create unusual effects at night by zooming the lens during a long exposure. Be sure your camera is securely mounted on a tripod and zoom smoothly. Exposure settings of at least 1/2 second are best for this technique.
Fireworks also offer opportunities for interesting nighttime images. The easiest approach is to put your camera on a tripod and then set the shutter to “B” (Bulb) for several bursts of fireworks.
You can also create unique effects by intentionally introducing subject movement into your photos with the use of slower shutter speeds. This could be the light trails of a passing car or the fan-like appearance of a musician’s drumsticks during a nighttime concert.
Other Tips
The temptation under low-light conditions is to use the widest lens aperture available. Even with expensive fast lenses, you’ll typically obtain better results by using a smaller aperture, compensating with a slower shutter speed, and using a tripod or other form of camera support. Not only do all lenses deliver greater resolution when stopped down a bit, but you’ll achieve more depth of field as well.
Similarly, don’t automatically set your camera to its highest ISO setting; otherwise image quality will suffer and you’ll likely add noise and other artifacts to your image. One rule of thumb is to avoid the two highest ISO settings that are available on your camera.
Other than these few considerations, you’re really only limited by your imagination and a bit of experimentation. So the next time you start packing up your gear after the sun goes down, think again: this may be just the time to get started.


![]()
Get the Latest Photo Tips, News & Reviews from Shutterbug!
| Camera Reviews Other Reviews | Mobile Reviews Photography Reviews Columns | News | Features | How-To | Resources |
 © 2026 Shutterbug
AVTech Media Americas Inc., USA
All rights reserved