- REVIEWS
Camera Reviews 
More Reviews Mobile Reviews Photography Reviews - GALLERIES
- VIDEOS
- BUYER'S GUIDES
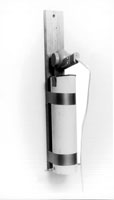
How To Build The Worlds Least Expensive, Easiest To Assemble Film Dryer
Next To A Coat Hanger And Two Clothespins
A coat hanger with one clothespin to hold the film on at the top and another to keep it from curling at the bottom worked well enough for me for quite some time. In my home darkroom--a large closet in the back bedroom--there is seldom a need to rush things. But when I recently purchased a new monolight (a step up from the good old hot shoe flash I'd been bouncing off an umbrella for years), I didn't want to wait hours between processing my test exposures and making contact sheets. So I invested the 20 minutes necessary to build a rollfilm dryer. The design for my dryer is based on a so-called Rapid Film Dryer I used many years ago while a photographer in the Navy. That wall-mounted unit consisted of a long metal tube with a blower at the top. It was designed to dry roll film still loaded on processing reels. You simply slid the reels up into the tube, fastened a little latch so they wouldn't fall out, and turned the timer on. Five minutes later your film was dry. We preferred this dryer over our old cabinet-style unit because it was indeed more rapid and, despite the tight ship our lab's Master Chief ran, it was the most consistently dust-free. There just wasn't any place for the dust to accumulate. Negatives dried in the Rapid Film Dryer did tend to curl, but were not particularly hard to handle because of it and eventually flattened out once they were archived. Materials You will need a 1.5-foot length of 4", light-gauge plastic drainpipe. If you shop in a big warehouse-style store, you'll probably have to buy at least a 5-foot length. Small hardware stores will actually cut a 1.5-foot piece. It cost about 85 cents a foot. You will also need a 2.5-foot piece of 1x4 lumber. I had some treated 1x4 pieces lying around, but any similar board will do. A 6-foot piece of 1x4 costs about $2.50. A roll of duct tape can cost as little as $1, depending on where you shop. Touch fastener tape sells for $1.88 in my favorite hardware store. A 5" piece of corrugated cardboard is usually free. And finally, you will need to acquire the high-tech part of your dryer--a blow dryer--purchased new for around $10 or from a thrift shop for $2 or less. I would have preferred a dryer with a "cool" or "air" setting. My dryer gets fairly hot, so I always use it on low. You will need an electric drill with at least a 3/8" bit, scissors or an Xacto-style razor knife, a wood saw (if you have to cut the pipe and lumber yourself), and a pencil. This film dryer is as easy to put together as it is inexpensive. Draw a circle on the cardboard using the drainpipe as a pattern, cut it out with scissors or a razor knife, and set it aside for later. Drill a hole through both sides of the pipe. You will slide a bolt or pencil through this hole to hold your reels in. Use duct tape to attach the drainpipe to the lumber with the bottom edge of the pipe at the bottom edge of the board and the holes on the right and left--just wrap the tape tightly around the board and pipe a couple of times. Positioning the pipe this way leaves a foot of board at the top for attaching the blow dryer and hanging the completed rig on the wall. Place the cardboard disk at the top of the pipe, position the hair dryer against the board with the handle facing you and draw a circle using the dryer nozzle as a pattern. Cut out the hole, slide the cardboard up the nozzle until it stops, then set the dryer with the cardboard disk attached on top of the pipe. Use an inch or so of touch fastener tape to secure the hair dryer to the board, then a strip of duct tape to secure the cardboard to the top of the pipe. Drill a hole at the top of the board for a screw or nail, and this lightweight, very efficient piece of darkroom equipment is ready to hang on the wall. It dries four reels of 35mm film in about five minutes. |


![]()
Get the Latest Photo Tips, News & Reviews from Shutterbug!
| Camera Reviews Other Reviews | Mobile Reviews Photography Reviews Columns | News | Features | How-To | Resources |
 © 2026 Shutterbug
AVTech Media Americas Inc., USA
All rights reserved