- REVIEWS
Camera Reviews 
More Reviews Mobile Reviews Photography Reviews - GALLERIES
- VIDEOS
- BUYER'S GUIDES
An HDR Primer; High Dynamic Range Photography For Those Who “Want It All!”
High Dynamic Range (HDR) photography is definitely the rage these days. Actually,
it's a bit more than a rage. It could give us a glimpse into the future
of photography. A brief overview is that several images are made at different
exposures, then the images are combined in software to create a single image,
which can show detail in the dark areas and in the bright portions of the image
that could not otherwise be resolved by the normal "dynamic range"
(or contrast capabilities) of the sensor.
One of the overriding issues in photography is dealing with the dynamic range
of a scene. For example, if the shadows and highlights have more than a three-
or four-stop exposure difference, the results will be blocked up shadows if
you expose for the highlights, or your highlights will be blown out if you expose
for the darker portions of the scene. In addition, averaging just doesn't
handle the wide contrast range; something gets lost.
There are ways to handle this "in camera." If the line between the
brightest and darkest parts of the image are somewhat square or easily defined
(like the horizon), then using a split graduated soft-edge or hard-edge Neutral
Density (ND) filter is quick and easy. I always carry my Singh-Ray split grads
with me. However, split grads won't work on very unevenly lit highlight
areas that can't be covered evenly with the filter, like a city skyline.
There is simply no distinct line to place the ND grad.
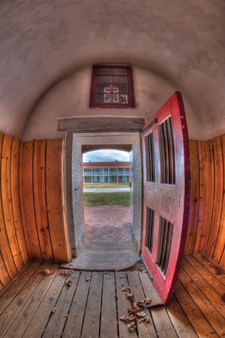
This is where HDR photography shines. For example, say you are photographing
an interior partially lit by exterior light. It's not unusual to have
an exposure difference of five, six, or even seven stops. Shooting a series
of exposures from --2 EV to +2 EV (five exposures) and then blending the
images in HDR is the way to go. The combination of digital imaging and HDR software
creates a valuable tool in the modern photographer's kit.
HDR Options
There are several ways to create an HDR image. Photoshop has a Merge to HDR
command in the Automate menu. There are several HDR software programs that are
excellent and have more controls than Photoshop's Merge to HDR, two of
which are FDRTools and Photomatix Pro. We'll concentrate on Photomatix
Pro (http://hdrsoft.com) for
the sake of this article because it's the software that I use these days.
I do encourage you to download a trial of FDRTools (www.fdrtools.com/front_e.php).
All HDR software programs are not created equal and you may find aspects of
one that work better or are more to your liking than another.
HDR Workflow
The easiest way to get started is to place the camera on a tripod and set the
camera to Aperture Priority. Make your first image with no compensation, then
using the exposure compensation dial make four more exposures: +1 EV, +2 EV,
-1 EV, and --2 EV. Another option is to make an exposure at average with
no compensation, then an exposure at +2 EV and one at --2 EV, for a total
of three exposures. Check your histogram to see that you have one image that
is completely within the histogram with absolutely no spiking on the right side.
If not, then shoot an additional one or two more images, underexposing to bring
down the spiking. That image will ensure that you have one exposure with nothing
overexposed.
For purposes of comparison we'll use Photoshop's Merge to HDR and
the two tonal mapping methods available in Photomatix Pro: Tone Compression
and Detail Enhancement.

Merge To HDR Let's have a look at Photoshop's Merge to HDR.
We will be merging raw files, which are preferred to achieve the highest dynamic
range.
Go to File>Automate>Merge to HDR.
Click on Browse and find the folder that has the raw files or you can drag images
to this box directly from Bridge. I find dragging faster and you can also see
the images that you want to merge, which saves time.
Either way, here's what you should see:
Click OK and the program combines the exposures in the Merge to HDR box. Click
OK and here's Photoshop's version of the HDR of this image:
 |
|
|
At the end of the conversion, there is a box with a histogram. You can move the fader around to see what details are present in the image, but this is not your final image. Save the image and reopen in Photoshop. Go to Image>Mode>16 bit. After selecting 16 bit, the following dialog box is opened:

The first three options in the drop-down menu give you little or no control.
The Local Adaptation command gives you the most control after clicking on the
Toning Curve and Histogram button. Slide the bottom left square to the right
to meet where the curve begins, then move the top rightmost small square in
toward the left in similar fashion, like you would do in Levels. You can move
the Radius and Threshold to taste. Overall, I find the controls quite basic
and limited. As you can see, the combination of exposures retained some detail
in the bright areas and inside the room, but the final image is pretty lackluster
and requires quite a bit more work to bring it to where I'd like to see
it.
Photomatix Pro
Now, let's have a look at processing the same shot through Photomatix
Pro Version 3.0. Upon opening the application, this window is presented:

After clicking on the Generate
HDR Image button, the "Selecting Source Images" window opens. Navigate
to the folder with your images that you wish to combine in HDR. Don't
forget that you can drag the images directly from Bridge into the Generate HDR
box.

After OK'ing through this box, this next box comes up for combining your
raw files:

It's a good idea to check "Align source images" just in
case some minimal movement occurred during the exposures. You can adjust white
balance here or leave it "as shot." You have the choice of Adobe
RGB or ProPhoto RGB. I have Adobe RGB selected here. When combining raw images
part of the box is grayed out, except the "Attempt to reduce ghosting
artifacts." This should be checked on if you have moving people or water
ripples. But, not checking it and letting the movement do what it does may also
render interesting effects.
Click OK to create your HDR image, which looks very different from the Photoshop
HDR. Think of it as your HDR raw file, and under the File menu, choose Save
as HDR. If you want to rework the image you can open it directly in Photomatix,
alleviating the need to reprocess. After pressing the Tone Mapping button on
the Workflow Shortcuts box, a new set of controls appear, along with the image
at the default settings. If you processed an image before the current one, the
previous settings will appear where it currently reads Default. Click on the
drop-down to select Default if you want to start from scratch.

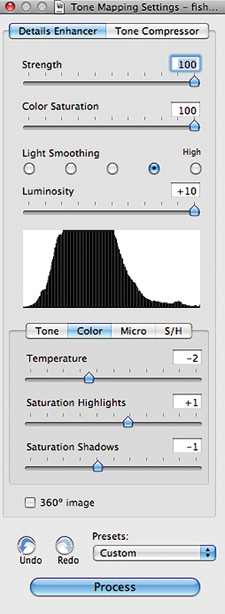
The top two settings are Details Enhancer and Tone Compressor. The Tone Compressor
option should be selected if you want to process the image to look more like
a true photograph. We'll have a look at the Details Enhancer first. This
is the option that I and many other photographers use exclusively because of
the many creative and interpretive controls.
Here's the final image after Tone Mapping:
Here are the four settings boxes under Tone, Color, Micro, and S/H adjusted for the image above.
 |
 |
 |
 |
The top section of all the boxes is the same. There is no formula or a specific
set of settings to master. It's all about what you want and the more you
mess around with the sliders, the more you get a sense of what works.
|
| |||||||||


![]()
Get the Latest Photo Tips, News & Reviews from Shutterbug!
| Camera Reviews Other Reviews | Mobile Reviews Photography Reviews Columns | News | Features | How-To | Resources |
 © 2026 Shutterbug
AVTech Media Americas Inc., USA
All rights reserved