- REVIEWS
Camera Reviews 
More Reviews Mobile Reviews Photography Reviews - GALLERIES
- VIDEOS
- BUYER'S GUIDES
Fix Dark Images in Photoshop with this HDR Trick (VIDEO)
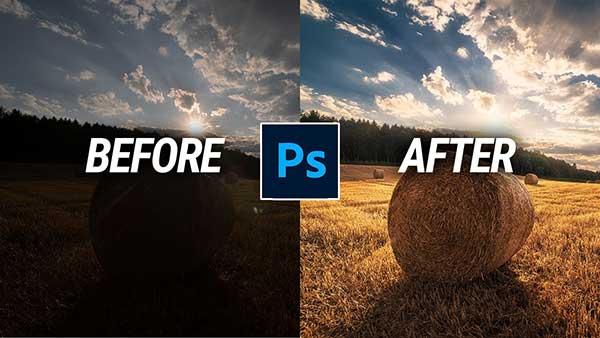
Sometimes the light just does not cooperate when you’re shooting photos. There are, of course, many ways to fix dark or unbalanced lighting in an image during post-processing but some methods work better than others.
In the below tutorial, Christian Möhrle of The Phlog Photography shows you “how to use HDR to tame harsh light conditions” and create photos with more balanced illumination. You can follow along and try Möhrle’s HDR trick by downloading his sample image here.
“As I was photographing directly against the sun, I had problems with over- or underexposing most of the image here,” he explains. “For that reason, I decided to combine multiple exposures to create an HDR image. Plus, I wanted to reduce the sunstar a lot since it made the image look too ‘dirty’ for me (here I simply blended the original with a second shot where I was covering the sun with my finger). This was all done in Photoshop and the Camera Raw editor.”
Step #1: Basic Adjustments
“First, I merged the HDR sequence in the Camera Raw editor. Then, I changed the profile to Adobe Landscape for more base saturation. The exposure was increased to get more details in the shadows. To prevent overexposure, I lowered the highlights. Furthermore, I increased the shadows and whites while dropping the blacks to keep some contrast.”
Step #2: Masking
“Using a Color range mask on the blue part of the sky, I made that darker by dropping the exposure. Another color range mask was used on the yellow tones of the field. Here, I increased the highlights the contrast and the clarity to make the field pop.”
Step #3: Color Grading
“First, I changed the hue of the yellow tones by bringing it down giving the field more of an orange color tone. I also brought down the purple hue just to have some more intense blues in the sky. In the luminance tab, I raised the orange luminance to further bring up the brightness of the field and dropped the blue luminance for a darker sky. For the split toning I used a warm color for the highlights and the mid-tones, while adding a very subtle blue tone to the shadows.”
Step #4: Merging & Blending
“I started by merging the two images (the base shot + the one where I covered the sun with my finger) and blended them using a layer mask. Next, I added some glow around the sun to reduce the ‘harshness’ of this area. Finally, I used a luminosity mask to make the highlights in the field even brighter.”


![]()
Get the Latest Photo Tips, News & Reviews from Shutterbug!
| Camera Reviews Other Reviews | Mobile Reviews Photography Reviews Columns | News | Features | How-To | Resources |
 © 2026 Shutterbug
AVTech Media Americas Inc., USA
All rights reserved