- REVIEWS
Camera Reviews 
More Reviews Mobile Reviews Photography Reviews - GALLERIES
- VIDEOS
- BUYER'S GUIDES
DxO Optics Pro 5.3; Raw Converter & Image Enhancer With Auto Or Manual Transmission
Whether you shoot raw or JPEG, whether you’re on the Windows or Mac platform, the latest edition of DxO Optics Pro, Version 5.3, offers sophisticated automated image enhancement and raw conversion. For advanced users, all controls can be fully tweaked manually as well. Furthermore, DxO says Version 5 is up to four times faster than Version 4.
Based on their own lab’s test data of camera and lens performance, DxO Optics Pro 5.3 provides natural color, smooth, detailed raw conversions and eliminates optical defects by removing lens distortion, vignetting, lens softness, and chromatic aberration. Furthermore, major perspective correction is at your fingertips. DxO first wowed me a few years back with its automated perspective correction for a wide angle lens. Contrast and exposure optimization facilitate highlight recovery and open up shadow detail. DxO provides local correction—each part of the image is treated separately—but there are no visible seams or halos.
 |
The raw conversion engine has been redesigned to produce more detail and fewer artifacts. Here’s how it works: noise reduction is performed up front, before noise has a chance to be amplified by the raw conversion process and degrade details. In techno speak, this means applying a new demosaicing algorithm that processes data from more distant as well as neighboring pixels to reconstruct detail. The results, according to DxO, are greater clarity, crisper details, and more true-to-life colors, along with significant reductions in graininess and other artifacts. For low-light shooting, noise removal can really clean up images shot at high ISOs, giving you up to two more stops of working range. This noise removal technology is specially tailored for each camera that DxO supports.
Specific Support
All automatic enhancements (which can be modified to your taste) are based on extensive testing by DxO of the cameras and lenses that it supports. These include cameras from Canon, Nikon, Sony, Pentax, Konica Minolta, Fuji, Kodak, Olympus, Panasonic, and Samsung, and lenses from these as well as Sigma, Tamron, and Tokina. Go to www.dxo.com to check exactly which specific models and lenses are covered. Incidentally, these profiles are included with the software—you don’t pay more for them. New profiles are added for download from the DxO website as new models are introduced and tested.
New Interface
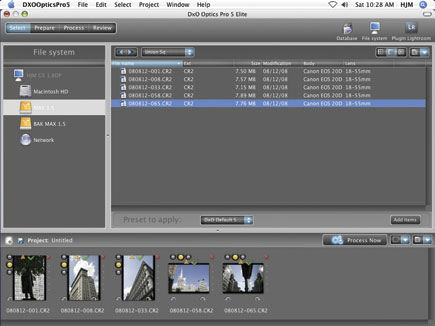
If you’ve worked with previous versions, the first thing you notice about DxO Optics Pro 5.3 is the new, streamlined interface (#1) as seen in the Mac version I tested. Designed to simplify and enhance workflow, four tabs are used to select each of four logical steps: Select, Prepare, Process, and Review. Clicking on the Select tab opens a Browse panel on the left where you navigate to the images you want to work on. If you select a folder, the pictures within it appear in the central Content panel, either as images or file names.
 |
|
|
For each one you want to work on, double-click it or drag it to the Project panel across the bottom of the window. You can name the project and save it or leave it untitled. Once in the Project area, each image can be rotated and given a star ranking. The presence of a check mark icon indicates that DxO has created a camera and lens profile for that shot.
Prepare Tab
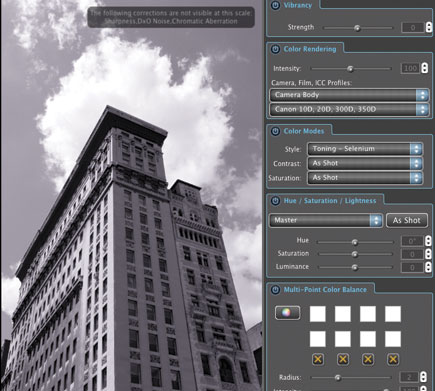
Click the Prepare tab and a new window will open, with the Project panel containing your selected photos in the same position at bottom. This Prepare window (#2) is where you’ll correct and enhance exposure, color, contrast, cropping, detail, and other attributes. To start processing an image, double-click on it in the Project panel and it will open in the main Prepare window.
 |
|
|
Note that a warning label superimposed over the top right of the photo indicates that certain corrections will not be visible at this scale. This info can be toggled on or off by clicking on the “i” icon in a turquoise circle at the right just above the photo window.
To the top right, you see a group of nine icons for palettes for Move/Zoom, Histogram, Presets, Exif, Light, Color, Geometry, Detail, and My Palette. To access the controls and adjustments for each palette, click on the icon and drop-down menus open in the right-hand panel. If you change a setting, then later want to return to the default, just click on the checkbox to the right of the palette.
The Presets palette lets you create, save, and apply preset adjustments you have made in the Prepare tab so you can apply them to a single photo or a group of photos later.
Light Palette
In the Light palette (#3) you adjust overall exposure, then you can choose a preset Highlight Preservation option—here set to Strong. Next, move down to DxO Lighting. Similar to Photoshop’s Shadow/Highlight tool, this will brighten the image depending on the light level of each area, without clipping either the shadows or the highlights, according to DxO. Further sliders adjust black and white points as well as gamma and contrast levels. Finally, a tonal curve is available for those who prefer it to sliders.
 |
|
|
Color Palette
Next in line is the Color palette (#4). Here, the Vibrancy slider—similar to that found in Adobe Camera Raw (ACR) and Lightroom—saturates low saturation colors more than highly saturated ones. The goal is a more natural look than that obtained from the Saturation adjustment, which is found under HSL (described below) within DxO.
 |
|
|
Color Rendering allows you to increase or decrease the intensity of color with a slider and via presets for different camera, film, and ICC profiles. These include “as shot,” camera body, color positive, color negative, black and white, cross-processed, and ICC profile. Choices range from about 25 different camera bodies to 12 color positive films to two cross-processed stocks.
Color Modes offers preset Styles, including black and white and six toning options with contrast and saturation variations. Here, I applied a selenium tone to a color original. HSL proffers Hue, Saturation, and Luminance sliders. The Multi-Point Color Balance tool allows you to set and modify color in up to four selected areas of your image.
The last Color palette option is to set the raw white balance. As in ACR, there are drop-down presets and separate Color Temperature and Tint sliders. If you don’t see these, click “show more options.” If you don’t like the default, try the drop-down choices such as Daylight, Cloudy, or Flash, and/or fine-tune with the sliders. If you fiddle with these for a while and don’t like the results, just go back to the top and select “as shot” to return to the original settings.


![]()
Get the Latest Photo Tips, News & Reviews from Shutterbug!
| Camera Reviews Other Reviews | Mobile Reviews Photography Reviews Columns | News | Features | How-To | Resources |
 © 2026 Shutterbug
AVTech Media Americas Inc., USA
All rights reserved