Create Dynamic Effects
Soften Up Your Product Shots

My favorite effect, applying select pieces of Scotch tape to a lens filter. This effect can look as good as anything I can dream up in Photoshop, and the high-speed film gives the whole scene an impressionistic look.
Photos © 1999, Jay Abend, All Rights Reserved

One of the things that many good photographers struggle with is sharpness. I have spent years of my life working on getting the most tack-sharp images, and have even written a few stories for your favorite magazine explaining some of the things that I do to make things really, really sharp. Now I'm going to go in the opposite direction.

If you ever have the opportunity to look through one of the big creative directories like The Black Book or the Photography Workbook, you'll notice that the styles of most photographers have changed over the years. My 1979 Black Book shows page after page of perfectly lit, perfectly exposed, tack-sharp pictures of red peppers on black Formica, and other typical studio shots of the '70s. My '98 book shows page after page of motion blur, excessive film grain, high-speed black and white work, and creative Photoshop expressionism. In today's competitive commercial photography marketplace, you've got to have an identifiable style to make it at the top, and that style has gotten looser and more expressive. In my world, which consists of lots of corporate brochures, magazine ads, and product shots, too much of a style can actually be a hindrance. Get known as the Apple Pie guy and they'll look elsewhere when they need a shot of a Blueberry Pie.

For overall diffusion I like clear packing tape. It's very soft and can kill the detail, but combined with some high grain it looks interesting.

I have made a living taking gorgeously lit, perfectly exposed pictures of people and products, but like all the other copycat photographers out there, I have been really energized by the changing photography scene. I now mix lots of sharp but predictable product work with some very different and usually soft product work. Lots of photographers have experimented with different levels of in camera diffusion, post-process Photoshop diffusion, and even commercial solutions like the Hosemaster and Turbo Filter lighting systems. Without investing in expensive equipment, there are a number of different techniques that you can apply to get interesting diffusion effects. The nicest of the softening filters are the Nikon diffusion filters or the Hasselblad Softars. Pop one on your lens, take your picture, and you've got a perfect soft image. If you shoot weddings, great. If you're trying to get some interesting effects for product work, forget about it.

One way to spice things up is to apply selective diffusion. One popular technique used by photographers has been to apply the diffusion filter to the lens for selected portions of the image. With a multiple flash head setup, you can darken your studio, open the lens, and fire off your main softbox with no diffusion. Then selected flash heads that only light small portions of the product or background can be popped while varying levels of diffusion are applied to the lens. I use this technique a lot and tend to prefer three or four flash heads mounted in Fresnel spots aimed through theatrical "cookie" scrims. I filter each of the Fresnel lights with varying levels of Hasselblad Softars, but leave one light undiffused.

Here is a simple setup. A daylight-balanced softbox, a white reflector card, and some creative Scotch tape. With Fuji 1600 loaded I can shoot handheld with no problem.

I'll assume that you probably don't have a studio full of high powered flash heads mounted in 10" Fresnel spotlights, so here are a few techniques that can look really great and can be done with the equipment you already own. 
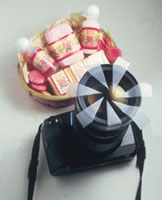
My first and favorite technique is the famed Scotch Tape Selective Diffusion Technique. (Hereafter referred to as STSDT.) Here's how I do it--using small flash units, a couple of photofloods, or some nice window light, I cut up small pieces of crystal clear Scotch tape and a few pieces of that slightly opaque "invisible" stuff. I then apply a small sunburst of pieces to a skylight filter, usually leaving one main area clear. I screw the filter on the lens and turn the filter around until the diffusion effect is to my liking. According to the brightness of the scene, the tape will diffuse the image or obscure it with a white frosty effect. You can experiment with clear packing tape, laminating film, and tiny pieces of Roscoe Toughlux. In the old days photographers put Vaseline on the lens, but this is a little cleaner and can deliver some dynamite looks. Obviously you'll need to experiment with tape on different areas of the lens, but this costs next to nothing so it is easy to mess around with.

As you can see from the photos I shot using the taped lens, the effect can be pretty nice. The tape is not enough to get a really impressionistic look, however. For that I like to shoot with some very high-speed film. For a long time everyone loved high-speed Scotch film for high-speed, high grain expressive work. I can't find that stuff anymore, so I use the Fuji Provia 1600 (RSP). This is really ISO 800 film designed to push process. I apply two stops of push for ISO 1600. The great advantage of the Fuji is that it has a very accurate color balance, but still exhibits the fabulous grain that gives the images that expressionistic quality. To shoot these images I used daylight-balanced lamps and shot handheld. With the amazingly high film speed you can work fast without a tripod and still get f/11 at 1/250 of a sec.

The tape and fast film can have a very dramatic look. Shot through a 50mm lens at f/11, just enough diffusion is present to soften the image up, and the film grain adds some extra style.

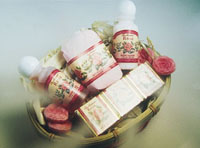
For the shot of the two colored goblets I chose a different approach. One of my favorite looks is to "frame" the product within a box of diffusion. While this works really well when shooting on a surface that has some detail, even on white this looks pretty cool. As you can see the right side of the image goes almost white, yet it looks like snow on a windowpane. With semi-opaque tape you can vary the effect by determining how much light actually falls on the surface of the tape and on how bright the scene is. The other shot of the goblets shows how effective overall diffusion can be when combined with fast grainy film. Here I applied a single sheet of clear packing tape over a skylight filter and fired off shots at different aperture/shutter speed combinations. Smaller apertures yield sharper images; wider apertures are softer and more romantic. For the overall diffusion look, I usually prefer a wide angle lens since this increases the sense of intimacy.

One of the nicest looks is to mix daylight-balanced light with little bits of warm tungsten light. I have often left the modeling lamps on when shooting flash with long exposures. After the daylight-balanced pop of the flash, the tungsten lamps burn in a little bit of red or orange color. Applied to the correct areas of the scene it can be really interesting. For a really dynamic effect, I pop darken the studio, pop the flash, and then drop the diffusion filter in front of the lens for the duration of the tungsten exposure. This gives you tack-sharp details, but a soft warm look all the way around.

The best way to develop a style that you are comfortable with is to experiment. Since I shoot a lot of digital images, I can play around in Photoshop without spending any money on film. That said, there is still a look that you can only achieve with film and actual optical diffusion. For inspiration I suggest that you get a hold of a major creative source book, whether for the country or just for your area. It's never nice to rip-off another artist's work, so use what you find for inspiration only. I don't know of a photographer who wouldn't be flattered to know that his or her work had inspired another artist.

X