- REVIEWS
Camera Reviews 
More Reviews Mobile Reviews Photography Reviews - GALLERIES
- VIDEOS
- BUYER'S GUIDES
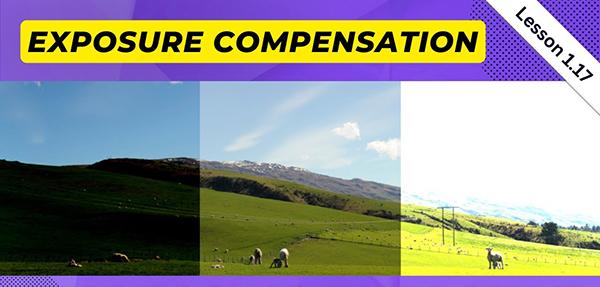
Camera Basics: Using EV Compensation to Get the Light Right (VIDEO)
One of the first challenges faced by inexperienced photographers is arriving at a correct exposure, and this can be particularly difficult when shooting outdoor scenes full of bright highlights and deep shadows. This tutorial explains how to take advantage of a simple camera setting that enables you to control the brightness of an image by instantly increasing or decreasing exposure.
Just about every camera has a feature called Exposure (EV) compensation that lets you override exposure adjustments when shooting in one of the camera's semi-automatic modes. You can even take advantage of this convenient trick when shooting in Program mode if your camera has that capability.
This tutorial from Great Big Photography World demonstrates everything you to know, and the technique is so simple that that it only takes three minutes to explain. Once you understand how it works you'll rarely have to worry about achieving accurate exposures, and you 'll be able to concentrate on other important variables like composition and focus.

While EV compensation enables you to decrease exposure when an image is too bright and take the opposition approach to open up dark photos, this episode is devoted to the later situation. But after watching the video it will be a no-brainer whenever you want to go in the other direction.
The unnamed instructor provides this common example: "At times you'll have too much light hitting the camera's sensor from the sky or background, and therefore the main subject of your image will appear too dark." This is where EV compensation comes into play by letting you modify the exposure settings calculated by the camera.
Simply put, "Dialing in EV Compensation toward the + symbol will lighten your exposure." Camera's typically enable you to do this in 1/2 or 1/3-stop increments within a range of plus or minus three our four stops. You can easily experiment to see how this works by going outside and making a few shots of a friend in the foreground with a bright sky overhead.

This technique offers other key benefits not covered in the video like when photographing scenes with a lot of bright snow. Because the camera's meter is designed to properly expose "average" subjects that have a value of middle gray, that's how snow will appear in a photo unless you add a stop-and-a-half of EV compensation.
The same holds true in the other direction when there's an abundances of blacks in an image (like a portrait of a black cat) and you don't want the subject to appear dirty gray.
There are many more beginner tips on the Great Big Photography World YouTube channel, so make sure you take a look when you have some free time.
We recently posted another straightforward primer with a beginners guide to properly exposing photographs when shooting with your camera's Manual exposure mode setting. As you'll see, capturing images in Manual is easier than you think.


![]()
Get the Latest Photo Tips, News & Reviews from Shutterbug!
| Camera Reviews Other Reviews | Mobile Reviews Photography Reviews Columns | News | Features | How-To | Resources |
 © 2026 Shutterbug
AVTech Media Americas Inc., USA
All rights reserved