- REVIEWS
Camera Reviews 
More Reviews Mobile Reviews Photography Reviews - GALLERIES
- VIDEOS
- BUYER'S GUIDES
Building Great Photos
Compositing Multiple Frames To Create One Great Image
By now you're no doubt
aware that you're being fooled on a daily basis. You know what I
mean--that new car looks much better in the brochure than in person,
that catalog full of furniture has the same sunset outside of every window,
and the weatherman on the local TV isn't really standing in front
of a giant map. Background Separation |
|||
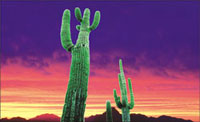
Surreal Composites--A great technique is to take a collection of original images and combine them to create a fanciful and surreal final image. For this other-worldly desert scene I took four original film shots of cactus plants taken in the Arizona desert. I scanned each cactus and carefully stripped them out from their backgrounds. I then scanned a rather spectacular desert sunset panorama shot I had and went to work. I placed the four cactuses on top of the background panorama layer. I moved them around and re-sized the various elements until I had a relatively nice grouping. Once everything was in the right place I went to work on the cactuses themselves. I used the Hue and Saturation controls to really enhance the color, and used Levels and Curves to really make these plants "pop." |
|||
Enhancing Reality--This shot taken on Las Vegas' famous Fremont Street has always been a popular image of mine. The original shot was the "Casino" sign against a black sky. To really make the image more dramatic I painstakingly traced the outline of every bulb on the edge of the sign, then deleted the background. I then took a shot I had of some palm trees in Los Angeles and stripped out one long palm tree. I placed the tree behind the sign and used the Lighting Effects in Photoshop to create the effect of a bright orange light in the middle of the tree. Once that was done I zapped up the color of the Casino sign by adjusting each color channel with the levels control. To finish it off I created a nice cloudy evening sky using the "Sky Effects" portion of KPT 6, a Photoshop plug-in. I think the finished shot looks realistic, but extremely wild.
|
|||
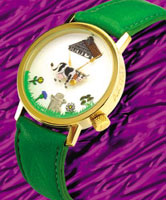
Compositing As A Production Tool --Special effects are nice, but sometimes a client asks for a look that is a lot easier to create in the computer than in front of the camera. A perfect example is this shot done for French watchmaker Akteo. In order to get the watches in exactly the right position and with the right strap curvature we needed to mount the watches on custom-made metal fixtures. To make the fixtures totally invisible takes a lot of propping and fiddling. In the old days we would struggle with each watch, hiding the fixtures and lighting the watch and the background as perfectly as possible.
|
|||
Today we have Photoshop, so the client has figured out that it is much easier, faster, and cheaper to just shoot two watches on a large fixture with a Canon D30, clip the watches out from their background, and then add a background and shadow later. Here you can see the original image in all its glory. Once the background junk is removed the watch is given a hot green background and realistic drop shadow. After a few hundred of these you get pretty good. |
|||
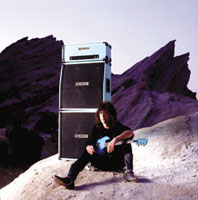
Adding Drama--I always loved this shot of rock guitarist Earl Slick, known for his work with John Lennon, David Bowie, Little Caesar and Phantom, Rocker and Slick. Shot just north of Los Angeles, the original was a dramatic shot and in my portfolio for years. Recently, when I revamped my book, I thought this image could use a little sprucing up. I found the original transparency and pulled a clean unaltered scan. Once I had the image in digital form I carefully clipped out the original bright afternoon sky, producing just the foreground on a layer. I searched through my files looking for a dramatic sky shot and found a very cool 35mm transparency shot from the Griffith Observatory overlooking downtown Los Angeles. Once scanned the image had to be pulled and stretched to fill the frame, and I had to clown a little bit here and there to remove the city lights at the bottom of the frame. Now I had the same image with an unbelievably dramatic sky, and it looks like it was shot that way. |
|||
|


![]()
Get the Latest Photo Tips, News & Reviews from Shutterbug!
| Camera Reviews Other Reviews | Mobile Reviews Photography Reviews Columns | News | Features | How-To | Resources |
 © 2026 Shutterbug
AVTech Media Americas Inc., USA
All rights reserved