- REVIEWS
Camera Reviews 
More Reviews Mobile Reviews Photography Reviews - GALLERIES
- VIDEOS
- BUYER'S GUIDES
Bowens’ Esprit Gemini Digital Monoblocs; New Controls And Versatility
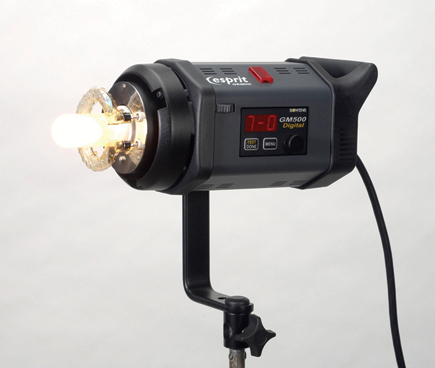
Bowens, a leading provider of lighting equipment and related accessories, is adding two new lights to its Esprit Gemini monobloc line: the Esprit Gemini Digital 250 (GM250) and the Esprit Gemini Digital 500 (GM500), which was the one tested here. While they are called digital units, they aren't targeted specifically at photographers who shoot digitally and are just as effective for photographers shooting film. The term "digital," in this case, is being used to indicate the controls of the new units, all of which are digital. In fact, one of the biggest differences between the original Gemini monoblocs and the new Gemini Digitals is the simplicity of making adjustments. Rather than having two large rotary dials on the side of the unit, found on the "analog" monoblocs, all of the GM500's functions are controlled by a small, single dial on the side. Settings such as the power level and modeling light controls are displayed digitally on an adjacent LED. And power settings are calibrated in tenths of a stop rather than thirds of a stop, as they are on models in the original Esprit Gemini line.
 |
|
|
The Panel Controls
There are two membrane buttons on the side, located below the display. One is
the Menu button, the other is the Test/Done button. There's also a slave
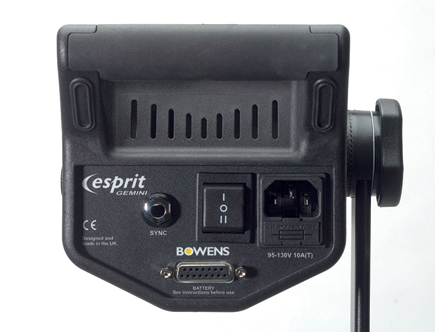
cell on the top, as well as a two-way power switch that makes it possible to
select the power source for the GM500, which can be AC power or the Bowens'
Travel-Pak, Turbo-Pak, or Explorer 1500 battery packs. And there is a sync socket,
a main AC power socket, and a battery pack connector on the back.
The default function for the control dial is the power level, which is adjustable
in tenths of a stop over a five-stop range, from 1¼32 to full power.
When going from a lower to a higher power setting, the flash automatically adjusts.
When going down in power, the power is dumped by flashing and recharging.
To access custom functions, press the Menu button next to the rotary dial. The
digital display can only show three characters, so you have to figure out the
function names by reading the instruction book. For example, the first function,
"LP," indicates the modeling light status. Once familiar with the
LCD abbreviations, though, they're easy to remember.
 |
|
|
To adjust the modeling light settings, press Menu. Rotating the dial selects
settings of OFF (OFF), Full (FL), Proportional (PRO), or User (USR). In User
mode, the modeling light can be set to remain at any setting from output level
5-10. Once the desired setting is displayed, press the Test/Done button to confirm
the adjustment and go up one Menu level. Turning the rotary knob brings up the
next function. Once all selections have been made, press Test/Done until END
is displayed. Press the button one more time to confirm the setting. That also
reverts the display back to the power level and sets the unit ready to fire.
All told, there are five main functions. The last main function, Advanced (ADV),
has four subsettings. They're not as easy to access, but then, they don't
need to be, since they don't need to be adjusted as frequently. In most
cases, it's a matter of setting them and forgetting them. All of the functions
are laid out in a logical fashion, with those likely to be adjusted most often
appearing first, down to those likely to be set once and forgotten. The only
setting that frequently needed adjusting after the initial setup was the power
level.
 |
|
|
Photocell Functions
One very useful capability is the unit's Photocell (PHO) functions. The
GM500 can be taught to ignore the pre-flashes from built-in or on-camera flash
units. That makes it easy for the light to be synchronized, through its built-in
slave, to the camera's flash for triggering, even when the camera's
flash emits pre-flashes. That way, the unit can be fired without a radio or
IR triggering system, or even a sync cable.
The Photocell slave cell can be turned completely off, or set to trigger on
the first, second, third, or fourth detected flash. The manual walks users through
a simple step-by-step procedure to set up the timing. Once that was done and
the settings were saved, it worked perfectly with the Nikon D2X and SB-800 flash,
with which we tested the unit. In the Slave mode, it was possible to move freely
about the studio and fire the GM500 in sync with the shutter and on-camera flash.
 |
|
|
|
| |||||||||


![]()
Get the Latest Photo Tips, News & Reviews from Shutterbug!
| Camera Reviews Other Reviews | Mobile Reviews Photography Reviews Columns | News | Features | How-To | Resources |
 © 2026 Shutterbug
AVTech Media Americas Inc., USA
All rights reserved