- REVIEWS
Camera Reviews 
More Reviews Mobile Reviews Photography Reviews - GALLERIES
- VIDEOS
- BUYER'S GUIDES
Beginner's Guide to Astrophotography: A Quick & Easy Tutorial on How to Take DSLR Night Sky Photos

(Editor's Note: This piece is an excerpt of a story by Charles Wade, which first appeared on NightSkyPix.com. Read the full story here.)
When I was a teenager, every year without fail, we would go on our family camping trip. It was our traditional yearly pilgrimage.
On a clear night and away from the city lights, I would look up at the sky and always be fascinated at the large cluster of shining stars deep in the sky. I would try and take pictures of them with our point and click camera, but usually, the images would come out just about black.
Things have progressed since those camping nights, and so has my experience with capturing the night sky. I have learned a lot (and made many mistakes) along the way. But I am always learning and testing new techniques because once you get past the initial learning curve, the images you can capture are amazing and rewarding.
So here is my beginner's guide to astrophotography, I’ve laid out everything you need to know in a step by step guide, by the end of it you be able to capture gorgeous astrophotography images, even if you’ve never touched a DSLR camera before.
What Is Astrophotography?
Astrophotography is just another subgenre of photography. While you have probably heard of the more traditional photography genres like nature, landscape, street, portrait, macro, and many others, astrophotography is all about capturing images of the night sky.
To be more specific, it's all about taking a picture of the night sky, and the spectacular (one might say mysterious) objects either you can see with the human eye (the moon and stars for example) or go even further into deep space photography like the milky way, nebulae or distant planets.
What Outcome to Expect?
By the end of this guide, you’ll have an actionable plan to go out there and start capturing your first images of the night sky, even if you’ve never attempted this before.
You’ll be quite surprised by how easy it can be to learn how to start astrophotography, now don't get me wrong, like most hobbies you can go overboard with equipment and the complexity of the whole process. But in this article, my goal is to give you an actionable and simple plan to start capturing your first night sky images.
Different Types of Astrophotography
If you're new in the world of starting astrophotography, you would think there is only one type of astro imaging, but as you see further down below, there are quite a few sub-categories of the topic. With each requiring their own specific type of equipment and set up to capture their image.
Below is a quick explanation of each of them.
Wide Angle Astrophotography
Wide angle photography is an excellent type of astrophotography for someone just starting out as it is the least technical.
With minimal equipment required, just a DSLR camera that you have lying about at home, a lens and a tripod you can capture some fantastic images with minimal investment.
To capture this type of image, you would need a wide or super wide angle lens for your DSLR camera. The types of images you would expect to capture would include capturing images of the stars and the milky way.
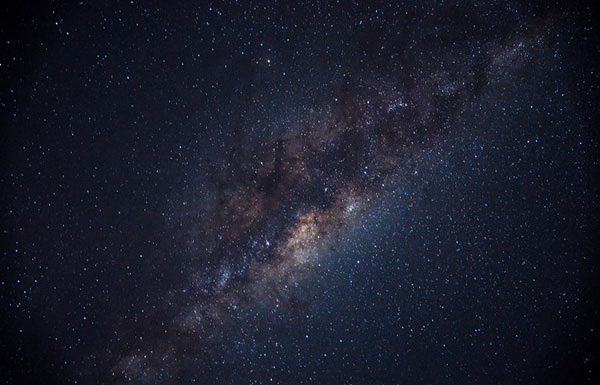
Milky Way Photography
With the milky way being some 25,000 light years away, it’s no wonder we can't see it with our naked eye. But did you know that a typical DSLR camera can capture it because it can capture more light than we ever can?
With some quick settings, you can capture a pretty impressive image of the milky way.
(Note: While the image capturing process is not too complicated, you will still need to do some photo editing and cleaning up to get it looking like the images below.)
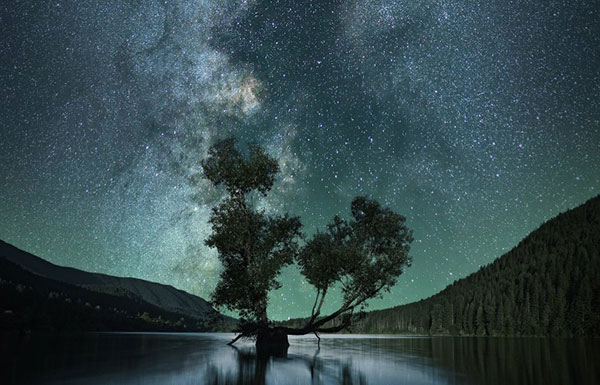
Landscape Astrophotography
Night landscape is a mixture of your local surroundings, such as mountains or trees with either the stars or the milky way in the background. Landscape gives you added visual interest to your image foreground and adds a nice contrast and definition to your images.
Time-Lapse Astrophotography
Another sub-category of wide-angled astrophotography is time-lapse. This is the art of capturing many (we recommend shooting 250 photos per sequence) images and then combining them to creating a spectacular time-lapse video.
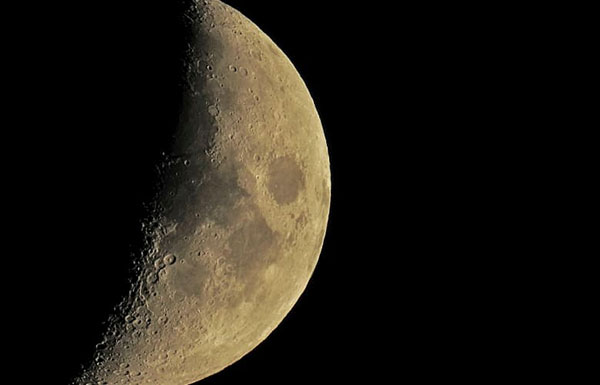
Solar System Photography
Now we're getting a little deeper into space; these images include capturing objects like our moon, the sun and all the orbiting planets in our solar system.
Depending on where you want to photograph, now we're getting to the point where we need to attach the camera to a telescope to get those breathtaking planetary shots.
(Note: Brightness usually isn't an issue here, but the steadiness of the camera and stability are especially important here.)
Deep Sky Astrophotography
Deep sky imaging is where I spend a lot of my time nowadays in this hobby. Capturing deep space astrophotography images can be some of the most spectacular photos you will see.
Here you are capturing images of objects like red and blue nebulae, other galaxies and their planets and solar systems.
The only downside to deep sky photography is the setup involved, to capture galaxies and nebulae, you will start to need equipment like a dedicated camera (CCD), astronomical telescope, equatorial mount, laptop (to control the CCD camera).
So here you need quite a technical setup, and it can get a little costly. But remember that with a bit of practice it won't take long and you’ll be able to produce some stunning and unusual pieces of imagery with deep sky astrophotography.

Understanding the Image Process
So, you have to take all these images on your camera and now what? Here I give you a quick bird's eye view on what's involved after you capture your images.
Later on, in this article, I go into detail on how to process your images but right now here is the basic outline on what's involved.
Capturing Deep-Sky Images - The Basic Process Is This:
Steps to setup your DSLR or CCD camera and telescope.
- Pick an object and set the camera focus
- Capture multiple long exposure images
- Transfer those images onto your computer.
- Layer and combine those images to eliminate the noise from the pictures
- Edit the picture with editing software (like photoshop) and correct the brightness levels of the image.
Plan Your Astrophotography Shoot
Ok, now you know what type of astro images you want to take and you probably already have most of the essential equipment at home (like a DSLR camera and a tripod).
But before you learn how to take astrophotography pictures, there are some things you need to plan, or you could be very disappointed with the results you get.
Keep reading below to make sure you can capture the best possible images on your photo shoot.
Light Pollution
The first step is to find the darkest spot possible for your astrophotography setup.
A good location is where there is minimal to no light pollution. While your backyard might seem dark, that doesn't mean there is not a large amount of light pollution in the atmosphere. This is what we need to avoid as too much light pollution (lights from your town or city or even street lights) can hurt your images if you don't adjust for them.
To help you in that task, I’ve added a list of apps that do as I mentioned above. Locate where you live and see where the light pollution is coming from. Then you can also see the darkest surrounding areas to find a suitable spot to set up for your photography shoot.
DarkSiteFinder.com - this site name doesn’t leave a lot to the imagination but does precisely what it says. An excellent tool for finding dark sky locations, you can use this pretty much anywhere as it covers the entire earth.
Lightpollutionmap.info - Another site for track light pollution and is useful for finding dark photography locations close by.

Read the full version of this astrophotography tutorial with additional text and images on NightSkyPix.com.


![]()
Get the Latest Photo Tips, News & Reviews from Shutterbug!
| Camera Reviews Other Reviews | Mobile Reviews Photography Reviews Columns | News | Features | How-To | Resources |
 © 2026 Shutterbug
AVTech Media Americas Inc., USA
All rights reserved