- REVIEWS
Camera Reviews 
More Reviews Mobile Reviews Photography Reviews - GALLERIES
- VIDEOS
- BUYER'S GUIDES
5 Tips for Budding Landscape Photographers: If I Knew Then, What I Know Now…
(Editor's Note: Jimmy Arcade is a landscape photographer and a member of Datacolor's Friends with Vision.)
I am a landscape photographer who has had no formal training in photography. Some photographers know—early on in their lives—that they were born to be photographers. I, on the other hand, was a late bloomer and didn’t know what I wanted to do until well after my college years.
Most of the key lessons I’ve learned, along the way of my own landscape photography journey, have been through trial-and-error. I have some epic failures and small wins under my belt, to show for it.
In this article, I’ll be sharing some nuggets of wisdom I wish someone would have shared with me early on in my journey as a landscape photographer. Here are five key lessons I have learned along the way:
#1: Exposure: Your camera’s LCD lies to you!
I started in photography with a 35mm SLR film camera. With film cameras, you didn’t know the outcome until the film was developed. Crazy to think about now, right?! When I made the digital leap and started shooting with a DSLR, I was stoked that I could see image on my LCD monitor and verify the exposure by the brightness!
While the exposure looked good on my LCD, I would later find many of the images were overexposed or underexposed. What I didn’t understand is, while my film camera hid the photos, my digital camera lies to me!
When referencing the LCD monitor (or electronic viewfinder) brightness to confirm accurate exposure, you are not accounting for a couple of factors:
First, cameras auto-adjust brightness of the display, based on the amount of ambient light available. If it’s bright outside, the camera will decrease brightness of the display. If it’s dark outside, the camera will increase brightness.
Second, ambient light can also impact your visualization of exposure. In bright sunlight, the LCD looks darker, so a correctly exposed image may appear underexposed. In a dark setting, the display looks brighter, so a correctly exposed image could seem overexposed.
These factors make it nearly impossible to confirm exposure by eyeing brightness on the LCD monitor.
Tip: Review the histogram to confirm exposure accuracy and ensure shadows and highlights are not being clipped. To maintain highlights, consider enabling the “highlight alert” feature, if your camera supports it.
#2: Exposure - In-Camera Light Meters Exposed
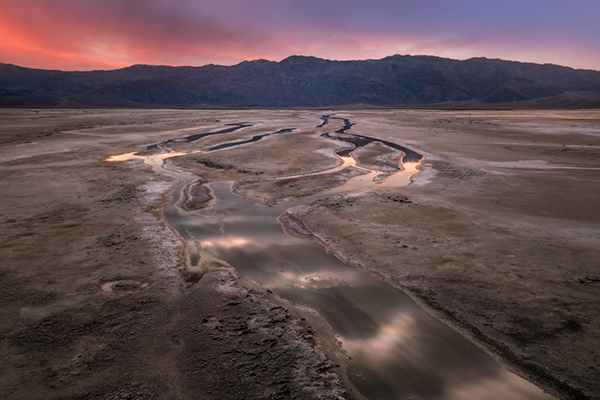
When I first started using a DSLR, I was relying almost entirely on my camera’s built-in light meter for measuring exposure. For scenes with less contrast, the camera did a decent job of metering and I was satisfied with the results. In scenes with extreme tonality such as sunsets, snowscapes, and expansive black or white backdrops, in-camera metering would lead to blown-out skies, grayed out white tones, crushed black tones, and other issues.
What I didn’t realize is I was losing a good amount of my camera’s sensor data, in the shadows and highlights. As a result, the dynamic range of tones in my raw files was incredibly limited. There was very little I could do to recover the highlights/shadows, without introducing artifacts or noise to my images.
While I wouldn’t discourage anyone from mastering metering modes for exposure, the metering can be time-consuming when you’re shooting in the field and the ambient light is always changing around you.
Tip: Learn to read your camera’s histogram and base more complex exposure decisions off that reading. Get to know how extreme white and black tones can impact histogram readings and adjust accordingly. Expose to the right to maintain highlights. If you can’t capture the full dynamic range of tones in one shot, embrace exposure bracketing and blending. These techniques can help you salvage your raw data and result in more tonally rich images.
#3: Perfection is the enemy of progress
I often refer to myself as an imperfect perfectionist. While my tendency toward perfectionism can lend itself well to improving my artistry, it can also be a major impediment.
I can find myself so focused on getting everything right, that I don’t look up enough at the scene before me. Within a moment’s notice, a temporary lighting change could drastically alter the landscape and create that magical composition photographers dream of. If I am too focused on the minutia, I miss those unique moments.
For example, when I started learning how to focus stack, I would look through my LCD loupe and ensure each step on the focus ring was accurately dialing in the focus. For each focal point, I would zoom in with 10x magnification and verify each section was perfectly in focus. But I was missing the light show!
I’ve since learned to focus stack by incrementally spinning the focus ring to approximate focal distances and snapping several shots with each micro-adjustment. I almost always nail the focus this way and it allows me to pay attention to the changes in the landscape.
Tip: While I certainly encourage fellow landscape photographers to strive for perfection, I’d also encourage you to measure the cost. Find shortcuts that allow you to direct your attention to the ever-changing landscape, weather patterns, and lighting conditions. A unique capture is far more valuable than accurate settings. In the words of Winston Churchill, “perfection is the enemy of progress."
#4: Don’t let Photoshop intimidate you
I started post-processing in Lightroom and there was certainly a learning curve to it. However, while watching video tutorials from landscape photographers I admire, I observed them using Photoshop to enhance their images. Since Photoshop intimidated me, I tuned out.
I was overwhelmed by the seemingly complex nature of the program. Yet, I couldn’t deny some landscape photographers were creating incredible images with the help of Photoshop. I was interested, but still watched from afar, until I came across video tutorials by my favorite contemporary photographer. Most of his adjustments were in Photoshop. If I wanted to learn from this master artist, I had to delve into Photoshop. I could no longer avoid it.
Through lots of trial-and-error, I began to see how powerful and useful Photoshop can be for landscape photographers. While cameras do a wonderful job of recording raw data, Photoshop can be used to enhance the tonal quality of an image, create greater depth, add contrast, and direct the eye through the photo.
Being just a set of tools, Photoshop didn’t make me a better photographer. However, the power of the tools available, along with the wisdom of photographers that wield the power, helped me to rethink how I envision and execute on my images, starting in the field and finalizing in post.
Tip: Do not let Photoshop intimidate you. Take advantage of the vast array of possibilities and learn what you can do to take your images to the next level.
#5: Monitor your color accuracy
Like many photography rookies, my initial post-processing tendencies were to overuse contrast, clarity, and saturation. Once I knew the difference, those issues were easy to overcome. I found the greater challenge was color accuracy.
Many photographers I followed seemed to have such a stunning depth of color in their images. I would spend endless hours adjusting white balance and HSL settings but wasn’t satisfied with the results.
In photography forums, my requests for photo critiques would lead to feedback, indicating my images were too warm, too cool, or the tint was off. I would adjust, ask for further feedback, and would be told the white balance is still off. It was suggested calibrating my monitor will help, but I was skeptical.
I was not seeing improvement in my images, so I relented, did some research, and purchased my first calibration device. It was a Spyder5Pro, by Datacolor. I was astounded by the results of calibrating, as I culled through my images and saw how different the colors looked. This perspective shift has led to creating more color-balanced images.
Tip: Invest in a quality monitor calibration device. I’m currently using Datacolor’s “SpyderX Capture Pro” bundle and would highly recommend it. The SpyderX helps ensure I’m seeing accurate representations of color, white balance, brightness, and contrast levels on my screen. It’s made a world of difference in how I see and utilize color and tones in my post-processing workflow.
To learn more about Jimmy’s photography and follow along on his journey as a landscape photographer in-progress, visit www.arcadephoto.com or follow him on Instagram and Facebook.
To find out more about Datacolor’s SpyderX visit https://spyderx.datacolor.com/.


![]()
Get the Latest Photo Tips, News & Reviews from Shutterbug!
| Camera Reviews Other Reviews | Mobile Reviews Photography Reviews Columns | News | Features | How-To | Resources |
 © 2026 Shutterbug
AVTech Media Americas Inc., USA
All rights reserved