- REVIEWS
Camera Reviews 
More Reviews Mobile Reviews Photography Reviews - GALLERIES
- VIDEOS
- BUYER'S GUIDES
For The Love Of Photography; Don’t Allow The Challenge Of A Disability Stop You From Making Great Pictures
My life in photography changed one fall morning at the Frederick County Fair.
A numbness on my right side indicated that I was joining the more than 600,000
people nationwide who suffer from strokes each year.
Thankfully, others around me recognized the first signs of my stroke and rushed
me to a nearby hospital. During my 25-day hospital stay, I had ample time to
ponder both recovery and photography. I was one of the fortunate; I temporarily
lost only the use of my right arm and right leg. Today, I continue on the path
to recovery with slowly returning function in both limbs.
Among the thousands of victims who suffer from strokes and other disabilities
are professional photographers and others who share a passion for photography.
You may be one of those whose life and creative talents revolved around photography.
Even with limited use of your body, there is little reason that you should be
forced to abandon that love of the craft. True, it will require some compromises
and changes, but photography can be the best physical and mental therapy available.
After a realistic assessment of your limitations, you need to spend your efforts
focused not on what you can't do, but rather on those things you can do.
In my case, I had a good left hand, a left leg, a wheelchair, and a supportive
wife. My wife and the wheelchair provided the mobility to find potential photographs
and the left hand could support a camera. I had all I needed to get back to
work.
The Importance Of The Right Gear
Like an old friend, familiar equipment is a comfortable way of restarting your
photography, but it may present difficulties. Look at your current photographic
equipment and see how it adapts to your disability. The new technology built
into even the simplest
point-and-shoot cameras can be invaluable to a photographer with disabilities.
Technology that we have accepted as standard, such as motorized film advance,
accurate and automatic exposure settings, autofocus and zoom lenses make photography
possible for photographers with hand problems.
Just as the debate of film vs. digital seems to have faded away, there is little
doubt that digital offers definite advantages for a person with limited hand
use. Digital cameras are smaller, lighter, and offer good zoom lenses. Best
of all, these cameras eliminate one-handed film loading. Insert the media card
into the slot, and you're good to go. One key advantage of digital photography
is the ability to immediately review your work. You can freely experiment, revel
in your successes and delete your failures with no cost.
We have all laughed at tourists shooting one-handed as they hurry past scenic
overlooks. Now, you may be that one-handed shooter. Suddenly you may realize,
as I did, what our left-handed friends have always known: cameras are designed
for right-handed people. Now it is your challenge to adapt this design to your
abilities, whichever hand you are able to use.
These are the very personal decisions that will help form techniques for successful
photographs; so take your time and enjoy the experience. Here are some of the
things I've learned along the way:
1) Always use the neck strap or wrist strap to prevent dropping
the camera but also to help you with the controls.
2) Decide how best to hold and balance the camera for both
horizontal and vertical compositions and then to reach the shutter release with
the camera at eye level. Despite what the instruction manual says, there is
no one correct way to hold a camera and make photographs. Now is the time when
you must invent the best solution for your hand, your camera, and your ability
(#1).
 |
|
|
3) Your goal is to be able to raise the camera to your eye
and hold it steady and level long enough to release the shutter. Make all camera
adjustments with the camera in your lap or dangling around your neck. Composing
the picture and releasing the shutter will be quite enough at eye level as you
begin.
4) Use a higher ISO value and a faster shutter speed to eliminate
some of the shakiness that comes with using weakened muscles. Lenses or cameras
with Image Stabilization features make it easier to get sharper images.
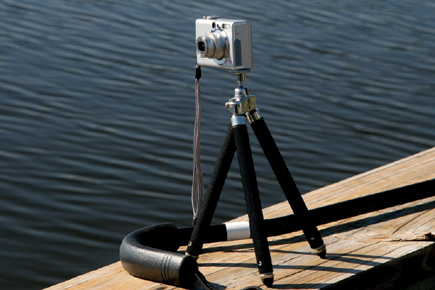
5) I tried to use a tripod when possible but found it heavy,
awkward, and difficult to manage with a cane and a wheelchair. With one hand,
it is not easy to set up and mount a camera on a tripod. If you have someone
to help you carry it and set it up, by all means, use a sturdy tripod. However,
there are a number of new lightweight and stable tripods, monopods, and other
camera supports that are valuable for a photographer with disabilities. A folding
pocket tripod may be more helpful with a light digital camera and you can put
it on a rail, rock, or picnic table (#2).
 |
|
|
Your Mobility
Often the disabled photographer has lost the use of a leg or foot and has limited
mobility. In addition to supporting the camera on a tripod we must also think
about supporting the photographer as he or she begins to make photographs. With
limited mobility, you must explore areas that can be safely reached by wheelchair,
walker, or cane. We have all read the articles that recommend exploring our
own back yard for photographs--now is the time to do that. You might start
by using simple window lighting to photograph family and pets from the stability
of a chair (#3). With practice, you can move to a deck or to the back yard itself
and photograph flowers, birds, and other things close by home. Anything that
stays reasonably still is fair game for the photographer with disabilities (#4).
 |
|
|
|
 |
|
|
|
| |||||||||


![]()
Get the Latest Photo Tips, News & Reviews from Shutterbug!
| Camera Reviews Other Reviews | Mobile Reviews Photography Reviews Columns | News | Features | How-To | Resources |
 © 2025 Shutterbug
AVTech Media Americas Inc., USA
All rights reserved