- REVIEWS
Camera Reviews 
More Reviews Mobile Reviews Photography Reviews - GALLERIES
- VIDEOS
- BUYER'S GUIDES
Color Controls, Drive Modes, Panoramas & More: In-Camera Creative Options

In this article we’ll be exploring various in-camera creative options. Today’s cameras contain microprocessors that are like having a custom photo lab and graphic art studio built-in. In the color realm they allow you to choose color saturation (vividness), neutralize or enhance color casts (white balance) and even create custom color renditions to match every subject and scene. Drive modes allow you to capture fast action “in a hurry” and pick out the best frame, aiding you in getting the best sports shots you ever made. And finally we’ll explore some art filters and special effects, including panoramas that are now easier to make than ever before. Our aim is to give you a sampler that will hopefully encourage you to explore the amazing capabilities your digital camera affords even more.
Use in-camera controls to increase color saturation.
Digital images are composed of bits of code that can be altered in many ways. Color saturation, the degree of color vividness, is one of the options you have in every camera and it can have a profound effect on the look of a scene. There are numerous ways to affect color saturation: you can use the Color Saturation menu in the Picture Style options, choose a Scene mode that enhances color or raise the saturation in the Parameters settings and save it to a “my settings” bank to call on any time you wish.
Note that color saturation affects the vividness of all the colors in your image, though you might find that colors such as red, yellow and orange tend to be more sensitive to this control than the blues and greens. Saturation can get a bit wild, as seen in this detail from a train caboose photographed in “Normal” (#1) and “High Saturation” (#2) mode. Each subject, scene and lighting condition will inspire you to work with varying degrees of saturation.
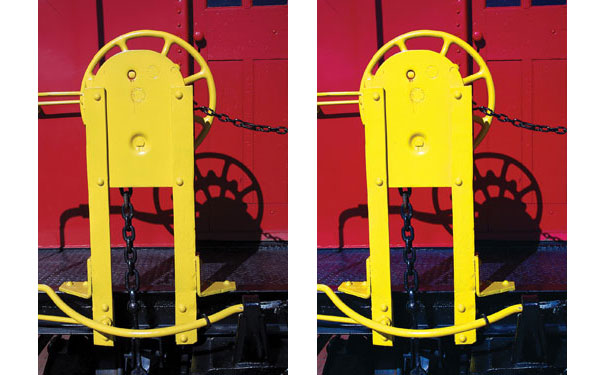
All Photos © George Schaub
Use Spot metering to saturate bright colors.
As we saw in a previous chapter, the Spot meter has many uses, but one that is not always mentioned is how it can be used as a way to saturate bright colors. Aim it at a color you wish to become richer and the exposure system will move its brightness value to the center of the recording range. If that color is bright it will become darker, and a darkened bright color will become even more vivid. This often results in underexposure of other parts of the image, as seen here in this boatyard scene (#3) where the spot meter was placed over the bright yellow hull, the exposure locked and then the image was recomposed to yield this photo.

Use White Balance bracketing.
If you want to experiment with WB settings to see how variations look and affect the subject and scene, try using White Balancing bracketing. Some cameras allow you to make 1 picture at the set or Auto White Balance, 1 “warmer” and 1 “cooler” rendition with a press of the shutter release. You can set the degree of bracket in small or large increments.
Here’s a Daylight WB setting that was bracketed to create 3 shots (#4, #5 and #6)—a “neutral” or set WB, 1 cooler (bluer) and 1 warmer (yellower) rendition. Of course you can do this by changing the setting for each individual shot as well, but WB bracketing makes it easier.


Use White Balance for enhanced color moods.
White Balance settings can be used as a way to “correct” color, but it is also very useful for adding a touch of color richness or mood to a scene. To enrich “warm” colors (yellow, red, orange) you can set the White Balance to Cloudy, such as in this late fall shot made in a New Mexico valley (#7). Or you can alter the WB setting to add an entirely different mood to a scene. In this dawn cloudscape WB was set to Daylight for a good and true color rendition (#8); WB was then switched to Tungsten to add a moody blue cast to the scene (#9). Both are possible skies—it’s up to you to create the mood and feeling of each scene.


When to use the Auto or Daylight White Balance setting.
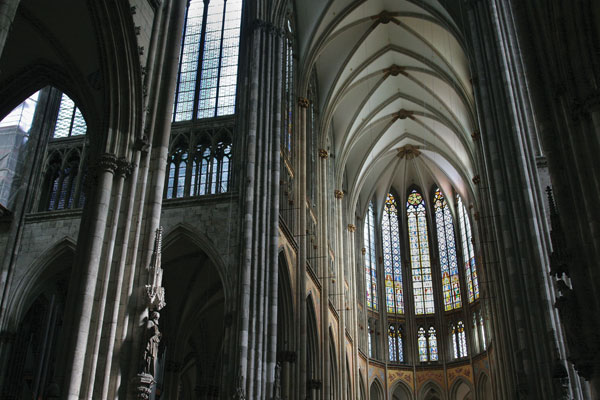
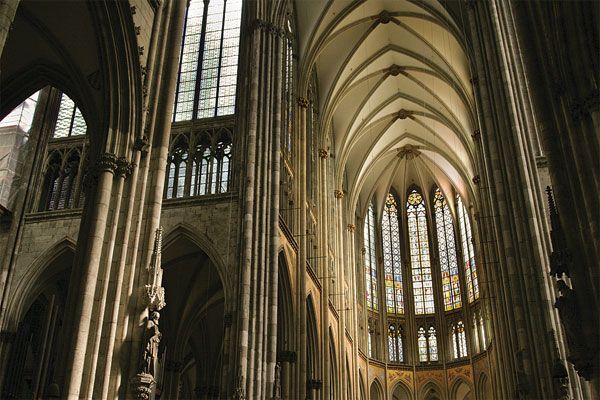
When you want to retain the color cast you see, set the White Balance to Daylight. This serves as a sort of fulcrum that will record a warm glow as warm and shade colors as cool, or “bluish”, without attempting to correct or balance the light. Setting the White Balance to Auto is best reserved for mixed light (a mix of different sources, such as tungsten and daylight) and when working indoors under artificial illumination. But Auto can be too “clinical” for the mood. In this set of photos made inside the Cologne Cathedral (#10 and #11) the Auto WB tends to neutralize the color of the light, which was in fact more like the warmth shown in the Daylight WB setting shot.
Customize the White Balance to the scene.
There is an easy way to match the White Balance to the light at hand for correct color rendition. Set the WB to Custom. Place a sheet of opaque, bright white paper under the illumination. Fill the viewfinder frame with the paper and press the shutter release—there’s no need to focus. This takes a color reading of the white and “neutralizes” the colorcast. Then, whenever you set the White Balance on Custom it will hold that reading for you.
This comes in handy when working in a studio or in a place where you will be shooting for a while and don’t want to worry about White Balancing every time you make a shot.
Tech Tip
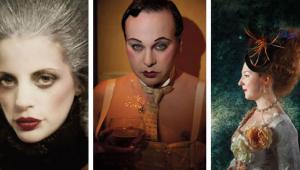
What is White Balance?
White balance (WB) is a way to render “natural” color when the color in the scene is highly influenced by the light source. You can see how light affects color by making non-flash shots indoors lit by tungsten light (which might put an amber cast over the scene); shooting in open shade (which might cause a blue cast); or making photos in arenas and concert halls with stage lighting (where the cast of the light turns out quite different than what you observed). This color influence is not what we see because our eyes adapt to the cast of light, unless of course it is overwhelming.
White Balance settings do not alter the color of the subjects themselves, but rather the influence of the prevailing light source. When counterbalancing this influence (for example, when removing the blue cast from subjects photographed in the shade) WB is a “corrective” measure, but you can also use it as a creative tool to add color emotion or mood to a scene.
These statues are in the vestibule of a church in Germany, all of them are illuminated with tungsten light. But incandescent light sources are not always “true” to the Tungsten WB setting due to the age of the bulb or the type of bulb used. Taken with Auto White Balance, the statue looks okay (#12). But when a Custom WB setting is made you can see how much nuance was lost in the Tungsten setting (#13). Setting Custom meant that all the other shots made under that illumination came out right as well (#14 and #15).


How to use the Drive modes.
There are generally 3, and sometimes 4 options in the “Drive” mode function in your camera, and each has a specific benefit. Single is probably the Drive mode you would most commonly use. Set this and every time you press the shutter release you’ll get 1 shot.
There are 1 (or 2) Continuous Advance modes, which means that the shutter will fire at a number of frames per second (fps) for as long as you keep pressure on the shutter release. The frames per second rate depends on the camera, with most cameras offering 2-4 fps and pro cameras delivering up to 8 fps, and faster. Some mirrorless cameras will go as high as 10 fps. There is a “low” and a “high” framing rate on many cameras, with high being the max you can get, albeit with a smaller file size.
You set continuous high to be sure to capture the action in fast moving events, such as this 8-shot sequence of a goal score and celebration that took about 2 seconds to unfold (#16 to #23). (If you look closely you can see the puck hit the back of the net about halfway through the set.)


Tech Tip
Using the Self-Timer mode.
Self-Timer mode delays shutter release for a set period of time after you press the release. This can be as long as 10 seconds, a setting that can allow you, the photographer, to get into the frame when the camera is set on a tripod. There’s also a shorter 2-second self-timer, which is a great way for D-SLR users to cut down on the potential vibration caused by pressing down the shutter release. This comes in handy when using long-range telephoto lenses or when making close-up shots handheld.
Using add-on filters and digital filter effects.
“Traditional” filters screw onto the front of the lens to alter the character of the light passing through. Filters create just about any optical effect, from those that warm up the light (a slight yellow cast) to starburst filters that cause highlights to diffract into 8 pointed “stars.” Digital photography and image manipulation software has, for the most part, eliminated the need to use such filters. Virtually any effect attained with these filters can be emulated in the camera or later in processing.
One “external” filter that digital photographers who enjoy shooting landscapes still use is a Graduated Neutral Density filter, sometimes called a “Grad.” The filter starts out with a neutral (color free) gray mask that gradually fades to clear about mid-filter. This is very useful for photographing landscapes where you include the sky, such as in this photo where a Grad helped deepen a bright sky to add drama to the scene (#24).

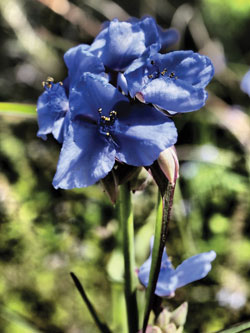
Using in-camera Art filters.
“Filters” in the camera’s menu or the camera’s Scene modes are pre-programmed processing instructions that are applied to the image after exposure. Some of these effects can be as simple as adding a “warm” cast to the image, while others can be used to add a soft focus blur, to create a “fisheye” effect, to make an image look like it was made with a “toy” camera and more.
Camera makers have been adding more and more of these special effects that require no more effort on your part than setting them prior to making a shot (and some even allow you to add the filter effect on images shot without them right in the camera as well). Check your camera’s instruction book and explore your camera’s menu for these varied filter effects.
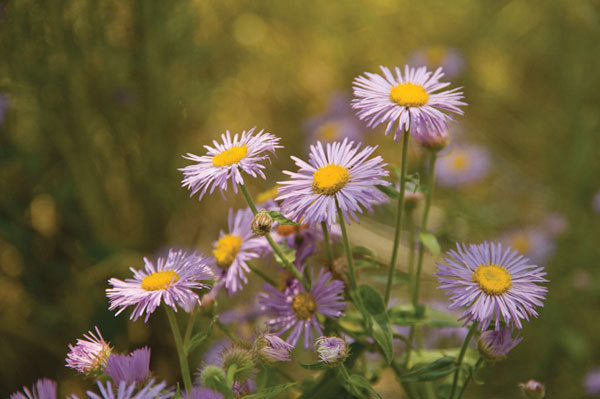
This Herald Square street scene was made using a “sketch” filter (#25). This iris was photographed with a high contrast/saturation filter (#26). And this stand of autumn trees was shot with an in-camera fisheye lens effect (#27).


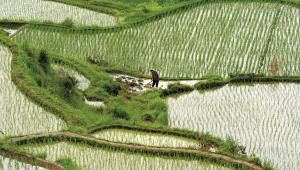
Making a Panorama.
Panorama imaging allows you to take a photo encompassing more of a scene than any lens could possibly match with 1 shot. This is often done by making a series of overlapping images and then using software to “stitch” them together, but more and more cameras offer in-camera panoramic power.
Here’s one way it works: Choose Panorama mode and a screen will come up that seems to crop the image into a long rectangular form. The screen also shows a guide to making an image, often showing where you should overlap the frames. You then follow the image trail from left to right or right to left (and even top to bottom) and then press a Set button when you are done to have the processor create the panorama for you.
Other cameras work with a “Motion” stitch, sometimes called “Panorama Sweep” where you sweep the camera along a horizontal (or vertical) arc and the processor stitches the scene automatically. This is an example of a “Sweep” Panorama made with a Sony camera in the Grand Tetons (#28).

Enjoy working in Black and White.
Even though all digital images are “color” images (in that they are composed of color information) they can also be used to make great black and white images. There are numerous specialized processing programs for creating black and white images from digital files, but you can easily create them in-camera as well.
Use the camera’s menu controls and choose Monochrome mode. (Note: If you are shooting in JPEG format you are committed to black and white; if you shoot using Raw format you can bring the photo back to full color later in Raw processing.) If you are working with a camera with “Live View’ you can see the monochrome effect right in the LCD finder; if not, you can quickly see the results in image review.
This waterfall was photographed using the Monochrome option in the camera and you could say that it is just as if not more effective than a color rendition (#29).

Tech Tip
Megapixels and the print size.
There’s an easy way to figure out what the print size/print quality ratio will be with your camera. This assumes a good quality exposure and a steady hand when shooting and on the quality of the lens used to make the image.
First, multiply the megapixel count of your camera by 3 to get the MB (megabyte) file size of the resultant image (assuming you shoot with the lowest compression, highest quality large JPEG or Raw file). If you have an 8MP camera that’s a 24MB file; a 10MP camera equals a 30MB file; a 14MP camera 42MB, and so forth. Then use these rough guides to the largest size print that delivers a good quality image.
Image file size and print size:
24MB file: 8x10-11x14”
30MB file: 11x14-13x19”
42MB file: 13x19-16x20”
Use the Black and White “Enhancement” filters.
When you choose Monochrome you can also work with “filters” or effects that change the way certain colors record in black and white. This processes the image in-camera and allows you to, for example, deepen the tone of blue sky by using a red “filter” or brighten foliage with a yellow or green “filter.” If you find it difficult to visualize what this will look like use Live View or Image Review and you’ll quickly get a feel for how it can enhance your black and white images.
In this set of photos of New Orleans’ Jackson Square the sky is deepened through use of a red filter effect (#30) and made pale by the use of a blue filter effect (#31).

Shoot multiple exposures on a frame.
Some cameras offer in-camera multiple exposure. This allows you to shoot numerous images and the processor will put one over the other in the same frame. Some cameras allow you to review the first image from the multiple set and compose over it.
One of the main options to choose is Auto Gain. This automatically adjusts the exposure on each shot in the set to avoid overexposure, something that would happen if no exposure controls were applied. In some cameras you can even apply more exposure to an image in the set, which allows that shot to “come forward” (via exposure) to the front, making the others a kind of backdrop. This multiple exposure of fireworks (#32) was made with 3 exposures of 1/2 sec each and an exposure time that showed the trails of the fireworks to good effect.


![]()
Get the Latest Photo Tips, News & Reviews from Shutterbug!
| Camera Reviews Other Reviews | Mobile Reviews Photography Reviews Columns | News | Features | How-To | Resources |
 © 2025 Shutterbug
AVTech Media Americas Inc., USA
All rights reserved