Lesson Of The Month
Creating Digital Macro Shots On Location

Lesson Of The Month

1 (Above), 2 (Below)
Photos © 2002, Ben Clay, All Rights Reserved

Recently, my wife and I undertook a long day hike through an old growth forest trail in Oregon, where we came across enormous redwood trees and beautiful plant life. I had planned on taking some pictures that day, but I didn't want to lug a lot of heavy camera and lighting equipment with me. This lesson demonstrates how you can hike with photo and lighting gear without breaking
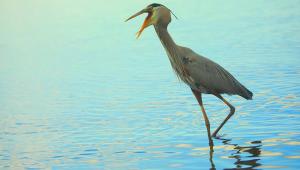
 your back.

During the hike, I kept an eye out for some exotic flower or plant that I could photograph, but as is often the case when you are looking for something specific, nothing sprang to attention. Then, about an hour into the hike, we came across a group of common Bunchberry Dogwood plants. After examining one of them for a moment, I decided it would make a good subject for a macro lesson.

I pulled out an Olympus E-10 digital camera and zoomed the lens in as far as it would go. I then moved as close as I could to the plant before losing focus, and took a shot in Program (automatic) mode (#1).

As you can see from the result, the exposure is good and the shot clearly depicts the plant, but it's fairly uninteresting overall and the background is somewhat distracting.

I wanted to come in tighter on the berries of the plant, but in order to do that without losing focus, I needed to attach an Olympus macro lens attachment to the lens. This lens attachment is great because it allows you to come in very close to your subject, and unlike other macro lenses, it's not a big piece of glass that will weigh you down (#2).

3 (Above), 4 (Below)

When shooting a macro shot, it is often best to use a tripod so that you can position the camera and focal distance precisely where you want it. I set up a very lightweight Gitzo carbon-fiber tripod with a lightweight Manfrotto ball head, attached the camera, and set it in the vertical position. Even in this sideways position, the tripod was very stable.

Also, notice the Olympus lithium polymer battery pack attached to the base of the camera: I can't recommend the accessory enough! I can go days without having to recharge the battery, and that's great if you're in remote locations like this (#3).

I first set my aperture to f/10 to ensure that everything in the shot would be in focus, set my shutter speed to accommodate a good exposure (1/40 sec), focused on the berries and took a shot (#4).

The macro lens had allowed me to come in much tighter on the berries and have every element of the shot be in focus. However, reviewing the shot in the LCD of the camera, I noticed that the background was still a little distracting. So I decided to draw the attention more toward the berries by throwing the background out of focus.

5 (Above), 6 (Below)

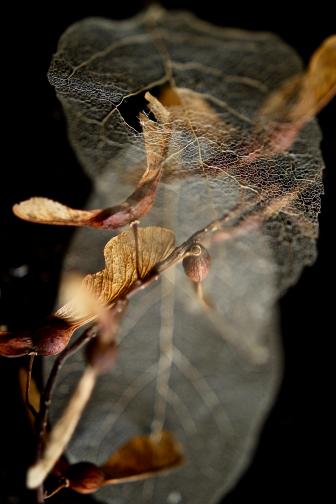
In order to throw the background out of focus, I needed to limit the depth of field by enlarging the aperture. So, I opened the aperture all the way up to f/2.4, set the shutter speed to 1/400 sec to compensate for exposure and took another shot (#5).

See how the background is very blurred now? Even sections of the leaves are soft. I didn't mind this selective focus, as I wanted all the attention to be drawn to the berries.

Reviewing the shot, I saw that the exposure was good, but that the sun cast a hard shadow of the berries onto the leaves. While this isn't a terrible thing, I felt it was a little distracting, and decided to diffuse the sunlight with a Photoflex 12" Translucent LiteDisc.

These LiteDiscs are great because they fold down to about 4" wide and are easy to carry around in your pockets. I pulled one out a side pocket and held it between the sun and the berries to see what affect it would have. Since the Translucent LiteDisc cut the light falling onto the plant by about a stop, I adjusted my shutter speed to 1/200 sec and took shots with the LiteDisc in place (#6 and #7).

The result shows a tremendous improvement. The reflection on the top of the berries is now smooth and gradual, yet the berries still maintain their sense of shape, and the shadow of the berries is now gone from the leaves. The plant is so well diffused, that it almost looks as if the shot were taken on an overcast day.

7

At this point, I could have stopped and had a great macro shot, but to illustrate further, I decided to bounce some sunlight in to give the berries some specular highlights, similar to the ones the direct sun previously gave. The advantage in this setup over the direct sun shot, however, would be that we wouldn't have the distractingly hard shadow of the berries.

I pulled out a 12" White/Silver LiteDisc and rested it against a leg of the tripod with the silver side reflecting direct sunlight into the berries. Once the Silver LiteDisc was secure, I held the Translucent LiteDisc in place, and took a final shot at the same camera settings (Final Image).

The result shows a well-lit macro shot of a rather ordinary Bunchberry Dogwood plant. Just imagine what you could do when you stumble upon that exotic flower or plant I mentioned earlier!

Final Image

This lesson will be posted in the free public section of the Web Photo School at: www.webphotoschool.com. You will be able to enlarge the photos from thumbnails. If you would like to continue your digital step by step education lessons on editing, printing, and e-mailing your photos it will be on the private section of the Web Photo School. To enroll for WPS just go to www.shutterbug.net and click on WPS Free Lessons.

Technical Equipment
Camera/Media: Olympus E-10 digital camera; Olympus lithium polymer battery; Olympus macro lens attachment; Gitzo 1228 carbon-fiber tripod; Manfrotto 3009 ball head
Lighting: Photoflex 12" Translucent Lite-Disc; Photoflex 12" White/Silver LiteDisc

X