
My nephew is a photographer and I helped him to make the design of his own studio, I have taken a couple of ideas from this post as they seem interesting and in this way we could save some money. We also decided to make a Bathroom Remodel Towson to make a surprise for his wife, she wanted to change the bathroom but could not find a good company that would have good rates and highly skilled personnel.
- REVIEWS
Camera Reviews 
More Reviews Mobile Reviews Photography Reviews - GALLERIES
- VIDEOS
- BUYER'S GUIDES
Studio In A Small Space; Big Studio Effect Without The Cost Page 2
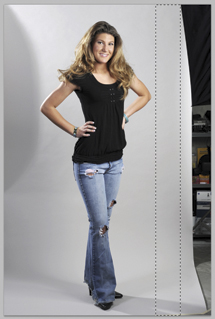
Step 2: I used Photoshop’s rectangular Selection tool to select an area between the left edge of the seamless paper and Haley’s elbow. Then, using Photoshop CS4’s Content-Aware Scaling feature (Edit>Content-Aware Scale), I dragged one of the selection “handles” until the original frame was filled with gray background. I clicked Enter and was finished with this part of the background.
 |
|
2 |
|
|
Tip: If you have an older version of Photoshop that lacks Content-Aware Scaling, select and drag one of the handles and it will work with a solid color background like this one, but forget using it with anything more complex.
Step 3: Next I used the rectangular Selection tool to select an area between the right edge of the seamless paper and Haley’s other elbow. Then, using the same technique as the left-hand edge of the seamless background, I used Content-Aware Scaling (Edit>Content-Aware Scale) to drag one of its “handles” until the frame was filled with gray background.
 |
|
3 |
|
|
Building a studio of your own using a small space begins with an attitude that says you can do it! All of the tips, tools, and techniques that I have shown here are just the beginning. Use them as a springboard and expand these concepts to fit your space, your gear, and your imagination. It all begins with clearing space for your in-home studio today!
 |
|
4 |
|
|
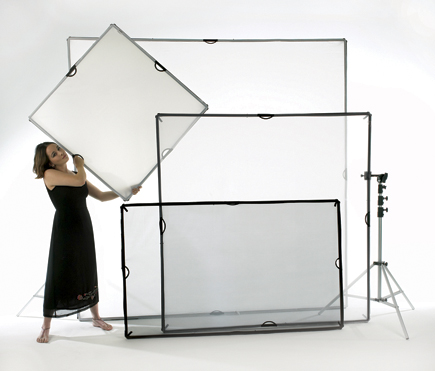
What’s A “Scrim Jim”? |
|
 |
|
|
|
| |||||||||
- Log in or register to post comments


PHOTO OF THE DAY

Today’s photo is Desert Dessert! by Hans B. Epp
eNEWSLETTER SIGNUP
![]()
Get the Latest Photo Tips, News & Reviews from Shutterbug!
| Camera Reviews Other Reviews | Mobile Reviews Photography Reviews Columns | News | Features | How-To | Resources |
 © 2024 Shutterbug
AVTech Media Americas Inc., USA
All rights reserved