- REVIEWS
Camera Reviews 
More Reviews Mobile Reviews Photography Reviews - GALLERIES
- VIDEOS
- BUYER'S GUIDES
Blacklight Photography: A 60s Technique Made New
To get started, here are the items you need:
1. A blacklight. You can get these online, and stores like Walmart, Lowes, and Home Depot usually carry them in the lighting department. I prefer a blacklight tube (like a florescent light tube) because it gives off more light than a single bulb. If you use two blacklights, you will have more light on the subject, you can experiment with different types of directional lighting, and the exposure time will be shorter. Lengthy exposure times with inanimate objects aren’t an issue, but if you shoot a person, then it is very relevant.
2. Phosphorescent paint. This comes in individual spray cans as well as small containers if you want to use a brush and apply the paint to specific areas of a subject. Art and hobby stores carry this kind of paint, and the spray cans are available anywhere paint is sold.
3. A tripod.
4. A flashlight or penlight. This is optional, but it allows you to add non-blacklight illumination to small areas of your subject or scene for an interesting variation.
There are many things you can do with blacklight photography. You can use the blacklight without any phosphorescent paint at all and the images turn out monochromatically deep cobalt blue, as in (#1). Adding a single color to the moody blue background can be visually arresting. In (#2) for example, I taped two pieces of paper that I spray painted neon orange behind the eyes of the mask. The phosphorescent paint responded to the blacklight, producing a very bizarre and attention-grabbing image.

All Photos © Jim Zuckerman
Shooting under blacklight illumination is challenging because the light level is so low. If you are shooting inanimate objects, like the painted mythical horse (#3), you can close the lens down to a small lens aperture like f/16 without any negative consequences. If the shutter speed is long, it doesn’t matter because nothing is moving. However, if you are shooting a model (#4), the length of the shutter speed is important because people can’t be perfectly still. What I do in that case is have them sit or stand against a wall or a corner where two walls come together. That way they can press their body and/or the back of their head against the firm support to help prevent movement so you are able to get tack sharp pictures.


It will also be necessary to raise the ISO. No one likes to use high ISO settings because of the increase in digital noise, especially in the shadows—which mostly comprise blacklight images—but it’s a no-brainer trading a bit of digital noise for sharp pictures. When I photographed my wife (she’s the one behind the masks), I used ISO 640, but in retrospect I should have raised that to 1250 or 1600. In many current cameras these high ISO settings don’t produce objectionable digital noise.
In determining the exposure, I found that the built-in light meter used in the Evaluative mode (Matrix Metering for Nikons) produced exposures that were about two f/stops too light. Therefore, I used the Exposure Compensation feature to underexpose by that amount and then I was able to use the Automatic Exposure modes (P, Av, and Tv) in the camera with very good results. Your results may vary, but probably not by much. Even though many of these pictures vary with respect to intensity of color and the percentage of shadow in them, I found that once I set the Exposure Compensation to minus two f/stops the meter did a remarkably good job in giving me well exposed images.
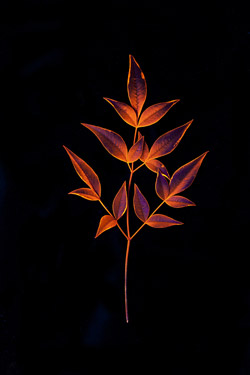
For many of my blacklight pictures, I used a piece of black velvet as the background. I didn’t want anything behind the subject reacting to the blacklight and diverting attention. In (#5) for example, I simply laid leaves that had been sprayed with paint onto the black fabric. I positioned the blacklight off to the side to create some texture on the plant.
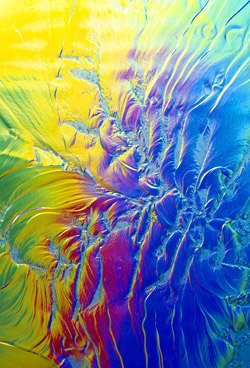
A technique that I use often is painting a white piece of foam core and using it as the background. Objects placed on the neon-colored foam core take on the cobalt blue color of the blacklight while the background glows with intensity, as in photos (#6, #7, and #8). For the pictures of my wife’s legs and hands I placed thin, white fabric over her to add texture. A variation of this is (#9) where I placed an 8x10” piece of textured glass in front of painted foam core. I positioned the blacklight to illuminate the paint and not the glass.


![]()
Get the Latest Photo Tips, News & Reviews from Shutterbug!
| Camera Reviews Other Reviews | Mobile Reviews Photography Reviews Columns | News | Features | How-To | Resources |
 © 2026 Shutterbug
AVTech Media Americas Inc., USA
All rights reserved