- REVIEWS
Camera Reviews 
More Reviews Mobile Reviews Photography Reviews - GALLERIES
- VIDEOS
- BUYER'S GUIDES
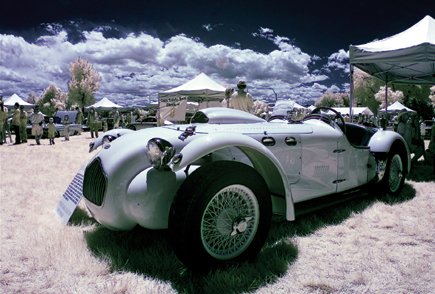
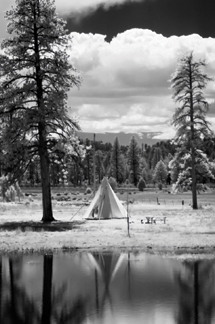
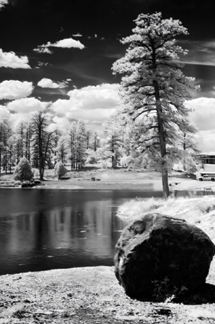
Digital Infrared Photography; Imaging With Invisible Light
Every photographer knows about visible light being used to capture photographic
images digitally or with film, but there are other kinds of light that we can't
see. Light with wavelengths from approximately 700 and 900nm (nanometers) is
called infrared light. Interestingly, this band of infrared light is a thousand
times wider than that of visible light, but is invisible to our eyes.
Shooting infrared has the power to transform mundane subject matter into unforgettable
images. Everyday scenes that you might walk by and never think of photographing
take on a more dramatic look when seen in infrared. Back in the bad old days
of IR film, you needed to use special film stock and load and unload your camera
in total darkness to reduce the damage of infrared fogging. To shoot IR film
you also needed special--that part hasn't changed--filters and
either process the film yourself or find an ever-dwindling pool of specialty
labs to do it for you. When shooting infrared film it's more click and
hope, but digital IR images can be made in camera and you'll immediately
see the results on the LCD screen.
 |
|
|
Are You Ready To Rumble...Er, Infrared?
Because the imaging sensors used in digital cameras are sensitive to more than
visible light, some manufacturers place an infrared cutoff filter in front of
the chip to block infrared light from striking it and causing color balance
problems. This filter's effectiveness varies from model to model, but
some consumer digicams allow enough IR to pass through to permit, what techies
would call, near infrared photography when an appropriate filter is placed in
front of the lens or when they have the internal filter removed by a trained
technician. (Near infrared light is the closest wavelength to visible light
and far infrared is closer to the microwaves in the electromagnetic spectrum.)
 |
|
|
When I get a new digital camera I give it the "remote control" test. One of the easiest ways to check if your digicam is capable of infrared capture by using filters is to point a TV remote control at the lens and take a picture or look at the image on the LCD panel. If you see a point of light, you're ready to make IR digital images. All you need is the right filter to get started. If your digicam passes the TV remote control test and has a Black and White mode, you'll be able see the infrared effect right before your eyes.
 |
|
|
Filters And Holders
For all of my early filtered digital IR images, I use HOYA's (www.thk
photo.com) Infrared (R72) filter because it is affordable and works great.
In smaller sizes, such as 52mm, the HOYA R72 costs less than $40, making it
a bargain for digital infrared photography. On the other hand, if you need a
72mm filter, expect to shell out almost $265.
 |
|
|
Cokin (www.cokinusa.com) introduced a 007 filter that's available in A, P, X-PRO, and Z-PRO (100mm sizes). This is a modular implementation of the 89B infrared filter that was previously only available as a gel. The price difference between the smaller A size and supersized X-PRO Cokin filters is similar to HOYA's, albeit not as extreme. Some IR cognoscenti have disdain for the 89B, feeling it lets too much visible light in and contaminating the IR image, but not me. My biggest concern when using the Cokin filter in the filter holder is that visible light can leak in from the sides and can pollute the IR image. So, instead of a holder I use my fingers and hold the filter flat against the front of the lens. The camera will be on a tripod anyway because the optical density of all IR filters produces long exposure times.
 |
|
|
Fans of premium filters from B+W (www.bwfilter.com) and Heliopan (www.hpmarketingcorp.com/heliopan.html) will have to spend a little more but not too much more because most IR filters are by their nature expensive. One of the most interesting of the currently available premium IR filters is the Singh-Ray (www.singh-ray.com) I-Ray Infrared Filter. This totally opaque filter eliminates all visible light and transmits more than 90 percent of the near-infrared electromagnetic wavelengths between 700 and 1100nm. Price for a 52mm filter is $160 and is well worth it if you are serious about shooting digital IR images.
 |
 |
||
|
|
Camera Conversions
If your digital camera is not IR sensitive or if you decide to get really serious
about digital infrared photography, you might want to have your camera converted
to IR-only operation. The IR Guy (www.irdigital.net)
converts digital SLRs such as the Canon EOS D30, D60, 1D, Digital Rebel and
Nikon D100 into IR-only cameras. If your camera is not listed check his site
to see what conversions are currently available. He is not the only person doing
this conversion but the only one with whom I've had personal experience.
After modification your camera becomes a dedicated black and white IR camera
and you will never be able to shoot conventional images again.
 |
|
|
|
| |||||||||


![]()
Get the Latest Photo Tips, News & Reviews from Shutterbug!
| Camera Reviews Other Reviews | Mobile Reviews Photography Reviews Columns | News | Features | How-To | Resources |
 © 2026 Shutterbug
AVTech Media Americas Inc., USA
All rights reserved