- REVIEWS
Camera Reviews 
More Reviews Mobile Reviews Photography Reviews - GALLERIES
- VIDEOS
- BUYER'S GUIDES
Copy of Make Your Computer Ready For Digital Photography
Make Your Computer Ready For Digital Photography
Bypass The “Default Demons”
by David B. Brooks
If you have recently purchased a new computer, whether a PC with Windows or an Apple Mac, is it really ready for use as a digital darkroom, to support opening, processing and editing or printing digital photographs? With rare exception the answer to that question is a resounding NO.
The reason is simple. Although digital photography has increased in popularity in recent years and many computers are purchased with making photos in mind, personal computers are still made and sold for general home/office use. They are, if at all, set up when delivered to provide typical, general functioning, what in the industry is described as being set at “default” values.
Default is a common minimum denominator of performance that supports a broad range of different kinds of uses, a “Jack of all trades master of none”, configuration. This less than ideal default condition is largely relative to the condition of the operating system that comes pre-installed with your computer. But it also applies to any devices or software that were installed optionally at the factory or to software and hardware you have added to make your computer into a digital darkroom.
 |
|
|
Preferences And Options
Your computer’s operating system, Windows for example, as well as software applications like image-editors and scanner drivers, contain provisions referred to as preferences, options and settings that support different choices as to the functioning of the components involved in a digital darkroom. Most of these components will function, as shipped by manufacturers, either without any setting being made or at a “default” factory setting, which as I said, provides the broadest kind of acceptable functioning. To achieve the best performance your motto should be “I don’t do default.”
The most appropriate and best performance that is available for photographic purposes then becomes your choice, if you take the time and effort to make it. There is a small possibility that the default settings will provide you with very close to optimal output quality with your digital photography, but unless you know you’re always lucky, don’t take a chance on the default demon giving you blah results.
By following the suggestions and recommendations that follow you’ll know you will obtain the best results. The basic and most fundamental preferences, options and setting you’ll need to make will be done through a few Icon selections in the Windows Control Panel or Apple System Preferences.
You open the Control Panel window by clicking on “Start” and then Control Panel. Apple System Preferences is available from the Apple Menu drop-down list.
Is What You See What You Get?
When you turn on your computer it tells the monitor what to display. But your computer has no idea what you are seeing. For instance, you can adjust the display controls to obtain a dark and bold or a light, flat contrast screen image, and the computer is oblivious to what you have done.
So, the most important job in setting up your computer to do digital photography is to tell your computer what kind of color you are seeing on-screen. If it cannot recognize what you see on-screen, then the results of your photo editing, as well as printing output, will be unpredictably different than what you saw with your computer display.
In other words, the adjustment of photos with a computer is accomplished by your perception of how it looks. Unless your computer has an objective reference to the colors you perceive on screen, it is blind to what you are doing. The first bit of information about your monitor that your computer should know is what monitor you have plugged in. To check this, (Plug N Play should sense and record the identity of the monitor), open the Windows Control Panel Display Properties by clicking on the Display icon in the Control Panel window. With an Apple Mac it is the Display icon in System Preferences.
When the Windows Display Properties window is open, click on the Setting tab at the top right and then click on the Advanced button in the lower right of the tab pane. Now a second window will appear with two rows of tabs.
You should click on the Color Management tab.
Immediately below the icon is the heading Current Monitor and, if your system is “Plug N Play” your display make and model should be recorded. Below that line is another heading for an entry, “Default Monitor Profile.” This line may be blank, or it may contain a name for an .ICM profile file, and there will then be a corresponding line in the box below called “Color profiles currently associated with this device.” If your display brand and model is identified but a profile is not designated as associated with the display, you can go on to the next step.
With Apple’s System Preference/Display open, the first screen and tab is “Resolution”, so click on the
Color tab. The make and model of the display should be listed in the top section of the box, which is the generic profile for the display
Adjusting Your Monitor
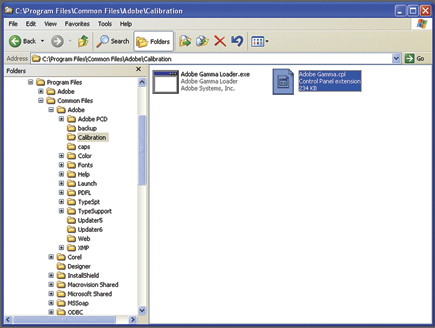
A generic manufacturer profile file that is “associated” with a display and designated as default tells your computer very little information about the display or how it functions, because there is no telling how the display is set up or adjusted for brightness, contrast, and color temperature. With Apple computer operating systems in the Display/Color window there is a button labeled “Calibrate.” A visually based calibration and profiling wizard will guide you through the process, which I will cover later. With Microsoft Windows a display calibration utility is not provided; however, if a user has any version of Adobe Photoshop installed, a calibration/profiling utility called AdobeGamma.exe is also installed, and usually can be accessed by an icon installed in the Control Panel.
 |
|
|
But first, before calibrating and profiling, check and if possible make some settings to your LCD display. Both Microsoft Windows and the Apple Operating System now utilize the same Gamma of 2.2 and color temperature of 6500K or D65 that are also built-in parameters of the two standard Photoshop workspace profiles sRGB and Adobe RGB (1998).
Most LCD display OSD controls support both gamma and color temperature parameter settings, although often in different places and configurations in the display control menu. In addition most LCD displays main primary adjustments are Brightness and Contrast.
Today’s LCD displays can be at least twice as bright as obsolete CRT’s (or greater), so their white luminance should be lowered to as close to 90.0 CD/m2 as possible, the typical brightness of a CRT, to obtain a match with photo inkjet printing paper white.
Manual calibration and profiling utilities like Adobe Gamma or the Apple system Preferences/Display/Calibrate will suggest adjusting contrast to 100 percent or maximum. Ignore this and set both Brightness and Contrast much lower, to no more than 50 percent or less. This depends on the maximum white luminance of the display and what the adjustment scales indicate as a percentage. A rough visual indication is to use a clean piece of photo printing paper next to the display with a pure white “New Document” filling the screen, and the paper lit by a 15” fluorescent desk lamp 16-18” from the paper (keep the desk lamp light from hitting the LCD display screen).
Display Settings
Gamma: 2.2 or L*
White Point Color Temperature: 6500K or D65
Brightness–White Luminance: 90.0 CD/m2
Using Adobe Gamma
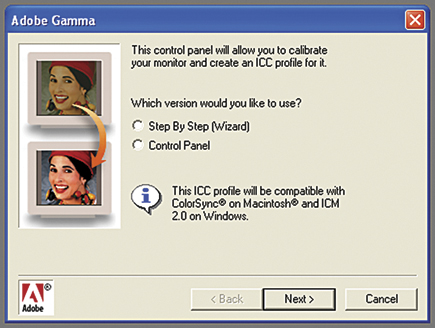
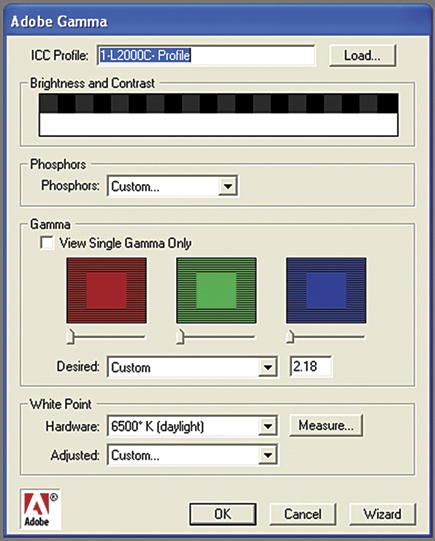
When you launch the AdobeGamma.exe utility, a screen will appear with two radio button options: choose the Step-By-Step (Wizard) the first time you use it. Then read the instructions in each screen carefully and follow the directions precisely, going from one screen to the next until the process is complete by your naming the profile to be created and clicking OK.
 |
|
 |
|
|
When that is done Adobe Gamma will set the new profile you have created for your display default profile; and as important it will adjust your display output to exactly reflect the value setting you have established by calibration and match the profile each time you restart your computer. Now your computer will know quite precisely what you are seeing and will be able to convey that information in relation to inputting images into your computer using a scanner and digital camera, or outputting an image to your printer to provide accurate color, brightness, and contrast matching between these devices based on what you see and perceptually adjust on screen.
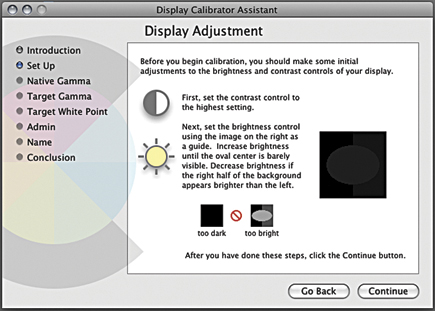
Apple/Display/Calibrate
The Apple System Preferences is accessed from the Apple menu or an icon in the Dock. The Display’s dialog window is launched from an icon under Hardware. Once open on-screen go to the Color tab and the Calibrate button is at the lower right of the window.
 |
|
 |
|
 |
|
 |
|
|
A Better Option For Adjusting, Calibrating And Profiling Your Display
On screen visual comparison display calibration and profiling will get you in the ballpark, but it is far less accurate (depending on individual perception acuity), than using a measuring instrument and its supporting software to adjust, calibrate, and profile your display to get accurate system Color Management. Unfortunately the cost is an impediment, as the few inexpensive products are only partial solutions or not accurate and reliable. But here is a list of products I have worked with and can recommend, starting with my favorite at the top. All are in the $200-$500 range; check the website for current pricing.
 |
|
 |
|
 |
|
|
1. ColorEyes Display Pro (www.integrated-color.com) is available as software only if you already have a supported colorimeter like Spyder2, Spyder3, or X-Rite i1Display (a colorimeter and software package is also available from integrated-color).
2. X-Rite i1Display 2 (www.xrite.com).
3. DataColor Spyder3 Elite (http://spyder.datacolor.com).
4. X-Rite ColorMunki (www.xrite.com) including printer profiling.
In addition, some LCD displays in the professional category like NEC Spectraview, Eizo ColorEdge, and LaCie LCD Displays, include proprietary calibration and profiling software with colorimeters specifically designed for the associated displays.
The Remainder Of Setup Is Easy (PC)
If you have a printer installed and connected to your computer, a necessary precaution is to check to see that it is recognized and its profile is associated with the device. To make this check, again open the Control Panel from the Start-button at the lower right of your screen. Then click on the Printers and Faxes icon button to open its window dialogue. An icon with an identification of your printer should be in the window space to the right. Click on the icon for your printer with your right mouse button to open a menu dialogue, and then click on Properties.
In the “Printer” Properties window click on the Color Management tab. In the sub-window dialogue in the lower half of “Printer” Properties/ColorManagement under “Color Profiles currently associated with the printer”, a file name should be highlighted. If you click on the Add button below, your system Color folder will be opened in which the named profile(s) for your printer are located. You can right click on those files in the Color folder window and select properties to obtain a window that will provide a description of the device (printer) the profile supports. If it is in fact your printer, everything is OK.
Apple Colorsync
Colorsync is an application in the Utilities folder under Applications found on a Mac Hard Drive. It has many uses including comparing the visual affect of applying a profile to an image or comparing different profile effects, repairing profiles, and finding the profiles associated with various devices, something helpful as some applications install profiles in the Library/Colorsync/Profiles folder and others in the Users folders, and all are gathered together in the Colorsync Utility profiles window(s). If you are not aware of or familiar with the Colorsync Utility, spending a little while to get familiar is worthwhile, and may save some frustration another day.


![]()
Get the Latest Photo Tips, News & Reviews from Shutterbug!
| Camera Reviews Other Reviews | Mobile Reviews Photography Reviews Columns | News | Features | How-To | Resources |
 © 2026 Shutterbug
AVTech Media Americas Inc., USA
All rights reserved