- REVIEWS
Camera Reviews 
More Reviews Mobile Reviews Photography Reviews - GALLERIES
- VIDEOS
- BUYER'S GUIDES
Low Light Exposure
Tripods and Image Quality
by George Schaub
It always surprises me how “light sensitive” digital cameras are, and how low the light can be and still have the sensor dig out detail. This becomes apparent when photographing in the shade, in late afternoon light, overcast light and even when the sun has set below the horizon. The common wisdom is that with image stabilization (in body or in-camera) and the ability to set high ISO numbers (for greater sensor light sensitivity) it’s easy to shoot low light scenes handheld. While this does allow for more candid work in dimmer light, the fact remains that the best image quality still results from shooting at the lowest ISO possible and, when shooting in low light, working with a steady tripod.
There are two side effects of working at high ISO speeds—increased noise and increased image contrast (with accompanying loss of color fidelity.) If you are working very long exposure times then noise can also occur, but this only becomes apparent with times as long or longer than a second, an eternity in photography. Shutter speed can also be decreased by opening up aperture or, if necessary, raising ISO within reasonable limits, about ISO 800. Keep in mind that every time you raise ISO you add 1EV, or stop, of light, thus halve the necessary exposure time. For example, if your shutter speed is 2 seconds a one step raise of ISO will cut it to 1 second; similarly, raising one step in ISO will cut down a shutter speed of 10 seconds to five, and so forth.
Tools: Tripod attached to camera; if lens is long (over 150mm) and/or heavy, tripod should be attached via lens collar. Pattern exposure mode; exposure compensation, if necessary, to insure that meter does not overexpose low light areas.
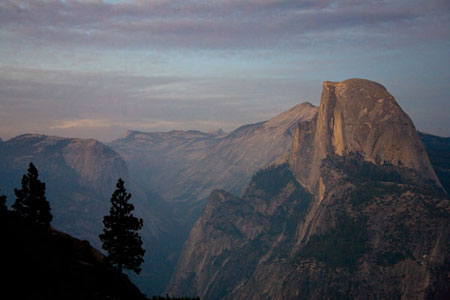
Sunset Glow |
|
 |
|
|
When the subject at sunset is the sky itself then all you need do is point the camera upwards, lock the reading and shoot (of course do not point it at the sun.) When it is a scene illuminated by the setting sun, here the view from Glacier Point in Yosemite, and the overall light does not exhibit a large degree of contrast between the ground and the sky, the best way to read the light is as it falls on the subject. Your playback might appear a bit dark, but that is a simple matter to fix later by simply adding some contrast when you process the image. The key element in this shot, however, is that it was exposed at a modest ISO and shot on a tripod. Lacking a tripod it could have been exposed at a higher ISO to insure a steady shutter speed, but that would introduce noise in the sky, something not present in this exposure.
Settings: Tripod mounted camera, 300mm lens, ISO 200, f/8 at 1/4 second. Note that f/8 aperture setting was used to insure sharpness from silhouetted trees to background. Note that with 300mm lens minimum handholdable shutter speed is about 1/500 second, or 1/60 second with image stabilized lens. To get f/8 at 1/60 second ISO would have to be set at 3200.
Rio Grande Valley |
 |
Shade, Late Afternoon
The deep rift of the Rio Grande Valley outside Taos, NM, causes the river and surrounding cliffs to lose direct illumination fairly early in the afternoon, except in high summer. Whatever light is in the valley tends to be flat and slightly blue, typical of shade conditions. In addition to using a tripod to steady the image and insure a low ISO setting, scenes like this can be enhanced by setting a +1 contrast in the Picture Styles or parameters, a shady White Balance and a higher color saturation setting, which is a type of color contrast increase.
Settings: Tripod mounted camera, 200mm lens; exposure: center-weighted metering pattern, ISO 100, f/5.6 at 1/30 second. Color saturation set at +1; contrast set at +1; shady white balance.


![]()
Get the Latest Photo Tips, News & Reviews from Shutterbug!
| Camera Reviews Other Reviews | Mobile Reviews Photography Reviews Columns | News | Features | How-To | Resources |
 © 2026 Shutterbug
AVTech Media Americas Inc., USA
All rights reserved