- REVIEWS
Camera Reviews 
More Reviews Mobile Reviews Photography Reviews - GALLERIES
- VIDEOS
- BUYER'S GUIDES
Metering Patterns: Center-Weighted Averaging
Metering Patterns: Center-Weighted Averaging
A Quick Lesson On An Often Ignored Metering Pattern
by George Schaub
When light is directional—not over the shoulder and not the same brightness throughout the frame—try center-weighted averaging metering. The key is to aim the camera at an area that incorporates the brightest part of the scene but does not exclude other brightness levels. You then lock exposure using the automatic exposure lock button, recompose and shoot. I like this metering pattern because first it forces me to consider the way light falls in the scene and second because it helps me make exposure decisions based on how I want to interpret the scene. It is a very personal way to read light thus creates more engagement with the whole process.
The ally of the center-weighted pattern (CWA) is the exposure lock button. Usually identified as AEL, you press it to hold the exposure you have read; it will not change even if you point the camera in another direction. With most cameras you can also lock exposure by maintaining slight pressure on the shutter release button, then press all the way down to make the exposure. Check your Custom Functions for other ways to hold exposure, as this is a key control and you want to make it as easy and accessible as possible.
Tools To Use: Center-weighted metering pattern; auto exposure lock (AEL) button. Check your camera manual to learn how to set various buttons on your camera as the AEL button.
Making Settings: The exposure should be as read by the camera with a locked exposure; the image is then recomposed to the original framing. The readings can be made with a zoom lens by zooming out to shooting position, locking exposure and the zooming back to the original framing, by pointing the camera in the direction where the light falls (note: not the light source!), locking the reading and recomposing or simply by walking closer to the subject and then stepping back once exposure has been read.
Zoom Reading
I had a zoom lens on the camera and zoomed into the area shown here (#1), locked exposure, then zoomed back to my final framing (#2). An evaluative pattern meter reading on the full frame scene read f/11 at 1/125 sec, a stop more than the best exposure for this scene. Shooting at that setting would have resulted in overexposure.
 |
 |
|
|
||
Camera Setting: The final exposure—about 1.5EV less at f/16 at 1/160 sec—yielded the perfect balance of light and shadow.
Light And Shadow
The reading here did not exclude the shadow areas; rather, I incorporated some of the shadows areas while placing the brighter area in the center of the frame, as shown here in this section of the image (#3). This is where I pointed the camera for the reading, then locked that reading and recomposed for the final framing and exposure (#4).
 |
 |
||
|
|
Camera Settings: CWA metering pattern; lock exposure with brighter area in the center of the frame. Exposure at ISO 100 f/16 at 1/60 sec.
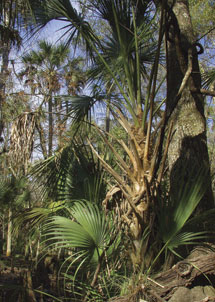
Dappled Light
Mottled or dappled light, as seen in this photo made in the Everglades, can be difficult to read correctly. Note the area chosen for the reading (#5) has a mix of light and shadow but has more highlight areas than the final composition (#6). Reading this area with CWA results in a well-balanced exposure that controls highlights without making shadows too dark.
Camera Settings: CWA pattern; at ISO 100, f/11 at 1/160 sec. I walked over for the “reading”, locked exposure and then backed up for the final framing.
 |
 |
||
|
|
Tech Note
The CWA pattern reads an exposure from the entire frame but gives the most “weighting” to an oblong shape, the center of which is at the center of the viewfinder frame that encompasses about 60 percent of the finder. It is dubbed “averaging” because it takes numerous brightness values into account and averages them for a good exposure. It is invaluable for sky, ground and sky, and in images where the light level varies around the frame.


![]()
Get the Latest Photo Tips, News & Reviews from Shutterbug!
| Camera Reviews Other Reviews | Mobile Reviews Photography Reviews Columns | News | Features | How-To | Resources |
 © 2025 Shutterbug
AVTech Media Americas Inc., USA
All rights reserved