- REVIEWS
Camera Reviews 
More Reviews Mobile Reviews Photography Reviews - GALLERIES
- VIDEOS
- BUYER'S GUIDES
Digital Infrared With Micro Four Thirds Cameras: We Use An Olympus Pen For Digital Infrared Capture
A typical digital camera’s sensor sees a range of light in wavelengths from approximately 350 to 1000 nanometers. A nanometer (nm) is a metric unit of length equal to one billionth of a meter. Your eyes usually see a range of light from approximately 400 to 700 nanometers. Most digital cameras place a low pass filter directly in front of the imaging sensor to allow low frequency light visible to the human eye to pass through to the sensor. It blocks unwanted light from the infrared and ultraviolet spectrums (the high end and the low end wavelengths) from polluting a photograph’s color. As owners of early Leica M8 cameras quickly discovered, this piece of glass is very important for maintaining maximum color fidelity.
The Modified Olympus Pen
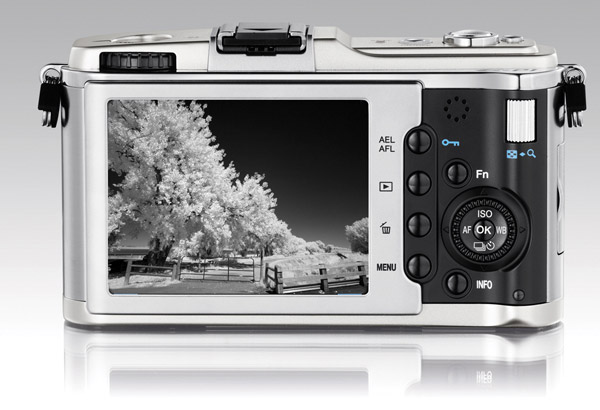
The lead quote is from the designer of the original half-frame Olympus Pen camera and was quoted in my “On Test” of the Olympus E-P1 for the January 2010 issue. You’ll find it on www.shutterbug.com. If you have any questions about the basic camera I suggest you refer to these resources because this review is about an E-P1 that’s been modified for direct infrared capture (#1).

During modification the low pass filter that prevents infrared and ultraviolet light from striking the E-P1’s sensor is removed, allowing all—visible and invisible—light to pass through. In this procedure, the camera’s low pass filter is not replaced with a piece of optical glass because Olympus packages and seals its Dust Reduction and Image Stabilization Units along with the sensor into a single assembly with the lens-facing part of the assembly covered by a piece of optical glass that’s sealed with an O-ring. During the IR modification this unit is disassembled, the low pass filter is removed, and all parts are re-assembled with the lens-facing optical glass and seal remaining in place. This is important because it allows the E-P1’s dust reduction system to remain intact and functional. After all this, what ultimately gets captured depends on what kind of filter you place in front of the lens (#2).
Two kits are available: Kit 1 includes a modified EP-1 body, M.Zuiko Digital ED 14-42mm f/3.5-5.6 lens, four step-up rings, three filters to block certain wavelengths, and an armored case. The case is a rugged one and while I’m not sure if it will stop a 9mm round, cops will like it anyway because two, maybe all, of the filters seem well suited for forensics work. Kit 2 includes a modified EP-1 body, step-up rings, three filters and that armored case. No lenses are included in the second kit. These kits are available through Hunt’s Photo & Video (www.huntsphotoandvideo.com).
Why step up rings? Simple, neither Olympus nor Hunt know what lenses you’re going to use with the camera. The 14-42mm f/3.5-5.6 lens, included with Kit 1, has a 40.5mm filter ring so there’s a step-up ring that starts at that size. For testing purposes, Olympus loaned me Kit 1 but also sent two new Micro Four-Thirds series lenses along that are not part of either kit. These other lenses have 52mm and 58mm filter rings. Instead of three sets of (expensive) filters, one size fits all when using the kit’s step-up rings but using too many (three?) might cause focus problems because stacking three rings or more moves the filter too far from the front of the lens (#3).

All Photos © Joe Farace
In addition to aesthetic reasons, there is also a practical rationale for using this modified E-P1, including landscape surveying and reconnaissance, because IR capture reduces atmospheric haze. Forensics and law enforcement personnel can use the kits to photograph evidence and substances not visible to the naked eye, especially detection of forged or altered documents and artwork, as well as crime scene fibers and hair. While that’s all fun and games in a CSI: Des Moines sort of way, most of us want to use the camera to capture interesting looking color and monochrome images as only digital infrared can.
What’s It Like?
The first thing I thought upon taking the modified E-P1 out of it’s case was that I wished Olympus had decided to use the E-P2 instead. Why? The E-P2 has a receptacle that permits using the VF-2 electronic viewfinder so you can look through the lens when using the camera hand held. Initially and erroneously, as it turns out, I expected to be using the modified E-P1 on a tripod but was wrong, as you can see by the shutter speeds recorded when using the dense Peca 914 filter with the camera. I’d forgotten that the E-P1 has pretty darn good in-body image stabilization. Fortunately, Hunt offers an a la carte plan where you can have your own E-P1 or E-P2 camera body modified for IR for a conversion-only price of $249, (#4).
Nevertheless, the large, 3” LCD Live View screen can get a bit “glary” outdoors and when used with the IR filter in front of the lens, viewing is not optimum. But you can make it work on a tripod or hand-held and I tried it both ways with great success. After my initial test shots I wondered how well Tiffen’s (www.tiffen.com) Hot Mirror filter would work with the camera. The Hot Mirror filter transmits light in the 350 to 740 nanometer range that blocks IR through the entire spectrum but does not appear to block any UV in a scene, which at the 6000 foot elevation where I made these tests is a reality that’s hard to escape. When I tested Fujifilm’s IS-1 (www.fujifilm.com) in December 2007 (also on Shutterbug’s website) using the Hot Mirror filter it produced images that were close—but no cigar—to normal looking color. When I tried Tiffen’s Hot Mirror with the modified E-P1 it produced images similar to those made with the ProMaster UV/IR Cutoff filter. Much as I did when testing the IS-1, you can color correct files made with a modified E-P1 in post-production to get similar-to-natural results (#5).

My next experiment was to try Singh-Ray’s (www.singh-ray.com) I-Ray infrared filter that I found to be hands-down the best if not the most expensive ($160-$190) infrared filter. That’s not saying a lot since IR filters, with the exception of Hoya’s R72 (www.thkphoto.com) are generally expensive. At the same time, I wanted to test the modified E-P1 next to another, unmodified Pen camera to see if there were any differences between just slapping an IR filter in front of an unmodified camera and see what happens. I journeyed out to Golden, Colorado, famous for beer and an architecturally stunning county office complex mentioned in January 2011’s Web Profiles. As regular readers know, I often test a camera for its IR capability and most Olympus SLRs and Pen series have some sensitivity in this area, but the question here was: how much when compared to a IR-specific camera? See the comparison photos for details but the bottom line is that a stock E-PL1 using the same IR filter as the modified E-P1 required a shutter speed of 30 seconds, while exposure with the modified camera was 1/125 sec at the same aperture and ISO. Olympus’ Pen series has pretty good in-body image stabilization but 30 seconds pushes the limits a bit (#6).

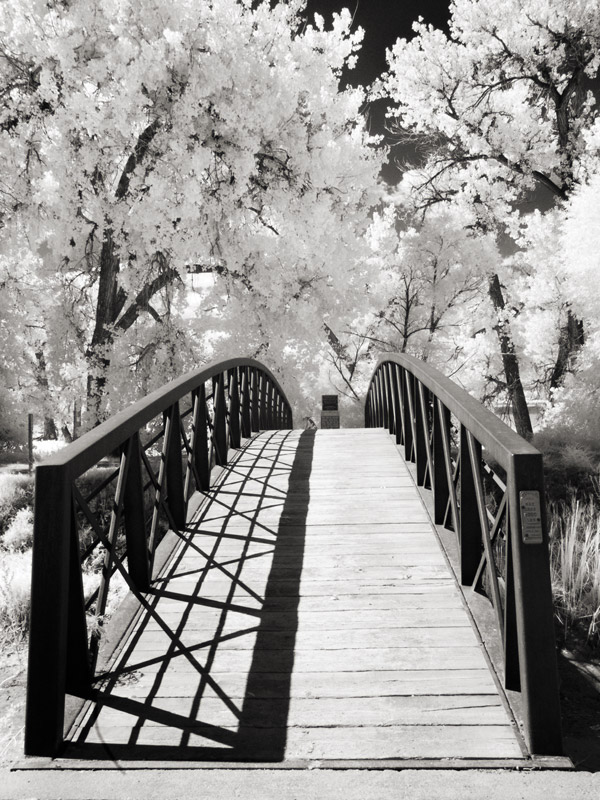
The modified E-P1 retains all of the features that make an unmodified camera so much fun to use, including the ability to make video clips—in digital infrared! That also means the camera’s 6 original Art Filters (Pop Art, Soft Focus, Pale & Light Color, Light Tone, Grainy Film, and Pinhole) are available for infrared interpretation. Since the combinations and permutations possible—with and without camera filters—are many and varied, I took a whack at applying all of the Art Filters using no camera filter and through the Peca 914. There’s not enough space here to display all of the images I captured, but I’ve included a few of my favorites for this review. You can see each one of the test shots in the Olympus IR Filters Gallery that I created on SmugMug (http://farace.smugmug.com). (#7, #8 and #9)


The Infrared Difference
For me, using an IR converted camera is always the easiest and best way to capture digital infrared images. While the two kits Olympus produced in collaboration with Hunt’s Photo & Video may be aimed at law enforcement and medical fields, there’s lots to like for the hobbyist as well. First of all, I’d forgotten how easy the E-P1 is to live with and what a great camera it is to use, and second, the case stuffed with a camera, lens, filters, extra battery and step-up rings only measures 10x13x6” and is light and easy to carry. Be sure to use the strap that’s included with the case; it makes it even easier to carry. But it’s the ease with which the camera moves back and forth between the worlds of visible and invisible light that make the modified Olympus E-P1 so much fun to use.
Filters For The E-P1 Modified
Both kits contain three filters and an assortment of step-up rings to allow them to work with different Micro Four Thirds series lenses. My kit contained:
A 62mm Peca #918 Visible Pass filter that transmits visible light in wavelengths from 400-700 nanometers.
A 62mm Peca #914 (89B) filter for IR-UV cameras transmits invisible light in a range from 900 to more than 1500 nanometers.
A 62mm ProMaster UV/IR Cutoff filter that blocks ultraviolet and infrared rays that can interfere with capturing the best possible image from the camera’s sensor. ProMaster claims that using the filter “leads to sharper and clearer images, reducing ghost images caused by IR radiation and using this filter means greater detail, more natural colors and finer color gradation.”
So what does each of these filters actually do in real world usage? I did a shoot-off with the modified E-P1 comparing each filter against a control image made using the same M.Zuiko Digital ED 9-18mm f/4.0-5.6 lens and an E-PL1. All images were captured in Olympus’ .ORF RAW format and a minimum of tweaking was done to each file, (#10, #11 and #12).


![]()
Get the Latest Photo Tips, News & Reviews from Shutterbug!
| Camera Reviews Other Reviews | Mobile Reviews Photography Reviews Columns | News | Features | How-To | Resources |
 © 2026 Shutterbug
AVTech Media Americas Inc., USA
All rights reserved