- REVIEWS
Camera Reviews 
More Reviews Mobile Reviews Photography Reviews - GALLERIES
- VIDEOS
- BUYER'S GUIDES
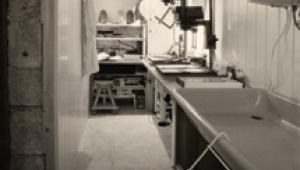
The Darkroom
The Hybrid Darkroom; Combining Old And New Technology
The way the battle lines are drawn, you might think that all photographers
are committed exclusively to silver halide or exclusively to digital and n'er
the twain shall meet. It isn't so. In reality the twain have met. More
and more photographers weave seamlessly between the two without a thought. It's
only the die-hards in each camp that refuse to acknowledge the advantages of
the "other side."
Now, I still shoot on film. Next to digital, film cameras are cheap to buy.
Film is simple, reliable, archivally superior, and delivers much better quality.
Also, it's often easier to go through negatives (or contact prints) or
slides than to hunt through a stack of CDs.
 |
 |
|
|
||
You can either get your film processed commercially, or do it yourself. Both
have advantages, but film processing is easier than most people think. If you
use something like a JOBO CPE-2 you can even process color films faster and
more reliably than a minilab. This is not the place to go into details, but
there are plenty of sources for learning how to do it. Once I have the processed
film, I choose silver or digital according to need and preference.
With color, it's all electronic. Before selecting color negatives for
high-resolution scanning, I may or may not make digital "contact prints"
in the way described later; with slides, I select and scan only the slides I
want. For both negs and slides I use a Konica Minolta DiMAGE Scan Elite 5400
II for 35mm and a high-end Epson flat-bed for larger formats. "Wet"
color printing just isn't as good as digital. I so rarely do "wet"
color printing anymore that I replaced the color head on my second enlarger
with another VC head. It is much easier to scan color negatives, cleaning them
up with Digital ICE and all the other clever products that Kodak acquired along
with ASF.
 |
|
|
Gone is the tedium of printing ring-arounds, images with subtly differing
filtration to see which looked best. Gone is the tedium of working toward a
neutral gray strip, only to have the chemistry go off just before you start
to make the final print. Although a good color analyzer, like the Lici Colorstar,
made color printing easier, it was still never as easy as it is with the computer.
But don't get rid of your Colorstar: it works for black and white, too.
With black and white, I still prefer "real" (traditional silver
halide) prints, but I start out by making digital "contact prints."
I find this quicker, easier, and better than the old "wet" approach,
for the reasons given later. Then, I often make my initial "work prints"
digitally, exploring the possibilities of contrast changes, cropping, burning
and dodging, and even perspective adjustment. Once I'm happy with the
changes, I go into the darkroom and make a traditional wet black and white print.
I don't have to justify why I prefer traditional black and white, any
more than a painter has to justify choosing oils or watercolors or acrylics.
Even so, it's worth saying that I prefer the "look" and I
find it easier to do many of the traditional manipulations in a traditional
darkroom. In particular, I find it much easier to do the sort of dodging and
burning that doesn't announce its presence all too clearly.
 |
|
|
On the other hand, a few pictures, mostly old pictures and record shots where
the quality is never going to be great, no matter what I do, are scanned and
printed with an inkjet printer.
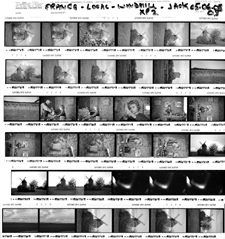
"Contact prints" and "work prints" are in quotes earlier
for two reasons. Partly it's because I don't always make actual
prints in either case--I just work on screen--though I usually do
make small reference prints to help me in the wet darkroom. On the reference
prints, front and back, I note down what I did with the computer and then what
I did in the darkroom to get the final image.
Partly, too, it's because there's no "contact" in the
"contact printing." It takes very nearly as long to make the digital
"contact prints" as to make wet ones, but there is a lot less setup
and cleanup time with the computer (unless Windows crashes...) and besides,
time isn't the real advantage.
There are three big advantages to the digital route here. First, you can correct
individual frames for exposure and contrast: a traditional approach in wet printing
was to make two sets of low-contrast prints at different exposures, optimized
for the thickest and thinnest negatives, respectively. Second, you can make
"enlarged contact sheets," simply by scanning at a high enough resolution
to allow enlargement. And third, you can make (small) "work prints"
straight off the contact sheet.
There is admittedly one disadvantage. Even enlarged "contacts" will
have nothing like as much sharpness and detail as a true contact print. You
can see the overall composition, and even people's expressions, but you
can't judge sharpness. For that, you need the negatives themselves and
a good magnifier.
|
| |||||||||


![]()
Get the Latest Photo Tips, News & Reviews from Shutterbug!
| Camera Reviews Other Reviews | Mobile Reviews Photography Reviews Columns | News | Features | How-To | Resources |
 © 2025 Shutterbug
AVTech Media Americas Inc., USA
All rights reserved