- REVIEWS
Camera Reviews 
More Reviews Mobile Reviews Photography Reviews - GALLERIES
- VIDEOS
- BUYER'S GUIDES
Creative Multiple Exposure; Digital And Film Options
Putting two or more captures on top of each other in a single image multiplies
the potential for impact and opens up new avenues to creative expression. Whether
you want to inject motion into a static shot, add moody atmosphere or dreamy
nostalgia, or enhance one subject with the texture of another, multiple exposure
offers a myriad of possibilities. The techniques complement portraits, landscapes,
flowers, and architecture--just about any subject.
Creating multiple exposure images is rather easy. Fine-tuning them for a striking,
professional result can require some care, but isn't brain surgery. I'll
show you how to make multiples both in camera and by combining two or more single
photos with image-editing software like Adobe's Photoshop and Elements.
Do It All In Camera?
Many film cameras and a few digital models offer the capability of making multiple
exposures on one frame or image. On the digital side, the Nikon D80, which I
used for some of the examples in this article, can shoot up to three exposures
for one image. The Nikon D2X and D200 allow up to 10 shots for one "frame."
The Pentax K10D and *istD and Fujifilm FinePix S1 Pro and S2 Pro cameras also
offer multiple exposure capability. Check with your camera manufacturer and
manual to determine if this option is open to you.
Exposure Is Critical
Whether you're shooting digitally or with film, setting the appropriate
exposure for in camera multiples is critical. The details of one image will
appear most strongly in the darker areas of the other image. Any areas that
overlap will become progressively lighter with each exposure.
The basic rule of thumb is that for two exposures, you stop down the aperture
(or increase your shutter speed) by one f/stop from normal exposure. For four
exposures, stop down each one by two stops. For eight exposures, stop down three
f/stops.
If this sounds hard to remember, there's a much easier solution. Forget
about changing your aperture setting. Simply multiply your ISO (sensitivity
or film speed) rating by the number of shots you plan to take for one image.
For example, if you are shooting at ISO 100 and plan to make a multiple exposure
of three images, just set the ISO at 300. Depending on your camera, the closest
setting might be ISO 250, 320, or 400. Then use the Aperture- or Shutter-Priority
mode, Program or Auto mode to determine the proper exposure for each shot of
your multiple. You can use this technique with both digital and film cameras.
CAUTION: Be sure to reset the ISO back to normal when you return
to standard single-shot photography. Some digital cameras may have the ability
to automatically compensate for multiple exposures, such as the Nikon D80's
Auto Gain mode.
A great advantage of digital cameras for multiple exposure is that you can immediately
see the result on your camera's LCD screen. If the result is too dark,
give more exposure to each shot. If it's too light, decrease the exposure.
I would start with a 1/3 to 1/2 f/stop change for each exposure. Using the earlier
example with three shots for one image, the ISO 100 was changed to 300. If the
multiple image is too dark, change the ISO to 200. If the result is too light,
change the ISO to 400.
Proper exposure will vary widely depending on the subject and how the multiple
images overlap. The starting recommendations are for medium-toned subjects.
If you have a predominantly light subject, you may have to decrease exposure
significantly. Alternatively, if you have a very dark subject, you'll
likely have to increase exposure.
Here's an exception: If you are shooting a medium-toned subject, such
as a person, against a black or very dark background, and the areas of the person
do not overlap, your exposure will be the standard, normal exposure for that
subject with no change for multiples. Since the background is black, wherever
it overlaps the subject in a subsequent multiple, there will be no change in
exposure--the black area overlapping the mid tone behaves as if the shutter
were never opened.
Review And Adjust
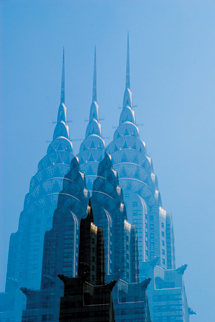
I made this multiple in camera in raw format (Nikon's NEF) with the Nikon
D80 and an 18-135mm Nikkor lens. The raw format allows for the greatest flexibility
in manipulating exposure and contrast later in your software. To prepare for
making a triple exposure of the Chrysler Building, I first took a reading in
Aperture-Priority mode. At ISO 100, the reading was about f/11 at 1/200 sec.
Before starting to shoot the multiples, I changed the ISO to 300. Next, I selected
the multiple exposure option on the camera and set it to three shots. Now, still
in Aperture-Priority mode at f/11, I began making my three exposures, moving
the camera from left to right between each shot. I made quite a few trials,
trying to place each element at the same distance of overlap.
 |
|
|
After each three-shot set I reviewed the result on the D80's LCD screen
and adjusted my composition and exposure accordingly--what a luxury compared
to all the years I shot multiple exposures with film cameras! With a very light
sky, I had to decrease the exposure by setting the ISO to about 600. One advantage
of the D80 is its D-Lighting system which digitally processes the photo in camera
to open up shadows while preserving highlight detail. For other multiple exposure
shots where I had underexposed, D-Lighting fixed them in seconds. Of course
you could do this later in Photoshop or other image editors. However, the ability
of this camera to do it in seconds on location is a huge aid for multiple exposure
shooting since you can quickly tell if you need to reshoot for better exposure.
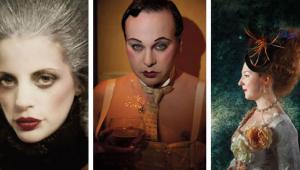
Focus Shift
Another powerful technique involves making two exposures for one final image,
one sharp and the other "defocused." First, make a sharply focused
exposure, then defocus the lens manually so that the image is blurred (you will
have to turn off autofocus on the lens), and make a second exposure.
 |
The result is a sharply defined central image that glows and floats above out-of-focus highlights. This technique is great to add an extra edge to contemporary portraits, flowers, and landscapes. It can also infuse a building, product, or object with a mysterious glow or dreamy otherworldly ambiance.
 |
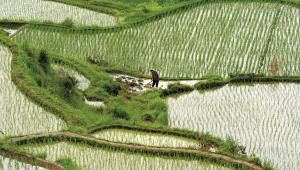
Software Solutions
When you need to critically align and blend different elements from different
photos for a composite, nothing offers the control of image-editing software
like Adobe's Photoshop CS3 or Elements 5.0. Both now offer layer masks
which allow you to "brush" in or out the parts of the scene that
you want visible. Further, by adding separate images, each on their own layer,
you have great freedom and flexibility to accurately and precisely position
each image element where you want it.
|
| |||||||||
- Log in or register to post comments


![]()
Get the Latest Photo Tips, News & Reviews from Shutterbug!
| Camera Reviews Other Reviews | Mobile Reviews Photography Reviews Columns | News | Features | How-To | Resources |
 © 2024 Shutterbug
AVTech Media Americas Inc., USA
All rights reserved