- REVIEWS
Camera Reviews 
More Reviews Mobile Reviews Photography Reviews - GALLERIES
- VIDEOS
- BUYER'S GUIDES
Adobe’s Photoshop Elements 6; A Very Capable Image Editor At An Affordable Price
 Adobe's
Photoshop application is the standard for many digital photographers. Heck,
it's even a verb now, as in "that looks Photoshopped." But,
at $500 and up, depending on the packaging, Photoshop CS3 is overkill for many
users. Recognizing that the majority of photographers don't want to be
spending their time learning a complex program, Adobe has offered Photoshop
Elements, a reduced but very capable editing program for a much more reasonable
price (about $90).
Adobe's
Photoshop application is the standard for many digital photographers. Heck,
it's even a verb now, as in "that looks Photoshopped." But,
at $500 and up, depending on the packaging, Photoshop CS3 is overkill for many
users. Recognizing that the majority of photographers don't want to be
spending their time learning a complex program, Adobe has offered Photoshop
Elements, a reduced but very capable editing program for a much more reasonable
price (about $90).
It's also clear that Adobe is catering to a wide audience with Elements.
Recent versions have added features to entice the scrapbooking crowd, and the
latest release is no exception (#1). Elements now includes a variety of project
types which I'll touch on in this review. However, because most of you
are interested in the photo-editing features, I'll focus on those in this
review.
Organizing Your Images, And More
Elements has long had two main modes of operation. The first is the Organizer
mode (#2). A surprisingly full-featured image management program, Organizer
is where you'll import your photos, apply keywords and ratings, and find
images when you're ready to do editing work. New to Version 6 are Smart
Albums (#3). These work by automatically grouping photos for you with no manual
tagging needed. So, for example, it's easy to select all the images taken
with a particular camera, or with specific ratings.
 |
|
|
 |
|
|
Organizer is now more tied into the editing features with tabs on the right side of the window--Organize, Edit, Create, and Share (#4). Create shows the different projects that come with Elements, including photo books, calendars, web galleries, and slide shows.
 |
|
|
The Share tab has plenty of options for posting your images to an online gallery, including some of the popular sites like Kodak Gallery, SmugMug, and Flickr, as well as sending directly to a CEIVA digital photo frame. The Photo Mail option will automatically re-size your image(s) to be suitable as an e-mail attachment and let you compose your e-mail message without having to save the image(s) separately and launch your mail application. You can use an existing address book (such as Outlook), or create a new one. The built-in Stationery & Layouts Wizard lets you format your mail and photos prior to sending, including adding frames, changing the photo size, and font (#5).
 |
|
|
You'll also find the Fix tab (#6) with many common auto adjustments available directly from the Organizer which can speed things up if you're working on a number of similar images and don't want to go into the Editor. One nice feature that's easy to overlook is the ability to apply changes to multiple images in a single operation. Just select all the images you want to work with and then perform the desired edit, like Auto Adjust Contrast, and your changes will be applied to all selected images.
 |
|
|
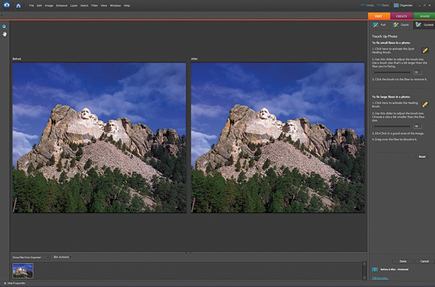
What's New In The Editor
The Editor is where most people will be spending their time, though, so let's
take a close look at what's new here. New to Version 6 is the Guided Edit
mode which walks you through some of the most common editing needs such as cropping,
color correction, and lighting adjustments (#7).
 |
|
|
Also new here is the Photomerge feature. The Group Shot option is perhaps the most unique, letting you copy and paste elements from one image into another with excellent results. You select a base image and then select areas from other images that you want to paste in. The merge feature then builds the new selection into your image. This would be perfect for those group shots where someone was left out--just merge them in!
 |
|
|
Photomerge Faces lets you select areas of one photo to be used in a different, but similar image--great for those times when you have a portrait with good expression but closed eyes. Now you can use the open eyes in another image to correct for this, with much better blending results than you would normally get from copy and paste. You can be creative with this one, too, and come up with some interesting compositions.
 |
|
|
|
| |||||||||


![]()
Get the Latest Photo Tips, News & Reviews from Shutterbug!
| Camera Reviews Other Reviews | Mobile Reviews Photography Reviews Columns | News | Features | How-To | Resources |
 © 2026 Shutterbug
AVTech Media Americas Inc., USA
All rights reserved