- REVIEWS
Camera Reviews 
More Reviews Mobile Reviews Photography Reviews - GALLERIES
- VIDEOS
- BUYER'S GUIDES
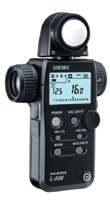
Sekonic Dualmaster L 558
Is This The Ultimate Meter
In the 1960s my father got
me a used twin-lens reflex camera, and, with a few rolls of Kodak Plus-X
in hand, this teen-ager set out to photograph New York City. Lacking
a light meter, I learned to guess exposures following guidelines on
a cue card. It wasn't long before I was given a General Electric
Exposure Meter that measured light in foot-candles. It measured light
with a simple battery-less photocell, and by selecting the measured
values on a rotating metal dial I could calculate the exposure. I had
never heard of the Zone System and didn't think very much about
highlights and shadow detail, but the primitive meter gave me a far
better exposure than the guessing method. Meters have come a long way
since then. |
|||
In The Field Digital And Film Working With Flash Low-Light Capability Metering Standards? Paul Mozell is a nature and landscape photographer and digital imaging consultant. See his work or contact him at: http://mozellstudios.com. |


![]()
Get the Latest Photo Tips, News & Reviews from Shutterbug!
| Camera Reviews Other Reviews | Mobile Reviews Photography Reviews Columns | News | Features | How-To | Resources |
 © 2026 Shutterbug
AVTech Media Americas Inc., USA
All rights reserved