- REVIEWS
Camera Reviews 
More Reviews Mobile Reviews Photography Reviews - GALLERIES
- VIDEOS
- BUYER'S GUIDES
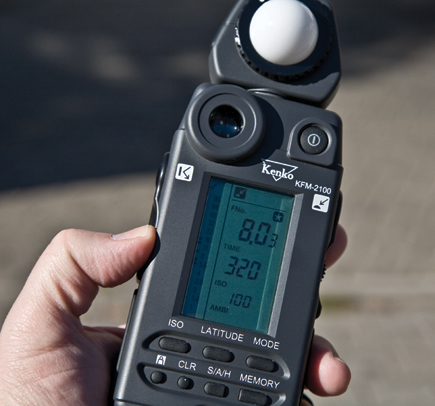
Kenko’s KFM-2100 Flash/Ambi Meter; Everything You Always Wanted In A Handheld Meter, And More
You might think that the sophisticated metering system in your camera is the be all and end all when it comes to exposure. The truth is, it does deliver remarkable results, but it can only take you so far. Want to tackle high-contrast scenes or tricky lighting or tonal situations without wasting a lot of time bracketing? Then you'll need a handheld meter. Shooting studio flash? Camera metering systems are of no help here, so you'll need a handheld flash meter. Prefer keying exposure to important highlight or shadow values, especially of areas off in the distance? You'll need a 1° spot meter for that--something with pinpoint accuracy, which is a far cry from spot metering in any camera. But the question really comes down to: How sophisticated does a handheld meter need to be? With the KFM-2100, you're getting a lot of bang for the buck, and if you feel this is too much meter for you, you can scale down your aspirations and opt for the smaller and more economical KFM-1100 (not tested at this time).
 |
|
|
As I'd previously indicated in my PMA report (available at www.shutterbug.com), the KFM-2100 heralds the rebirth of the venerable Minolta Flash Meter VI, which introduced us to pioneering technologies and novel ways of using a handheld meter. Little has changed, and from what I can tell, the current iteration is every bit as accurate and durable as the original. THK, in bringing back this meter, did not skimp or cut corners. The meter is back in all its glory, but under a new moniker and now marketed for both the film and digital photographer. While some may argue with the need for or efficacy of some of its more esoteric features, we can't argue with the Kenko meter's ability to deliver consistently reliable results.
On The Face Of It
The KFM-2100 is at its heart a digital meter, with alphanumeric and analog Liquid
Crystal Display (LCD). It's powered by a single and easily replaceable
AA battery, which appears to last a long time. The incident dome resides in
a rotating turret, while the 1° spot eyepiece sits above the display on
the main housing. Unlike some other meters, the white dome is fixed, not recessed,
for light ratio readings, and there is currently no flat disc replacement available
for such readings. However, you can use a method long in vogue, which is to
shade the dome from extraneous light when determining lighting ratios.
The few buttons are clearly marked, although a couple may require clarification. The secondary ISO button (below the one labeled "ISO") is a legacy feature aimed at setting the ISO for instant prints. However, no one says you can't use it simply as an alternate speed setting, regardless of the medium used. The S/A/H button is the one used to bias readings to a key highlight or shadow value, or to average two or more readings (10 max). Each press of the Memory button stores a reading. Use CLR to clear memory or any existing readings (it's good to get into the habit of doing this so you can start with a clean slate). Shutting the meter down retains the last measurement and stored readings. Switching modes keeps memory intact but erases the last reading.
I saw the sun producing patches of light and dark in these woods. So I took advantage of the early fall foliage to make several exposures, based on key tonalities, and used the S/A/H button to arrive at the final exposures (a dial on the side cycles through Shadow/Averaging/Highlight settings when the button is pressed, as well as shutter speeds by rotation of the dial alone). I should add that you can set your own custom highlight and shadow bias values, or use the default values (I recommend setting your own--the defaults go too far in either direction, unless you're shooting print film).
 |
 |
|
 |
||
|
||
Spot Meter Test
This shot of Karlstejn Castle, outside Prague, was made under pristine blue
skies. As I made my way up toward the castle, I saw looming above me a fetching
contrast of light and dark tonalities, with parts of the castle walls receiving
full sunlight, other parts in shadow. So I made two spot readings (key highlight
and shadow) and used the meter's averaging function to arrive at the final
exposure. Needless to say, the camera is always in Manual mode when using a
handheld meter. And be sure to set the same ISO on camera and meter.
 |
|
|
The Mode button shifts operating mode: ambient ("Ambi"), cord-activated
flash ("Cord"), and cordless ("Non Cord") flash. Because
I was shooting either by available light or with my Canon EOS-compatible flashes,
I used Ambi and Non Cord modes. The Non Cord mode was especially handy in determining
how much of the exposure was made with available light and how much fill from
flash--via the Light Ratio Analyze (known elsewhere as "flash analyze")
function. Had I used studio strobes, I would have made heavy use of Cord mode,
connecting an old-style PC cord to the flash and my Canon EOS 5D. In Cord mode,
the meter could be used to trigger the connected studio strobe (and all strobes
synced to that one) for a reading.
The only function that may be confusing is Latitude. This is actually a measure
of brightness range, which means that it applies to spot meter readings only.
The instruction manual says something about using the Latitude function with
an incident reading and for you to use that as a basis for determining the usable
tonal range when reading with the spot meter, but that is clearly in error--they're
mixing apples and oranges. The instruction manual also confuses tonal range
and dynamic range, but that's inconsequential when it comes to the overall
usefulness of the meter.
Ambient & Flash Tests
Using a JTL small product shooting table, I photographed the small ceramic sculpture
first by available window light coming in from behind the white diffusion plastic
of the sweep table, then with flash fill, and finally flash sans daylight. Depending
on how much of the field the white plastic occupies, the camera exposure can
be mildly or seriously underexposed. But the exposure was on target when measured
with the incident meter (Ambi mode), which meant I didn't have to bracket
exposures. When I added a flash (bounced off the ceiling) for fill, the Kenko
meter told me how much of the exposure was daylight and how much flash (meter
set to Non Cord mode and flash in Manual mode). I used this measurement to prevent
the flash from overwhelming the exposure. My final exposures were made solely
by flash illumination with two shoe-mount strobes--one main, the other
fill (also in Non Cord mode; manual flash).
 |
|
 |
|
|
|
| |||||||||


![]()
Get the Latest Photo Tips, News & Reviews from Shutterbug!
| Camera Reviews Other Reviews | Mobile Reviews Photography Reviews Columns | News | Features | How-To | Resources |
 © 2026 Shutterbug
AVTech Media Americas Inc., USA
All rights reserved