Site Links
|
 |
 |
 |
The Hasselblad Xpan Love At First Sight
By Tony Sweet April, 2003
The Hasselbald Xpan
Miles Davis, the jazz great,
would say, “When you see something that you can do, you know it
right away.” It follows that my love affair with the Hasselblad
Xpan was love at first sight, or actually love at second sight. I was
briefly introduced to the Xpan while teaching a class at the M.A.R.S.
school in Cape May, New Jersey. A student was trying to get my attention
to show me this new camera, but I was so focused on teaching and getting
to everyone in the field, that I blew it off, then just forgot about
it. Later at the Shutterbug Trade Show and Convention in Baltimore,
I was visiting the Hasselblad booth and vaguely remembered the Xpan
and wanted to have a closer look. After getting a brief intro to it
from Karen Hart of Hasselblad, I picked it up and it just felt great!
After looking through the 45mm lens, which comes with the kit, the format
just knocked me out and I had to have one! Now I have two! One is dedicated
to Fuji Velvia transparency film and the second is dedicated to infrared
and other various print films.
Rangefinder Panoramic
The Xpan is a rangefinder camera, that is to say that you are not looking
through the lens, but through a finder separate and apart from the lens.
It is possible to see images and make exposures with the lens cap still
on the lens! But, to help you out, the Xpan has an alert (a flashing
“–” symbol appearing in the finder) which indicates
that the light is very low or that the lens cap is still on the lens.
The angle of view is so wide that a center filter is required. At apertures
of f/4, f/5.6, and f/8, light falloff at the edges is not an issue and
the center spot is not required to maintain an even exposure. It’s
only when stopped down to f/11, f/16, and f/22 that the center spot
filter is needed in order to avoid light falloff and the resulting dark
edges. I keep my center spot filter on all three of the lenses all of
the time as a general practice.
Focusing can take some getting used to because of the split-screen focusing.
In nature, and for other scenes that don’t move, using hyper-focal
focusing is the way to go. Just set the lens to f/22 and turn the focusing
ring until the “infinity” symbol is on f/22, as it appears
on the right end of the depth of field scale, for greatest possible
depth of field. This same move can be done using f/16, f/11, f/8 for
maximum depth of field at those respective apertures, but works best,
giving the greatest depth of field, at f/22 and f/16.
Three Lenses Available
There are three lenses available for the Xpan: the 45mm (49mm filter
size) which comes separate or with the kit when you buy the camera;
a 90mm (49mm filter size) short telephoto lens; and the 30mm (58mm filter
size), super wide lens, which comes with its own finder which attaches
to the top of the Xpan body. The center spot filter is not included
with the lenses. Although I do use all three lenses for very specific
reasons to be discussed, I use the 30mm lens about 90 percent of the
time! When I was in California, I visited a fairly large camera shop
and looked through the 30mm for the first time. It was unbelievable
and I had to have it! One of my favorite features of the Xpan is its
ability to focus within 3 ft using the 45mm and 30mm lenses. It enables
one to compose almost intimate panoramic images and much smaller scenics.
Exposure Tips
The angle of view is quite wide on the 45mm and 30mm lenses and includes
far more in the scene than one may be used to seeing. You may want to
consider metering using the “aperture priority” mode and
using the “auto-bracketing” feature until you get a sense
of exposures in the panoramic format. There is so much area being included
that one needs time and a little experience to get a feel for metering.
There is no need to compensate for the center spot filter when on aperture
priority, because metering is being done in the camera and center spot
compensations are made automatically. But, when using a handheld meter,
you need to open up 1 stop on the 45mm and 90mm lenses to compensate
for the center spot filter and open up 11/2 stops to compensate for
the 30mm center spot filter. This is normally done on the 45mm and 90mm
by opening up the shutter speed 1 stop after setting your exposure.
On the 30mm, open up 1 stop on the shutter speed, then open 1/2 stop
on the f-ring, for example from f/22 to f/16.5.
At least 80 percent of my exposures are made using the aperture priority,
center-weighted metering system at +1 on the exposure compensation dial
and bracketing by 1/2 stops, using the auto-bracketing feature. The
auto-bracketing feature will create three exposures. The first will
be at the standard exposure, the second and third will be made at the
exposure modification you assign, your setting, either 1/2 stop or 1
full stop.
Panoramic Vision
Composition has been discussed as being a bit difficult in the panoramic
format because of the irregular “letter-box” shape. I actually
read on discussion boards how it was so frustrating and impossible to
make a meaningful composition in the “letter-box” shape,
also something about the “rule of thirds” not being applicable.
I couldn’t quite believe what I was reading, and photographers
wrote it! I mean, since when does the shape of the space determine whether
one can compose an image or not? Composition is how you place items
in the picture space…any picture space! The panoramic format invites
you to see “differently.” It’s possible to be intimidated
with the wide format, especially coming from 35mm or square formats.
Just keep the basic rules of composition and balance in mind and apply
them to the wider format. No matter how wide the area, it can still
be divided into thirds and image content can be balanced!
Panoramic Prints
Making prints in-house is an issue with panoramic film. How do you scan
it? How do you print it? Do you need an expensive drum scan? It is actually
quite easy to make high quality, fine art, razor-sharp prints in the
comfort of your home or office. The lenses are actually medium format
lenses, despite their small, compact sizes and render medium format
sharpness. I use the Epson 2450 flat-bed scanner with SilverFast scanning
software (a light version is bundled with the scanner) to create exceptionally
sharp and brilliant 6x18” prints on the Epson 2200 printer. I
have several drum scans given to me by clients and printing 12x36”
and larger is no problem. The sharpness is quite impressive!
Xpan Profile
Even though the Xpan is mostly used for its panoramic format, it also
shoots in normal 35mm. It can be switched by turning a button. When
in pan format, a “P” is visible. Don’t forget to remove
the center spot filter when in 35mm format, else the edges will be overexposed.
One can switch from 35mm to Xpan and back at anytime during the roll.
This is possible because when loaded, the film is completely unwound
and retracts back into the canister as exposures are made. A 36 exposure
roll will give 21 Xpan images. The aspect ratio of the panoramic images
is approximately 1.75 to 1.
Since the center spot is always on my lenses, I can stack only one other
filter before the lenses begin to vignette. I add an 81B warming filter
95 percent of the time. When using infrared film, I stack the 25A red
onto the center spot, removing the 81B.
There are two exposure modes: manual and aperture priority.
And one metering system: center weighted. The longest exposure possible
on the “Bulb” setting is 4.5 minutes.
The Xpan format is becoming more prevalent at stock agencies because
of ease of storage and exceptional sharpness. And you can get an excellent
desktop scan of an Xpan image using the Epson 2450 flat-bed scanner.
Here are some facts about mounting plates. Kirk Enterprises (http://kirkphoto.com)
makes the PZ46 low profile Arca style mounting plate for the Xpan. Really
Right Stuff (http://reallyrightstuff.com)
makes the B49L “L” bracket, which enables you to switch
from horizontal to vertical formats by just turning the camera, without
flipping the camera over on the tripod head. And Xpan mounts, kimac
sleeves, and pages are available from The Stock Solution, (800) 777-2076.
And last but not least, don’t forget to inform your lab when you
hand them Xpan rolls, perhaps keeping them separate and marked with
a felt-tip pen. Reputable professional labs look at film before cutting
and mounting, but just to make sure, let them know. The labs will not
be able to mount them anyway because of the specialized mounts needed.
I get my Xpan film uncut (processed only) and sleeved.
I cut and mount them myself using the mounts from The Stock Solution
mentioned earlier. The prices on the body and lens are as follows: The
Xpan 35mm Rangefinder Manual Focus Panorama camera body is $1668. The
45mm f/4 lens is $478; the 90mm f/4 lens is $595; and the Super Wide
Angle 30mm f/5.6 goes for $2566.
In conclusion, I find the Xpan to be a different and commercially viable
addition to my equipment arsenal. It has a heavy, over-built, rock-solid
feel. The controls are simple and straightforward. The lenses are razor
sharp, rendering a medium format look to the images. Plus, the most
important thing is that it’s a really fun camera to use!
All images shot on Fuji Velvia transparency film and scanned using the
Epson 2450 flat-bed scanner.
For more information about the Xpan, visit Hasselblad’s web site,
www.hasselbladusa.com.
Tony Sweet is a professional nature photographer, author, lecturer,
and workshop instructor living in Baltimore, Maryland. You can view
his web site at http://tonysweet.com.
|
 |
| |
|
|
Photos © 2002, Tony Sweet, All Rights Reserved |
|
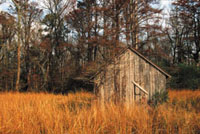
45mm f/4 Lens, 49mm Filter Size
This is the first image I made with the Xpan using the 45mm. Otter Cliffs
just seemed like a natural Xpan shot, with the long diagonal line cutting
across the frame, the huge boulders, and great perspective. This is definitely
a pan-enhanced image!
This is one of those images that just fit in the 45mm picture space. I
had to split the frame in half, normally not good composition, in order
to minimize the white sky showing behind the trees. If I had pointed the
camera any further upward, the white would have been a distraction. The
30mm lens would have included too much sky. Pointing the camera downward
to include more of the grass would have placed the house too far up in
the frame and was not seriously considered as a compositional option.
Also, notice the light change that occurred while changing camera bodies
from the Nikon F5 to the Hasselblad Xpan.
|
|
90mm f/4 Lens, 49mm Filter
Size
This image was made for the 90mm lens. This is a medium telephoto shot.
I am back about 10 ft from the scene and didn’t want to include
too much other than the buckets and some white siding to frame the subjects.
Since one only gets 85 percent viewing with the Xpan, I framed this and
all images up to the edge of the bright frame lines. When the remaining
15 percent appears in the final slide, cropping tightly results in the
appropriate space being created. Actually, 100 percent is visible in the
finder window. The 85 percent is what is seen within the bright frame
lines.
When all you want to do is to extract a very small area to avoid clutter,
the 90mm is the lens for these small, compact scenics.
Again, this was very tightly cropped, knowing that there will be an additional
15 percent of material added on the slide.
Most of that area is added horizontally and only a small part added vertically.
|
|
30mm Lens
The 30mm is to the 45mm in the panoramic format as a 17mm is to a 25mm
in 35mm format. The perspective and feel of each is quite different. The
30mm opens up the landscape giving a feeling of “expanse.”
Again, one must learn to “sight” the lens and learn to compensate
for the 85 percent of visible viewing space. In this and other images,
I made sure that similar material continued outside of the frame, and
cropped much tighter than shown here in order to keep the same composition
even when the additional 15 percent viewing was added on the final frame.
This image is “pan-enhanced” because of the drama created
by the expanse of the rocky coastline. The 35mm version of this image
does not have the same impact.
|
|
This is one of my favorite
pan-enhanced subjects. It’s perfect for the 30mm lens. We had a
great dawn at low tide creating the wet sand reflection. There is light
falloff at the edges of all extreme wide angle lenses. Without the reflection
to brighten the bottom edges of the image, the light falloff using a lens
this wide would have made the foreground too dark. You can see some of
the effect at the lower edges. I composed this with the end pilings almost
touching the edge of the frame. On the finished slide, you can see how
much room was added. Knowing how much room to leave or how tightly to
crop an image is gauged through experience. You’ll see quickly how
what you saw in the finder isn’t how the image shows up on film.
The composition adjustment will happen quickly.
This is an example of the close-focusing capability of the 30mm. Being
able to focus closely is an asset in being able to edit the image in the
finder. I moved in to about 3 ft from the foreground rock, again making
sure that similar compositional material was beyond the frame. The resulting
image is of three distinct sections: leaf-covered rocks, flowing stream,
and backlit leaves.
|
 |
|
 |
|
|
 |
 |
 |
|