- REVIEWS
Camera Reviews 
More Reviews Mobile Reviews Photography Reviews - GALLERIES
- VIDEOS
- BUYER'S GUIDES
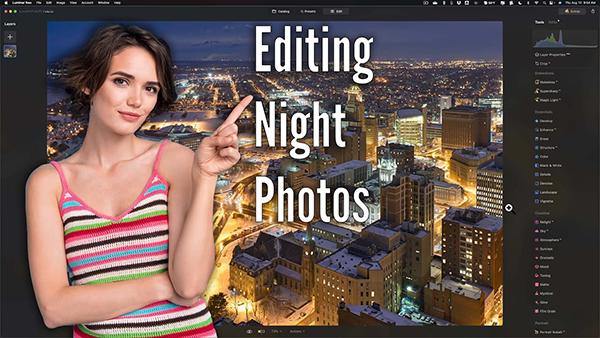
The ULTIMATE Guide to Editing Night Photos with Luminar Neo (VIDEO)
Last week we featured a tutorial from a pro explaining several "essential" tips for shooting epic photos after the sun drops below the horizon. Today we're following up with what another expert calls, "The ultimate tips and tricks for editing night photos in Luminar Neo."
If you're a regular visitor to the Shutterbug website you're well acquainted with image-editing guru Anthony Morganti who has almost 400,000 subscribers to his globally popular YouTube channel. Morganti's lessons typically involve editing images in Lightroom or Photoshop, but today he's giving Luminar Neo a spin.
In barely 15 minutes Morganti demonstrates his preferred method for getting the night right with this popular software. Along the way you'll pick up some solid advice for using other image-editing programs to do much of what he explains, and you'll likely become convinced that nighttime is the right time for expanding your skills.

Morganti opens Neo and skips the simple process of importing images, instead getting right to work on a single photo that's already in his screen. All you have to do to get started is click on File at the top left of the screen and select Edit Single Image from the dropdown menu that appears.
The demonstration image was captured several years ago when Morganti had an opportunity to shoot from atop the tallest roof in Buffalo. He admits there's a lot wrong with the image due to the poor conditions he faced. As he says, "whatever could go wrong, I did wrong." But you'll be impressed with the impressive results accomplished using this simple Luminar Neo transformation.
Morganti is a strong proponent of making adjustments in a specific order, insisting that dealing with image noise is the first thing you should do. He notes why noise reduction is more difficult and less effective the later you address it during post-processing.

If your image needs to be cropped and/or straightened, Morganti says that's next thing you should do. He has a simple technique for getting this done, paying attention the Rule of Thirds as he refines the composition.
From here you may be tempted to jump into sharpening, but Morganti explains why you should wait until a few other enhancements are competed. Instead he moves on to White Balance modifications, which are frequently required when editing nighttime photos. That's because cities often have streetlights with significant differences in color temperature.
At this point the image is much improved, but Morganti's recommended processing method has yet to hit the halfway point. So watch him complete the job, perhaps taking a few notes for future reference, and your night photos will be significantly better thanks to Morganti's advice. You can find a wealth of post-processing advice on Morganti's popular YouTube channel, so check there often or whenever you run into a snag.
We also recommend watching the tutorial mentioned above, so you can get things aa good as possible in the camera when shooting after dark.


![]()
Get the Latest Photo Tips, News & Reviews from Shutterbug!
| Camera Reviews Other Reviews | Mobile Reviews Photography Reviews Columns | News | Features | How-To | Resources |
 © 2025 Shutterbug
AVTech Media Americas Inc., USA
All rights reserved